
Best WLZRNZO Portable Washing Machine 20L in North Carolina (NC): Is It the Right Mini Washer for Travel & Dorms?
North Carolina’s students and travelers need compact laundry solutions for small spaces. A quality portable washing machine delivers clean clothes without bulky equipment. It transforms your laundry routine from a chore into a convenient, space-saving task.
The best WLZRNZO Portable Washing Machine 20L in North Carolina (NC) offers a smart solution for travel and dorms. Its 20L capacity handles small loads efficiently. The foldable design saves valuable space when not in use. This mini laundry machine features 3 cleaning modes for versatile washing options.
Product at a Glance
Product List:
Best WLZRNZO Portable Washing Machine 20L in North Carolina: Detailed Review
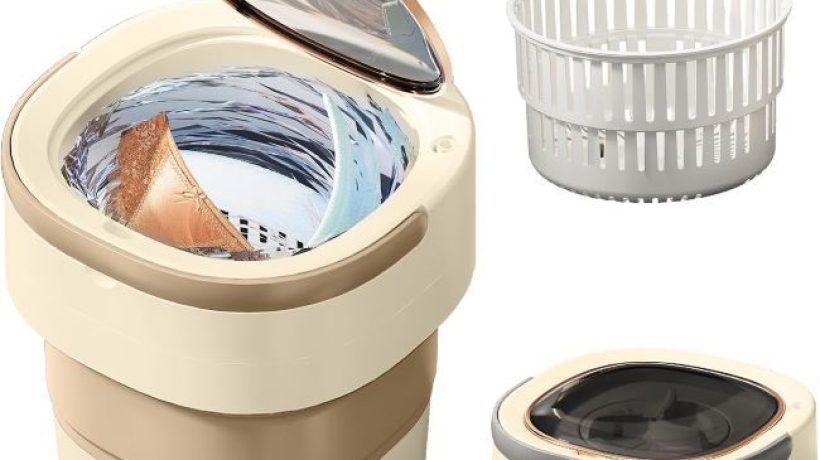
WLZRNZO Portable Washing Machine 20L
Why Best: Compact portable washer with foldable design and 3 cleaning modes.
The WLZRNZO Portable Washing Machine 20L delivers exceptional performance for North Carolina users. Its 20L capacity handles small loads of baby clothes, underwear, and socks efficiently. The foldable design allows for easy storage in dorm rooms or travel luggage. This mini laundry machine features a spin basket for improved drying performance.
The 3 cleaning modes provide versatility for different fabric types and soil levels. Its compact size makes it easy to use in various locations without taking up much space. The beige color blends well with different room decors. This machine becomes an essential tool for North Carolina students and travelers seeking a convenient laundry solution.
The WLZRNZO washer’s lightweight design makes it easy to transport between locations. Its simple operation requires minimal setup and maintenance. The durable construction withstands regular use in various conditions. This portable washing machine offers a reliable, efficient solution for maintaining clean clothes in North Carolina dorms and during travel.

Key Features Table
| Feature | Description |
|---|---|
| Type | Portable washing machine |
| Capacity | 20L |
| Design | Foldable |
| Modes | 3 cleaning modes |
| Basket | Spin basket |
| Use Cases | Travel, dorms, camping |
| Ideal For | Baby clothes, underwear, socks |
| Color | Beige |
Pros & Cons Table
| Pros | Cons |
|---|---|
| Compact design | Limited capacity |
| Foldable | Requires manual filling |
| 3 cleaning modes | Limited to small loads |
| Spin basket | Standard warranty |
| Lightweight | Limited color options |
| Portable | Basic features |
| Versatile use | Higher price point |
Common Cleaning Tips
Regular cleaning maintains your WLZRNZO washer’s performance and longevity. Start by unplugging the machine and allowing it to cool after use. Remove any remaining water from the tub and spin basket. Wipe down the interior with a damp cloth to remove detergent residue and dirt.
For the exterior, use a mild soap solution to clean the surface and control panel. Avoid using abrasive scrubbers that could scratch the finish. For the spin basket, clean it thoroughly to remove any fabric fibers or debris. Always ensure all components are completely dry before storing. Regular cleaning not only keeps your WLZRNZO looking good but also ensures optimal washing performance for your North Carolina laundry needs.
Maintenance or Troubleshooting Tips
If your washer isn’t starting, check that it’s properly plugged in and the outlet is functioning. For machines that won’t spin, ensure the load is balanced and not overloaded. If the washing performance seems poor, check for detergent buildup in the tub and clean thoroughly.
If the machine makes unusual noises, check for loose components or foreign objects in the drum. For machines that leak, ensure the water inlet is properly connected and not damaged. If the cleaning modes aren’t working, check the control panel and connections. Regular maintenance prevents most common issues and keeps your WLZRNZO washer running smoothly in North Carolina.
What Real People Say — Voices from the Community
North Carolina users praise the WLZRNZO Portable Washing Machine 20L for its convenience and performance. Many highlight the compact design for easy storage in dorm rooms. Others love the 3 cleaning modes for versatile washing options. The foldable design receives compliments for its space-saving capabilities.
Some users note the importance of the spin basket for improved drying performance. Others appreciate the lightweight design for easy transport between locations. The overall consensus is that the WLZRNZO provides excellent value and performance for North Carolina travel and dorm needs, making it a smart choice for convenient, portable laundry.
Relevant FAQs
1. What is the capacity of the WLZRNZO portable washer?
The WLZRNZO Portable Washing Machine has a 20L capacity. This size works well for small loads of baby clothes, underwear, and socks. It provides efficient washing for travel and dorm needs in North Carolina.
2. Is the WLZRNZO washer foldable?
Yes, the WLZRNZO Portable Washing Machine features a foldable design. This allows for easy storage in dorm rooms or travel luggage. The foldable design makes it convenient for North Carolina users with limited space.
3. How many cleaning modes does the WLZRNZO washer have?
The WLZRNZO washer features 3 cleaning modes. This provides versatility for different fabric types and soil levels. The multiple modes make it suitable for various laundry needs in North Carolina.
4. Does the WLZRNZO washer have a spin basket?
Yes, the WLZRNZO Portable Washing Machine includes a spin basket. This improves drying performance for your laundry. The spin basket helps remove excess water from clothes after washing.
5. What is the WLZRNZO washer ideal for?
The WLZRNZO washer is ideal for baby clothes, underwear, and socks. Its 20L capacity and 3 cleaning modes make it perfect for these small items. The compact design makes it suitable for travel and dorm use in North Carolina.
6. What color is the WLZRNZO washer?
The WLZRNZO Portable Washing Machine is available in beige. This color blends well with different room decors. The beige finish adds a neutral touch to your North Carolina dorm or travel setup.
Final Thought
The best WLZRNZO Portable Washing Machine 20L in North Carolina (NC) offers a smart solution for travel and dorms. Its 20L capacity, foldable design, and 3 cleaning modes make it perfect for North Carolina users. This mini washer provides the right combination of convenience, portability, and performance for small-space laundry needs.
Invest in the WLZRNZO Portable Washing Machine 20L to upgrade your laundry routine and enjoy clean clothes anywhere. Consider your specific needs for capacity, cleaning modes, and portability. Choose a washer that provides the performance and convenience your North Carolina lifestyle deserves. Enjoy fresh, clean clothes with this excellent portable laundry solution. If you’re interested in learning more about how washing machines work, How to Wire a Washing Machine Motor to a Plug explains the basics of motor wiring and electrical connections, offering helpful technical insights for DIY enthusiasts while emphasizing safe handling of electrical components.
Best FIREGAS 30-Inch Under Cabinet Range Hood in California (CA): Is It the Right Kitchen Vent for Your Home?
California’s diverse cuisine and open-concept kitchens demand effective ventilation to maintain air quality. A quality under cabinet range hood removes cooking odors, smoke, and grease efficiently. It transforms your kitchen from a stuffy space into a fresh, comfortable cooking environment.
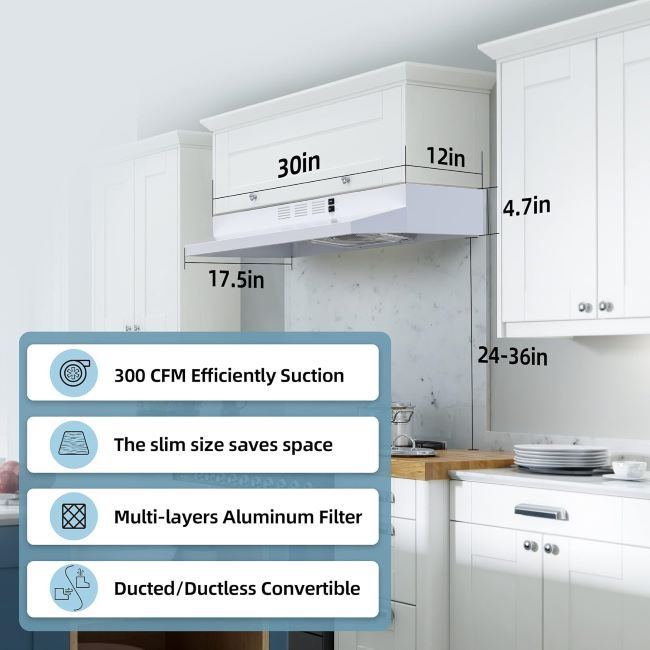
The best FIREGAS 30-Inch Under Cabinet Range Hood in California (CA) offers a smart solution for home kitchen ventilation. Its 300 CFM airflow handles most residential cooking needs. The ducted or ductless convertible design provides installation flexibility. This range hood combines performance, convenience, and space-saving design for California homeowners.
Product at a Glance
Product List:
Best FIREGAS 30-Inch Under Cabinet Range Hood in California: Detailed Review
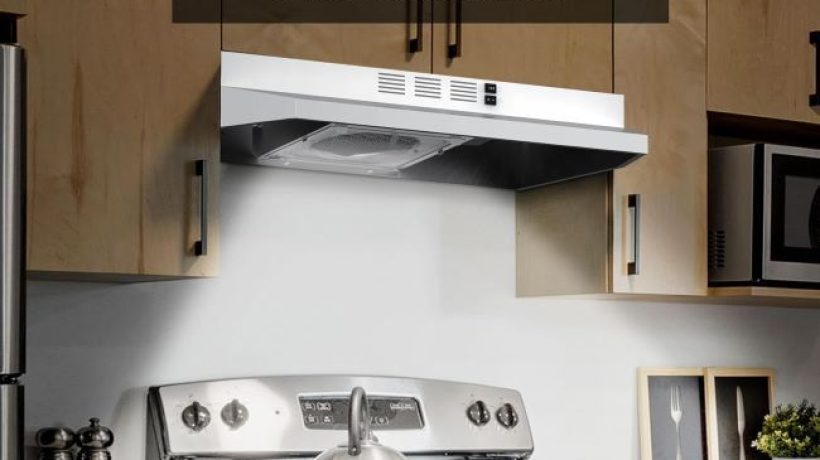
FIREGAS Range Hood 30 inch Under Cabinet
Why Best: Under cabinet range hood with 300 CFM airflow and convertible design.
The FIREGAS 30-Inch Under Cabinet Range Hood delivers exceptional performance for California kitchens. Its 300 CFM airflow effectively removes cooking odors, smoke, and grease. The 2-speed exhaust fan allows for adjusting the ventilation to your cooking needs. This range hood features a ducted or ductless convertible design for installation flexibility.
The rocker button control provides easy operation with a simple touch. Its white finish complements various kitchen decors and styles. The included aluminum filter captures grease and particles effectively. This machine becomes an essential tool for California homeowners seeking efficient kitchen ventilation.
The FIREGAS range hood’s compact under cabinet design saves valuable kitchen space. Its durable construction withstands regular use and cooking conditions. The quiet operation allows for comfortable kitchen conversations while cooking. This range hood offers a reliable, efficient solution for maintaining air quality in California kitchens.
Key Features Table
| Feature | Description |
|---|---|
| Type | Under cabinet range hood |
| Size | 30 inches |
| Airflow | 300 CFM |
| Speeds | 2 |
| Design | Ducted/ductless convertible |
| Control | Rocker button |
| Filter | Aluminum |
| Color | White |
Pros & Cons Table
| Pros | Cons |
|---|---|
| 300 CFM airflow | Limited to under cabinet |
| 2-speed fan | Requires installation |
| Convertible design | Standard warranty |
| Easy control | Limited color options |
| Aluminum filter | Basic features |
| Space-saving | Noise at high speed |
| Durable construction | Limited to 30″ size |
Common Cleaning Tips
Regular cleaning maintains your FIREGAS range hood’s performance and appearance. Start by unplugging the range hood and allowing it to cool completely. Remove the aluminum filter and wash it with warm, soapy water. Use a soft brush to clean the filter thoroughly and remove grease buildup.
For the exterior, wipe down the surface with a damp cloth to remove dust and fingerprints. Avoid using abrasive scrubbers that could scratch the finish. For the interior, use a degreaser to clean the duct and fan blades. Always ensure all components are completely dry before reassembling. Regular cleaning not only keeps your FIREGAS looking good but also ensures optimal airflow and efficiency for your California kitchen.
Maintenance or Troubleshooting Tips
If your range hood isn’t turning on, check that it’s properly plugged in and the outlet is functioning. For machines that won’t operate at different speeds, ensure the rocker button is functioning properly. If the airflow seems weak, check for clogs in the filter or duct and clean thoroughly.
If the range hood makes unusual noises, check for loose components or foreign objects in the fan. For machines that vibrate excessively, check that all mounting screws are tight and secure. If the light isn’t working, check the bulb and connections. Regular maintenance prevents most common issues and keeps your FIREGAS range hood running smoothly in your California kitchen.
What Real People Say — Voices from the Community
California homeowners praise the FIREGAS 30-Inch Under Cabinet Range Hood for its performance and value. Many highlight the 300 CFM airflow for effective ventilation during cooking. Others love the 2-speed fan for adjusting to different cooking needs. The convertible design receives compliments for its installation flexibility.
Some users note the importance of the aluminum filter for capturing grease and particles effectively. Others appreciate the rocker button control for easy operation. The overall consensus is that the FIREGAS provides excellent value and performance for California kitchens, making it a smart choice for efficient, space-saving ventilation.
Relevant FAQs
1. What is the size of the FIREGAS range hood?
The FIREGAS Range Hood is 30 inches wide. This size works well for most residential stoves and cooktops. It provides effective ventilation for typical California kitchen setups.
2. What is the airflow of the FIREGAS range hood?
The FIREGAS Range Hood features 300 CFM airflow. This effectively removes cooking odors, smoke, and grease from your kitchen. The airflow rate provides good ventilation for most residential cooking needs.
3. How many speeds does the FIREGAS range hood have?
The FIREGAS Range Hood features 2-speed exhaust fan. This allows for adjusting the ventilation to your cooking needs. The two speeds provide flexibility for different cooking situations in your California kitchen.
4. Is the FIREGAS range hood ducted or ductless?
The FIREGAS Range Hood is ducted or ductless convertible. This provides installation flexibility for various kitchen setups. The convertible design makes it suitable for different California home configurations.
5. What type of control does the FIREGAS range hood have?
The FIREGAS Range Hood features rocker button control. This provides easy operation with a simple touch. The rocker button makes it convenient to adjust the fan speed and light.
6. What type of filter does the FIREGAS range hood have?
The FIREGAS Range Hood includes an aluminum filter. This effectively captures grease and particles from cooking. The aluminum filter is durable and easy to clean for regular maintenance.
Final Thought
The best FIREGAS 30-Inch Under Cabinet Range Hood in California (CA) offers a smart solution for home kitchen ventilation. Its 300 CFM airflow, 2-speed fan, and convertible design make it perfect for California homeowners. This range hood provides the right combination of performance, flexibility, and space-saving design for your kitchen needs.
Invest in the FIREGAS 30-Inch Under Cabinet Range Hood to upgrade your kitchen ventilation and improve air quality. Consider your specific needs for size, airflow, and installation type. Choose a range hood that provides the performance and convenience your California kitchen deserves. Enjoy a fresher, more comfortable cooking environment with this excellent under cabinet range hood.
Best Jeevony Magnetic Dryer Vent Coupling DV180 in Illinois (IL): A Smart Upgrade for Safer, Easier Dryer Maintenance?
Illinois homeowners understand that proper dryer vent maintenance prevents fire hazards and boosts efficiency. A quality magnetic dryer vent coupling creates a secure, airtight connection while simplifying cleaning. It transforms your laundry routine from a potential safety risk into a secure, effortless process.
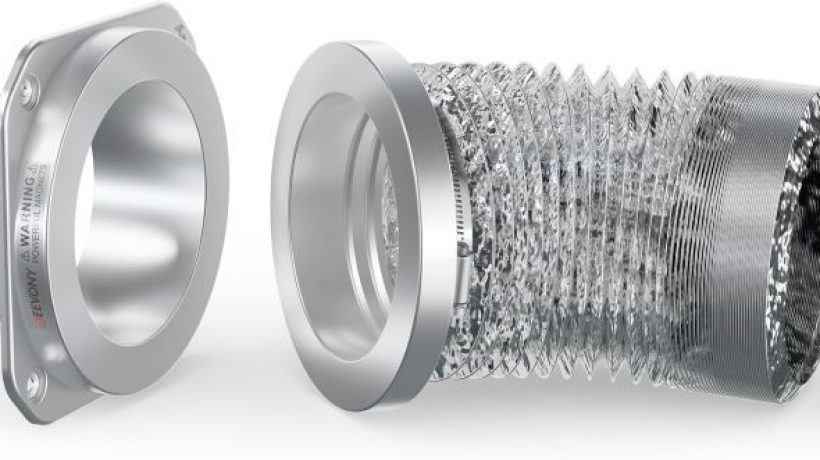
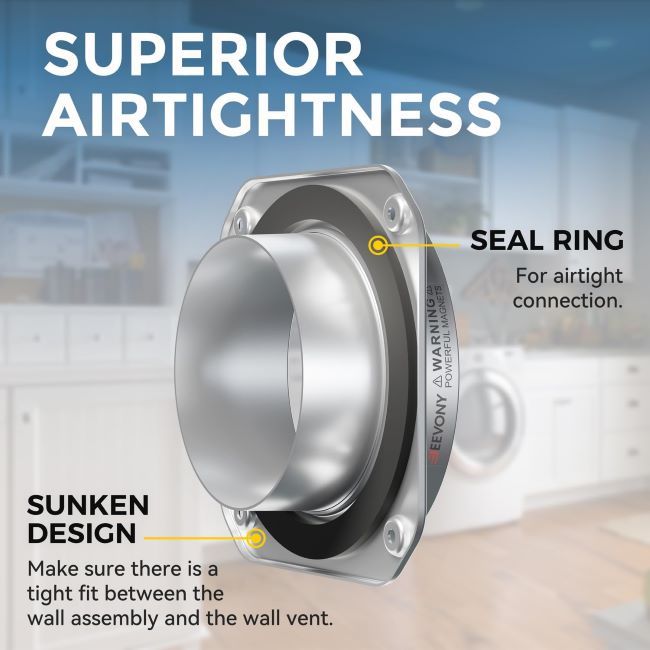
The best Jeevony Magnetic Dryer Vent Coupling DV180 in Illinois (IL) offers a smart upgrade for safer, easier dryer maintenance. Its magnetic connection allows for quick installation and removal without tools. The airtight seal prevents lint accumulation and air leaks that reduce dryer performance. This coupling kit includes a 2.6ft 4″ duct and two clamps for a complete solution.
Product at a Glance
Product List:
Best Jeevony Magnetic Dryer Vent Coupling DV180 in Illinois: Detailed Review
Jeevony Magnetic Dryer Vent Coupling DV180 Airtight Seal
Why Best: Magnetic dryer vent coupling with airtight seal and easy cleaning design.
The Jeevony Magnetic Dryer Vent Coupling DV180 delivers exceptional performance for Illinois homes. Its magnetic connection allows for quick installation and removal without requiring any tools. The airtight seal prevents lint buildup and air leaks that can compromise dryer efficiency. This coupling creates a secure connection between your dryer and vent system.
The included 2.6ft 4″ duct provides flexibility for various dryer setups and configurations. The two clamps ensure a secure fit that prevents accidental disconnection during operation. The quick connector design makes maintenance and cleaning effortless. This coupling becomes an essential component for Illinois homeowners seeking safer, more efficient dryer operation.
The DV180’s durable construction withstands regular use and temperature variations common in Illinois homes. Its compact design fits easily in laundry rooms with limited space. The magnetic connection allows for easy access to clean the vent system regularly. This coupling offers a reliable, safe solution for maintaining your dryer vent in Illinois.
Key Features Table
| Feature | Description |
|---|---|
| Type | Magnetic dryer vent coupling |
| Seal | Airtight |
| Connection | Quick connector |
| Included | 2.6ft 4″ duct, 2 clamps |
| Design | Easy to clean |
| Material | Durable |
| Installation | Tool-free |
Pros & Cons Table
| Pros | Cons |
|---|---|
| Magnetic connection | Limited to 4″ ducts |
| Airtight seal | Requires proper alignment |
| Easy to clean | Standard warranty |
| Tool-free installation | Limited color options |
| Includes accessories | Basic design |
| Durable construction | Higher price point |
| Improves efficiency | Limited compatibility |
Common Cleaning Tips
Regular cleaning maintains your Jeevony DV180 coupling’s performance and safety. Start by disconnecting the magnetic coupling from your dryer. Remove any visible lint from the coupling and duct with a vacuum cleaner or brush. Wipe down the magnetic surfaces with a damp cloth to remove dust and debris.
For the duct, use a vent cleaning brush to remove lint buildup from the interior. Avoid using water directly on the magnetic components to prevent damage. For stubborn lint, use a plastic scraper to avoid scratching the coupling. Always ensure all components are completely dry before reconnecting. Regular cleaning not only keeps your Jeevony DV180 looking good but also ensures optimal airflow and safety for your Illinois dryer system.
Maintenance or Troubleshooting Tips
If your dryer isn’t drying properly, check that the magnetic coupling is properly connected and sealed. For machines that make unusual noises, ensure the coupling is securely attached and not loose. If the dryer takes longer to dry, check for lint buildup in the coupling and duct and clean thoroughly.
If the magnetic connection seems weak, check for debris on the magnetic surfaces and clean them. For ducts that disconnect frequently, ensure the clamps are properly secured and the alignment is correct. If the airtight seal seems compromised, check for damage to the coupling and replace if necessary. Regular maintenance prevents most common issues and keeps your Jeevony DV180 coupling running smoothly in your Illinois home.
What Real People Say — Voices from the Community
Illinois homeowners praise the Jeevony Magnetic Dryer Vent Coupling DV180 for its convenience and safety features. Many highlight the magnetic connection for quick installation and removal without tools. Others love the airtight seal for preventing lint accumulation and air leaks. The easy cleaning receives compliments for making maintenance effortless and quick.
Some users note the importance of the included accessories for a complete solution. Others appreciate the tool-free installation for saving time and effort during setup. The overall consensus is that the Jeevony DV180 provides excellent value and performance for Illinois dryer maintenance, making it a smart upgrade for safer, more efficient dryer operation.
Relevant FAQs
1. What is the Jeevony Magnetic Dryer Vent Coupling DV180?
The Jeevony Magnetic Dryer Vent Coupling DV180 is a dryer vent connector with a magnetic connection. It creates an airtight seal between your dryer and vent system. The magnetic design allows for easy installation and removal without tools.
2. What does the DV180 kit include?
The DV180 kit includes the magnetic coupling, a 2.6ft 4″ duct, and two clamps. This provides a complete solution for connecting your dryer to the vent system. The included accessories ensure a secure, airtight connection for your Illinois home.
3. What size duct does the DV180 work with?
The Jeevony Magnetic Dryer Vent Coupling DV180 works with standard 4″ ducts. This is the most common size for residential dryer vent systems. The coupling is specifically designed for this duct size to ensure proper fit and function.
4. Is the DV180 easy to install?
Yes, the DV180 features tool-free installation thanks to its magnetic connection. This allows for quick setup and removal without requiring any special tools. The magnetic design makes it convenient for Illinois homeowners to install and maintain.
5. How do I clean the DV180 coupling?
Disconnect the magnetic coupling from your dryer first. Remove lint with a vacuum or brush from all surfaces. Wipe down the magnetic surfaces with a damp cloth to remove dust. Use a vent cleaning brush for the duct interior. Ensure all components are completely dry before reconnecting to your dryer.
6. Does the DV180 improve dryer efficiency?
Yes, the DV180 improves dryer efficiency by creating an airtight seal. This prevents air leaks that can reduce your dryer’s performance. The secure connection ensures optimal airflow throughout your Illinois dryer vent system.
Final Thought
The best Jeevony Magnetic Dryer Vent Coupling DV180 in Illinois (IL) offers a smart upgrade for safer, easier dryer maintenance. Its magnetic connection, airtight seal, and easy cleaning design make it perfect for Illinois homeowners. This coupling provides the right combination of safety, convenience, and efficiency for your dryer vent system.
Invest in the Jeevony Magnetic Dryer Vent Coupling DV180 to upgrade your laundry routine and enhance dryer safety. Consider your specific needs for duct size, installation ease, and additional features. Choose a coupling that provides the performance and convenience your Illinois home deserves. Enjoy safer, more efficient dryer operation with this excellent magnetic vent coupling solution. To maximize your dryer’s performance and reduce the risk of lint-related hazards, How to Clean Your Dryer Vent offers practical maintenance tips that work hand in hand with a magnetic vent coupling, helping you keep your dryer system clean, efficient, and safe year-round.
Best EUHOMY Countertop Ice Maker Machine in Florida (FL): Is It the Best Portable Ice Maker for Hot Weather?
Florida’s scorching heat demands a reliable ice maker to keep drinks cold and refreshing. A quality countertop ice maker provides fresh ice on demand without the hassle of ice trays. It transforms your kitchen from underprepared to summer-ready with the touch of a button.
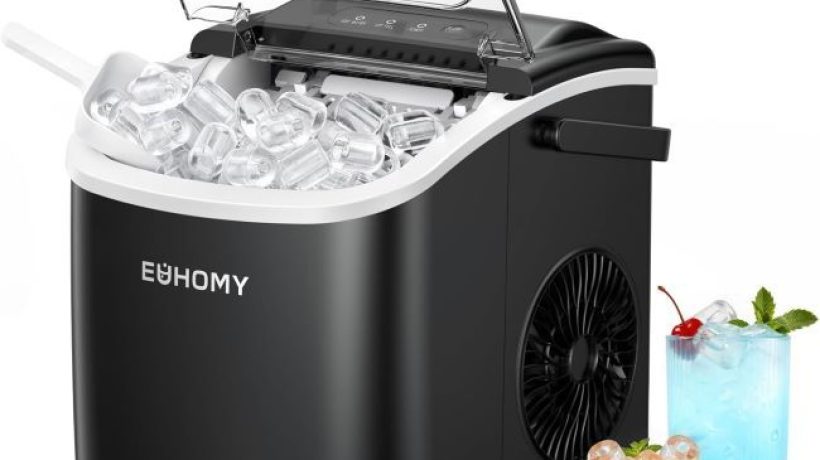
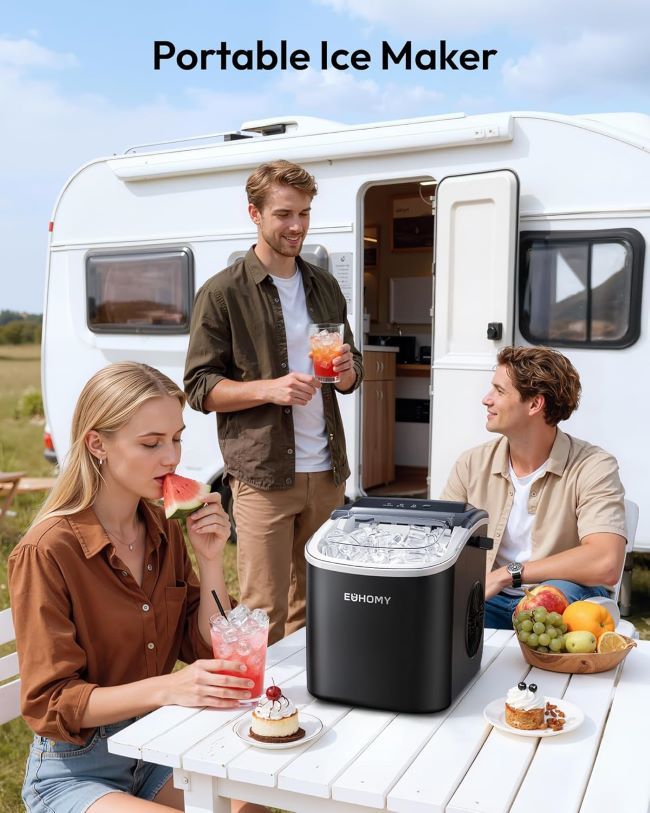
The best EUHOMY Countertop Ice Maker Machine in Florida (FL) offers a smart solution for hot weather needs. Its 26-pound daily production capacity keeps up with demand. The machine delivers 9 ice cubes in just 6 minutes for instant refreshment. This portable ice maker combines convenience, speed, and portability for Florida residents.
Product at a Glance
Product List:
Best EUHOMY Countertop Ice Maker Machine in Florida: Detailed Review
EUHOMY Countertop Ice Maker Machine with Handle
Why Best: Portable ice maker with fast production and auto-cleaning function.
The EUHOMY Countertop Ice Maker Machine delivers exceptional performance for Florida’s hot climate. Its 26-pound daily production capacity ensures a steady supply of ice. The machine produces 9 ice cubes in just 6 minutes for quick refreshment. This portable ice maker features an auto-cleaning function for easy maintenance.
The compact design fits easily on kitchen countertops or in RVs. Its lightweight construction with handle makes it portable for various uses. The included basket and scoop provide convenient ice storage and serving. This machine becomes an essential tool for Florida residents seeking a reliable, fast ice maker for hot weather.
The EUHOMY ice maker’s efficient operation requires minimal energy consumption. Its quiet performance allows for use in various settings without disturbance. The stylish black design complements various kitchen decors. This countertop ice maker offers a reliable, convenient solution for keeping drinks cold in Florida’s hot weather.
Key Features Table
| Feature | Description |
|---|---|
| Type | Countertop ice maker |
| Production | 26lbs in 24 hours |
| Speed | 9 cubes in 6 minutes |
| Function | Auto-cleaning |
| Design | Portable with handle |
| Accessories | Basket and scoop |
| Color | Black |
Pros & Cons Table
| Pros | Cons |
|---|---|
| Fast production | Limited capacity |
| Auto-cleaning | Requires water connection |
| Portable design | Needs regular cleaning |
| Quiet operation | Standard warranty |
| Energy efficient | Limited color options |
| Stylish appearance | Basic features |
| Includes accessories | Higher price point |
Common Cleaning Tips
Regular cleaning maintains your EUHOMY ice maker’s performance and hygiene. Start by unplugging the machine and allowing it to cool completely. Remove any remaining ice cubes and drain the water reservoir. Wipe down the interior with a damp cloth to remove mineral buildup.
For the exterior, use a mild soap solution to clean the surface and handle. Avoid using abrasive scrubbers that could scratch the finish. For the basket and scoop, wash them with warm, soapy water and dry thoroughly. Always ensure all components are completely dry before reassembling. Regular cleaning not only keeps your EUHOMY looking good but also ensures safe, hygienic ice production for your Florida home.
Maintenance or Troubleshooting Tips
If your ice maker isn’t producing ice, check that it’s properly plugged in and the water reservoir is full. For machines that won’t turn on, ensure the power outlet is functioning and the machine is properly connected. If the ice cubes seem small or misshapen, check the water level and ensure proper water flow.
If the machine makes unusual noises, check for loose components or foreign objects inside. For ice makers that leak, ensure the water reservoir is properly seated and not overfilled. If the auto-cleaning function isn’t working, check that the machine is properly connected and the function is activated. Regular maintenance prevents most common issues and keeps your EUHOMY ice maker running smoothly in Florida’s hot weather.
What Real People Say — Voices from the Community
Florida residents praise the EUHOMY Countertop Ice Maker Machine for its fast production and convenience. Many highlight the 9 ice cubes in 6 minutes for quick refreshment during hot days. Others love the auto-cleaning function for easy maintenance. The portable design receives compliments for its versatility in various settings.
Some users note the importance of the 26-pound daily production capacity for keeping up with demand. Others appreciate the quiet operation for use in kitchens or RVs. The overall consensus is that the EUHOMY provides excellent value and performance for Florida’s hot weather, making it a smart investment for reliable ice production.
Relevant FAQs
1. How much ice does the EUHOMY ice maker produce in 24 hours?
The EUHOMY Countertop Ice Maker Machine produces 26 pounds of ice in 24 hours. This capacity works well for most residential needs in Florida. It ensures a steady supply of ice for hot weather demands.
2. How fast does the EUHOMY ice maker produce ice?
The EUHOMY ice maker produces 9 ice cubes in just 6 minutes. This fast production provides quick refreshment when needed. The rapid ice production makes it perfect for Florida’s hot climate.
3. Does the EUHOMY ice maker have an auto-cleaning function?
Yes, the EUHOMY Countertop Ice Maker Machine features an auto-cleaning function. This makes maintenance easy and convenient. The auto-cleaning ensures hygienic ice production for your Florida home.
4. Is the EUHOMY ice maker portable?
Yes, the EUHOMY Countertop Ice Maker Machine features a portable design with a handle. This makes it easy to move and use in various settings. The portability makes it perfect for kitchens, RVs, or camping in Florida.
5. What accessories come with the EUHOMY ice maker?
The EUHOMY ice maker comes with a basket and scoop included. These accessories provide convenient ice storage and serving. The included accessories enhance the user experience for your Florida ice needs.
6. What color is the EUHOMY ice maker?
The EUHOMY Countertop Ice Maker Machine is available in black. This stylish color complements various kitchen decors. The black finish adds a modern touch to your Florida kitchen.
Final Thought
The best EUHOMY Countertop Ice Maker Machine in Florida (FL) offers a smart solution for hot weather needs. Its fast production, auto-cleaning function, and portable design make it perfect for Florida residents. This ice maker provides the right combination of convenience, speed, and reliability for keeping drinks cold in the heat.
Invest in the EUHOMY Countertop Ice Maker Machine to upgrade your kitchen and enjoy fresh ice on demand. Consider your specific needs for production capacity, speed, and additional features. Choose an ice maker that provides the performance and convenience your Florida lifestyle deserves. Stay cool and refreshed with this excellent portable ice maker. To keep your appliance performing at its best, How to Clean Countertop Ice Maker to remove mineral buildup, improve hygiene, and ensure your ice maker continues producing fresh, clean ice for years to come.
Best Ninja NC301 CREAMi Ice Cream Maker in Utah (UT): Is It Better Than Other Ice Cream Makers?
Utah’s love for sweet treats meets modern convenience with the right ice cream maker. A quality machine transforms simple ingredients into creamy, delicious desserts at home. It turns your kitchen into a personalized ice cream parlor with endless flavor possibilities.
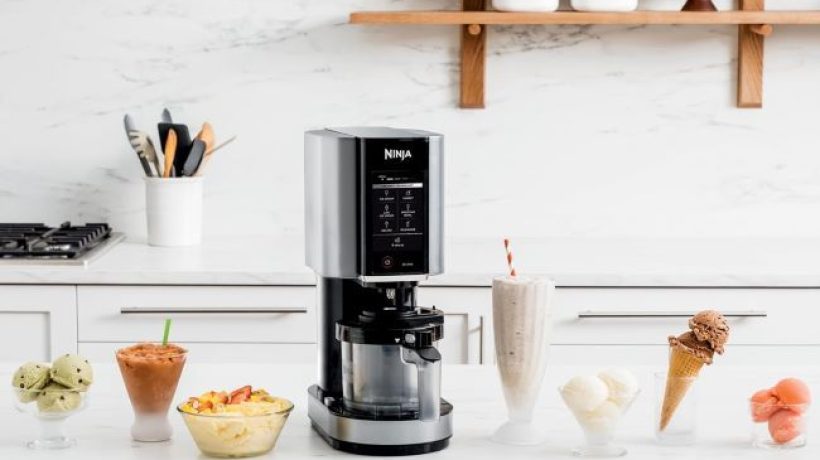
The best Ninja NC301 CREAMi Ice Cream Maker in Utah (UT) offers a versatile solution for homemade frozen treats. Its 7 one-touch programs create gelato, mix-ins, milkshakes, sorbet, and smoothie bowls with ease. This compact machine provides a fun, creative way to make healthier desserts for your family. It delivers better results than many traditional ice cream makers with less effort.
Product at a Glance
Product List:
Best Ninja NC301 CREAMi Ice Cream Maker in Utah: Detailed Review
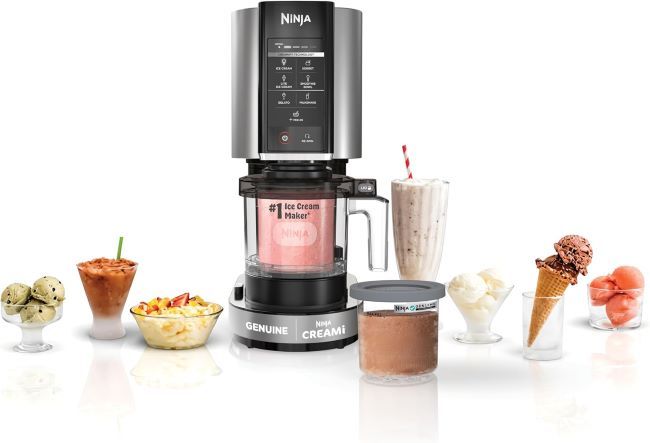
Ninja NC301 CREAMi Ice Cream Maker
Why Best: Versatile ice cream maker with 7 one-touch programs.
The Ninja NC301 CREAMi Ice Cream Maker delivers exceptional performance for Utah dessert lovers. Its 7 one-touch programs create various frozen treats with minimal effort. The machine includes 2 pint containers and lids for making multiple flavors at once. This compact silver model fits easily on most kitchen countertops.
The CREAMi transforms simple ingredients into creamy ice cream, gelato, or sorbet in minutes. Its mix-in feature allows for adding toppings and flavors for customized creations. The smoothie bowl function creates thick, creamy bowls perfect for breakfast or dessert. This machine provides endless possibilities for homemade frozen treats in your Utah kitchen.
The Ninja CREAMi’s compact size makes it perfect for small kitchens or limited storage space. Its simple operation requires minimal prep work and cleanup. The machine’s versatility allows for creating various textures from light and fluffy to rich and creamy. This ice cream maker becomes an essential kitchen tool for Utah families who love homemade desserts.
Key Features Table
| Feature | Description |
|---|---|
| Type | Ice cream maker |
| Programs | 7 one-touch |
| Use Cases | Gelato, mix-ins, milkshakes, sorbet, smoothie bowls |
| Containers | 2 pint containers |
| Lids | Included |
| Size | Compact |
| Color | Silver |
| Model | NC301 |
Pros & Cons Table
| Pros | Cons |
|---|---|
| 7 one-touch programs | Requires pre-freezing |
| Versatile use | Limited capacity |
| 2 pint containers | Needs counter space |
| Mix-in feature | Higher price point |
| Compact size | Limited color options |
| Easy operation | Standard warranty |
| Customizable flavors | Basic design |
Common Cleaning Tips
Regular cleaning maintains your Ninja CREAMi’s performance and hygiene. Start by unplugging the machine and allowing it to cool completely after use. Remove the pint containers and lids, then wash them with warm, soapy water. Use a soft sponge or cloth to clean the blending paddle and container.
For stubborn residue, soak the parts in warm, soapy water before cleaning. Avoid using abrasive scrubbers that could damage the plastic components. Wipe down the exterior with a damp cloth to remove splatters and fingerprints. Always ensure all components are completely dry before reassembling. Regular cleaning not only keeps your CREAMi looking good but also ensures safe, hygienic use for your Utah family.
Maintenance or Troubleshooting Tips
If your CREAMi isn’t blending properly, check that the pint container is properly seated and the lid is secured. For machines that won’t turn on, ensure it’s properly plugged in and the outlet is functioning. If the blending paddle seems stuck, check for food obstructions and clean thoroughly.
If the machine makes unusual noises, inspect for loose parts or foreign objects in the mechanism. For containers that leak, ensure the lids are properly secured and not damaged. If the ice cream texture seems off, check that you’re using the correct program for your desired result. Regular maintenance prevents most common issues and keeps your Ninja CREAMi running smoothly.
What Real People Say — Voices from the Community
Utah dessert lovers praise the Ninja NC301 CREAMi for its versatility and performance. Many highlight the 7 one-touch programs for creating various frozen treats with ease. Others love the mix-in feature for customizing their creations with favorite toppings. The compact size receives compliments for fitting well in small kitchens.
Some users note the importance of the 2 pint containers for making multiple flavors at once. Others appreciate the simple operation that requires minimal prep work and cleanup. The overall consensus is that the CREAMi provides excellent value and performance for Utah homes, making it a smart investment for ice cream lovers.
Relevant FAQs
1. What can I make with the Ninja CREAMi?
The Ninja CREAMi makes gelato, ice cream with mix-ins, milkshakes, sorbet, and smoothie bowls. Its versatile design handles various frozen treats with ease. The 7 one-touch programs provide optimal settings for different creations.
2. How does the Ninja CREAMi work?
The CREAMi uses a unique blending paddle to transform frozen ingredients into creamy textures. You first freeze your base mixture in the pint containers. Then the machine blends it to your desired consistency using one of the 7 programs.
3. How long does it take to make ice cream with the CREAMi?
The Ninja CREAMi typically takes 1-2 minutes to transform frozen ingredients into creamy ice cream. The exact time may vary based on the program and ingredients used. This quick operation makes it perfect for satisfying sudden dessert cravings.
4. Do I need to pre-freeze the ingredients?
Yes, the Ninja CREAMi requires pre-freezing your base mixture in the pint containers. This typically takes 24 hours in the freezer for optimal results. The pre-freezing step ensures the machine can create the perfect creamy texture.
5. How do I clean the Ninja CREAMi?
Remove the pint containers and lids after each use and wash with warm, soapy water. Clean the blending paddle with a soft sponge or cloth. Wipe down the exterior with a damp cloth. Always ensure all components are completely dry before reassembling.
6. What’s the difference between the Ninja CREAMi and other ice cream makers?
The Ninja CREAMi offers 7 one-touch programs for various frozen treats. Its mix-in feature allows for customizing creations with favorite toppings. The compact size and simple operation make it more convenient than many traditional ice cream makers.
Final Thought
The best Ninja NC301 CREAMi Ice Cream Maker in Utah (UT) offers a versatile, convenient solution for homemade frozen treats. Its 7 one-touch programs, mix-in feature, and compact size make it perfect for Utah kitchens. This ice cream maker provides better results than many traditional machines with less effort.
Invest in the Ninja CREAMi to transform your dessert routine and enjoy homemade frozen treats. Consider your specific needs for capacity, programs, and additional features. Choose an ice cream maker that provides the performance and convenience your Utah kitchen deserves. Create delicious, customized frozen treats with this excellent machine. If you’re comparing different ice cream makers, Whynter ICM-201SB: Automatic Stainless Steel Ice Cream Maker with LCD and Timer reviews another popular model, highlighting its built-in compressor, user-friendly controls, and performance to help you choose the best machine for your homemade frozen desserts.
Best TOSHIBA EM131A5C-SS Countertop Microwave in Wisconsin (WI): A Smart Upgrade for Fast & Even Cooking?
Wisconsin’s love for comfort food meets modern convenience with the right countertop microwave. A quality machine delivers quick, even heating for everything from leftovers to frozen meals. It transforms your kitchen routine from time-consuming to effortless with the touch of a button.
The best TOSHIBA EM131A5C-SS Countertop Microwave in Wisconsin (WI) offers a smart solution for fast and even cooking. Its smart humidity sensor ensures perfect results every time. This microwave combines power, convenience, and advanced features for Wisconsin kitchens. It provides the perfect tool for reheating, cooking, and defrosting with minimal effort.
Product at a Glance
Product List:
Best TOSHIBA EM131A5C-SS Countertop Microwave in Wisconsin: Detailed Review
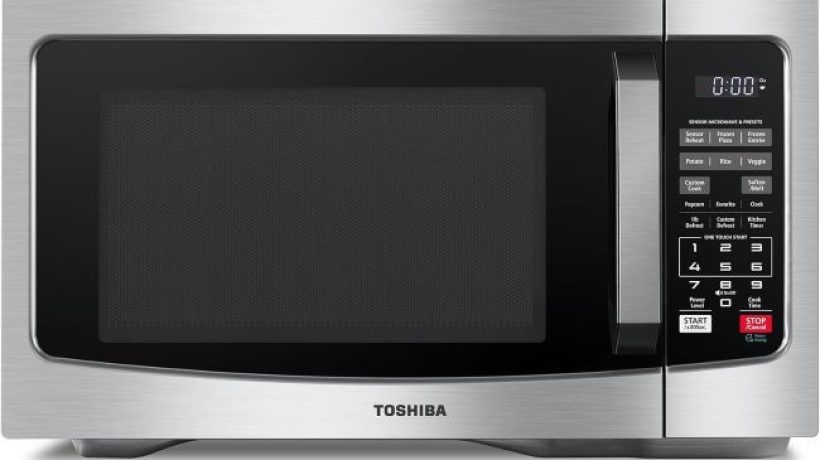
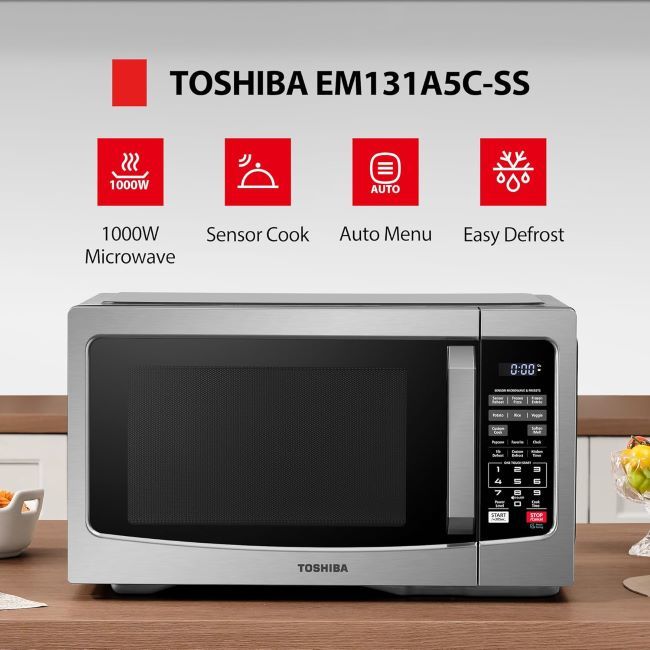
TOSHIBA EM131A5C-SS Countertop Microwave Ovens 1.2 Cu Ft
Why Best: Countertop microwave with smart humidity sensor and 12 auto menus.
The TOSHIBA EM131A5C-SS Countertop Microwave delivers exceptional performance for Wisconsin kitchens. Its 1.2 cubic foot capacity provides ample space for most cooking needs. The smart humidity sensor automatically adjusts cooking time and power for perfect results. This silver model features a 12.4-inch removable turntable for even heating.
The microwave’s 12 auto menus simplify cooking various foods with the touch of a button. Its mute function allows for quiet operation when needed. The ECO mode reduces standby power consumption for energy efficiency. This 1000-watt microwave provides quick, even cooking for various dishes. The easy-clean interior makes maintenance simple and hassle-free.
The TOSHIBA microwave’s compact design fits easily on most Wisconsin kitchen countertops. Its modern stainless steel exterior complements various kitchen decors. The digital controls provide precise settings for different cooking tasks. This microwave becomes an essential kitchen tool for Wisconsin residents who value convenience and efficiency.
Key Features Table
| Feature | Description |
|---|---|
| Type | Countertop microwave |
| Capacity | 1.2 cubic feet |
| Turntable | 12.4″ removable |
| Sensor | Smart humidity |
| Menus | 12 auto |
| Function | Mute |
| Mode | ECO |
| Power | 1000W |
| Color | Silver |
Pros & Cons Table
| Pros | Cons |
|---|---|
| Smart humidity sensor | Requires counter space |
| 1.2 cu ft capacity | Higher price point |
| 12 auto menus | Limited to microwave use |
| Mute function | Needs regular cleaning |
| ECO mode | Standard warranty |
| 1000W power | Bulkier design |
| Easy-clean interior | Limited color options |
Common Cleaning Tips
Regular cleaning maintains your TOSHIBA microwave’s performance and hygiene. Start by unplugging the machine and allowing it to cool completely after use. Remove the turntable and wash it with warm, soapy water. Wipe down the interior with a damp cloth to remove food splatters and odors.
For stubborn stains or odors, use a mixture of baking soda and water to create a paste. Apply the paste to the interior, let it sit for a few minutes, then wipe clean. The easy-clean interior makes this process simple and effective. Always ensure the microwave is completely dry before using it again. Regular cleaning not only keeps your microwave looking good but also ensures safe, hygienic cooking for your Wisconsin family.
Maintenance or Troubleshooting Tips
If your microwave isn’t heating properly, check that the door is properly closed and latched. For machines that won’t turn on, ensure it’s properly plugged in and the outlet is functioning. If the turntable doesn’t rotate, check that it’s properly seated on the support and the motor is working.
If the microwave makes unusual noises, check for food debris in the turntable or on the support. Clean the interior thoroughly to remove any obstructions. If the smart sensor isn’t working correctly, ensure the microwave is on a stable, level surface. For machines that spark, check for metal objects in the cooking chamber and remove them immediately. Regular maintenance prevents most common issues and keeps your TOSHIBA microwave running smoothly.
What Real People Say — Voices from the Community
Wisconsin residents praise the TOSHIBA EM131A5C-SS Countertop Microwave for its performance and convenience. Many highlight the smart humidity sensor for perfect cooking results. Others love the 12 auto menus for simplifying various cooking tasks. The mute function receives compliments for allowing quiet operation when needed.
Some users note the importance of the 1.2 cubic foot capacity for their cooking needs. Others appreciate the ECO mode for reducing energy consumption. The overall consensus is that the TOSHIBA microwave provides excellent value and performance for Wisconsin kitchens, making it a smart upgrade for fast and even cooking.
Relevant FAQs
1. What is the capacity of the TOSHIBA EM131A5C-SS?
The TOSHIBA EM131A5C-SS has a 1.2 cubic foot capacity. This size works well for most cooking needs in Wisconsin kitchens. It provides ample space for reheating, cooking, and defrosting various foods.
2. What is the smart humidity sensor?
The smart humidity sensor automatically detects moisture levels in the food. It then adjusts cooking time and power for optimal results. This feature ensures even heating and prevents overcooking or undercooking.
3. How many auto menus does the TOSHIBA microwave have?
The TOSHIBA microwave features 12 auto menus for various foods. These include settings for popcorn, pizza, potatoes, and more. The auto menus simplify cooking with the touch of a button.
4. What is the ECO mode?
The ECO mode reduces standby power consumption when the microwave isn’t in use. This feature helps save energy and reduces your electricity bill. It’s particularly useful for Wisconsin residents concerned about energy efficiency.
5. How do I clean the TOSHIBA microwave?
Remove the turntable and wash it with warm, soapy water after each use. Wipe down the interior with a damp cloth to remove food splatters. For stubborn stains, use a baking soda and water paste. Always ensure the microwave is completely dry before using it again.
6. What is the wattage of the TOSHIBA microwave?
The TOSHIBA EM131A5C-SS features a 1000-watt power rating. This provides quick, even cooking for various dishes. The high wattage ensures consistent results for your Wisconsin kitchen needs.
Final Thought
The best TOSHIBA EM131A5C-SS Countertop Microwave in Wisconsin (WI) offers a smart solution for fast and even cooking. Its smart humidity sensor, 12 auto menus, and ECO mode make it perfect for Wisconsin kitchens. This microwave provides the perfect combination of convenience, efficiency, and advanced features for your cooking needs.
Invest in the TOSHIBA EM131A5C-SS to simplify your kitchen routine and enjoy quick, even cooking. Consider your specific needs for capacity, features, and energy efficiency. Choose a microwave that provides the performance and convenience your Wisconsin kitchen deserves. Transform your cooking experience with this excellent smart upgrade. If you’re still weighing your options, How to Choose the Best Microwave Oven for Your Kitchen Needs explains the key features, sizes, power levels, and functions to consider so you can select the ideal microwave for your cooking style and kitchen space.
Best Amazon Basics 2 Slice Toaster in Michigan (MI): Features, Pros And Cons Explained
Michigan mornings deserve perfect toast to start the day right. A quality toaster delivers consistent, golden-brown results with minimal effort. It transforms your breakfast from ordinary to extraordinary with ease.
The best Amazon Basics 2 Slice Toaster in Michigan (MI) offers a reliable solution for daily toasting needs. Its extra-wide slots accommodate bagels and thick breads with ease. This toaster combines versatility, convenience, and affordability for Michigan kitchens. It provides the perfect tool for creating consistent, delicious toast every morning.
Product at a Glance
Product List:
Best Amazon Basics 2 Slice Toaster in Michigan: Detailed Review
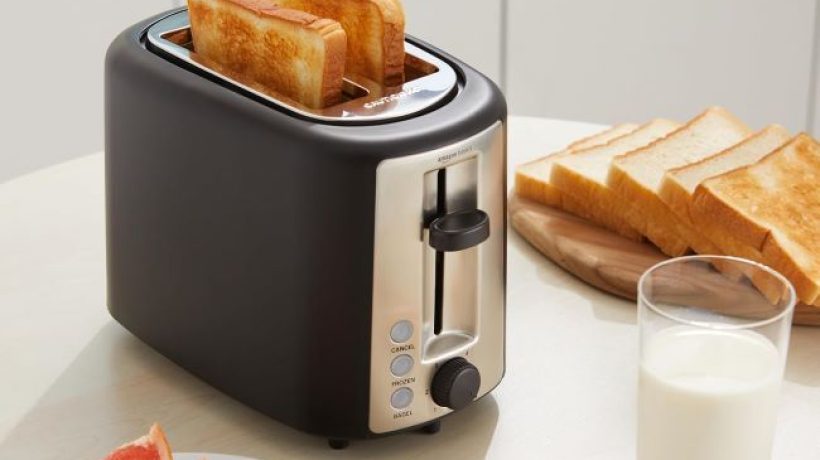
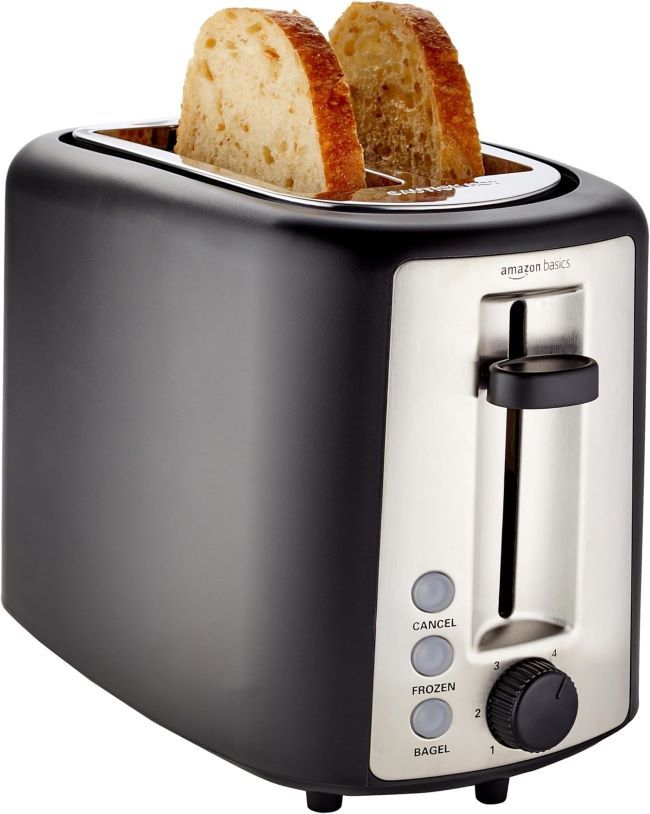
Amazon Basics 2 Slice Toaster, Extra Wide Slots for Bagels
Why Best: Affordable toaster with extra-wide slots and multiple browning settings.
The Amazon Basics 2 Slice Toaster delivers consistent performance for Michigan kitchens. Its extra-wide slots accommodate bagels, thick breads, and other baked goods with ease. The 6 browning settings provide customization for different toast preferences. This black and silver model features a 900-watt power rating for quick, even toasting.
The toaster includes defrost, cancel, and bagel buttons for added convenience. Its removable crumb tray makes cleanup easy and prevents messes on your countertop. The cord wrap feature keeps the power cord neat and tidy when not in use. This toaster works well for daily breakfast routines and quick snacks.
The Amazon Basics toaster’s compact design fits easily on most Michigan kitchen countertops. Its lightweight construction makes it easy to move and store when not in use. The even toasting ensures both slices cook uniformly for perfect results every time. This toaster becomes an essential kitchen tool for Michigan residents who value simplicity and reliability.
Key Features Table
| Feature | Description |
|---|---|
| Type | 2 slice toaster |
| Slots | Extra-wide |
| Settings | 6 browning |
| Buttons | Defrost, cancel, bagel |
| Crumb Tray | Removable |
| Cord | Wrap |
| Power | 900W |
| Color | Black & silver |
Pros & Cons Table
| Pros | Cons |
|---|---|
| Extra-wide slots | Limited to 2 slices |
| 6 browning settings | Plastic construction |
| Defrost function | Requires counter space |
| Bagel button | Basic design |
| Removable crumb tray | Standard warranty |
| Cord wrap | Limited color options |
| Affordable price | Higher wattage |
Common Cleaning Tips
Regular cleaning maintains your Amazon Basics toaster’s performance and appearance. Start by unplugging the toaster and allowing it to cool completely after use. Remove the crumb tray and empty any accumulated crumbs. Wipe down the exterior with a damp cloth to remove grease and fingerprints.
For the slots, use a soft brush or damp cloth to remove crumbs and residue. Avoid using abrasive scrubbers that could scratch the interior. For stubborn residue, use a mixture of baking soda and water to gently scrub the slots. Always ensure the toaster is completely dry before plugging it back in. Regular cleaning not only keeps your toaster looking good but also prevents fire hazards.
Maintenance or Troubleshooting Tips
If your toaster stops working, check that it’s properly plugged in and the outlet is functioning. For machines that won’t toast, ensure the bread is properly inserted and the lever is fully depressed. If the toaster gets stuck, unplug it and allow it to cool before gently removing the bread.
If the toaster makes unusual noises, check for crumbs or foreign objects in the slots. Clean the interior thoroughly to remove any obstructions. If the browning seems inconsistent, check that you’re using the correct setting for your bread type. For toasters that don’t brown evenly, ensure the bread is centered in the slots. Regular maintenance prevents most common issues and keeps your Amazon Basics toaster running smoothly.
What Real People Say — Voices from the Community
Michigan residents praise the Amazon Basics 2 Slice Toaster for its performance and affordability. Many highlight the extra-wide slots for accommodating bagels and thick breads. Others love the 6 browning settings for customizing their toast to the perfect darkness. The defrost and bagel buttons receive compliments for adding convenience to their morning routines.
Some users note the importance of the removable crumb tray for easy cleanup. Others appreciate the cord wrap feature for keeping their countertops neat. The overall consensus is that the Amazon Basics toaster provides excellent value and performance for Michigan kitchens, making it a smart investment for daily use.
Relevant FAQs
1. How wide are the slots on the Amazon Basics toaster?
The Amazon Basics toaster features extra-wide slots designed to accommodate bagels and thick breads. This makes it perfect for Michigan residents who enjoy hearty breakfast options. The exact width varies by model but typically fits most standard bread products.
2. What do the defrost and bagel buttons do?
The defrost button thaws frozen bread before toasting for even browning. The bagel button toasts one side of the bagel while warming the other. Both buttons provide added convenience for specific bread types in your Michigan kitchen.
3. How do I clean the crumb tray?
Remove the crumb tray and empty any accumulated crumbs after each use. Wash it with warm, soapy water and dry thoroughly before reinserting. Regular cleaning of the crumb tray prevents buildup and potential fire hazards in your toaster.
4. Can I toast bagels in the Amazon Basics toaster?
Yes, the Amazon Basics toaster works well for bagels and other thick bread products. The extra-wide slots and bagel button make it perfect for this purpose. Use the bagel setting for optimal results with your morning bagels.
5. How often should I clean my Amazon Basics toaster?
Clean the crumb tray after each use to prevent buildup. Wipe down the exterior weekly or as needed. For the slots, clean them monthly or when you notice residue accumulation. Regular cleaning maintains performance and prevents fire hazards.
6. What’s the wattage of the Amazon Basics toaster?
The Amazon Basics 2 Slice Toaster features a 900-watt power rating. This provides quick, even toasting for various bread types. The higher wattage ensures consistent results for your Michigan breakfast routine.
Final Thought
The best Amazon Basics 2 Slice Toaster in Michigan (MI) offers a reliable, affordable solution for daily toasting needs. Its extra-wide slots, 6 browning settings, and convenient features make it perfect for Michigan kitchens. This toaster provides the perfect combination of performance, versatility, and value for your breakfast routine.
Invest in the Amazon Basics 2 Slice Toaster to simplify your morning routine and enjoy perfect toast. Consider your specific needs for slot size, browning settings, and additional features. Choose a toaster that provides the performance and convenience your Michigan kitchen deserves. Start each day with the perfect slice of toast tailored to your taste. If you’re exploring additional options before making your purchase, Beyond the Basics: Finding Your Perfect Toaster on Amazon USA compares a variety of toaster models, features, and price points to help you find the ideal fit for your kitchen and budget.
Best AROMA Digital Rice Cooker in Arizona (AZ): Perfect for Rice, Steaming & One-Pot Meals?
Arizona’s diverse cuisine demands a rice cooker that handles everything from fluffy basmati to sticky sushi rice. A quality machine simplifies meal prep while delivering consistent results. It transforms your cooking from a daily chore to a set-and-forget convenience.
The best AROMA Digital Rice Cooker in Arizona (AZ) offers a versatile solution for rice, steaming, and one-pot meals. Its digital controls provide precise cooking for various grain types. This multicooker combines convenience, efficiency, and reliability for Arizona kitchens. It provides the perfect tool for creating delicious rice dishes with minimal effort.
Product at a Glance
Product List:
Best AROMA Digital Rice Cooker in Arizona: Detailed Review
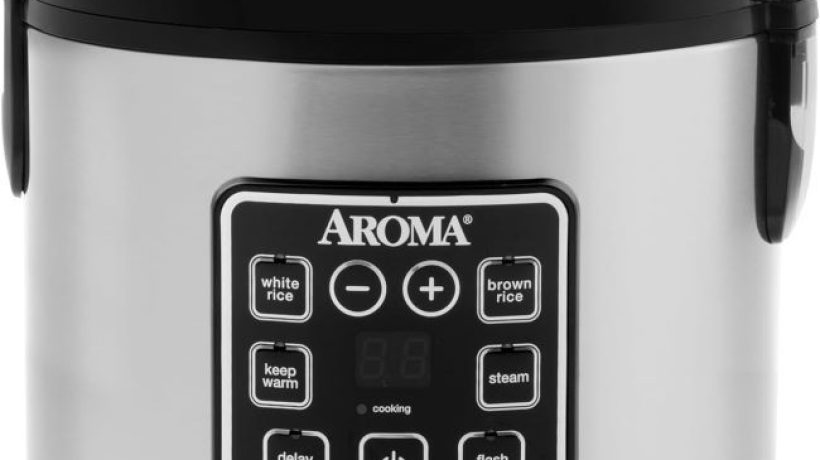
AROMA Digital Rice Cooker, 4-Cup (Uncooked) / 8-Cup (Cooked)
Why Best: Digital rice cooker with steamer and multicooker functions.
The AROMA Digital Rice Cooker delivers exceptional performance for Arizona kitchens. Its 4-cup uncooked capacity yields 8 cups of perfectly cooked rice. The digital controls provide precise settings for various grain types and cooking modes. This stainless steel exterior model ARC-914SBD combines style with functionality.
The rice cooker’s steamer function works well for vegetables, fish, and other foods. Its multicooker capabilities handle one-pot meals with ease. The 2-quart capacity suits small to medium families or meal prep for the week. This machine provides consistent results for various rice types, from white to brown to specialty grains.
The AROMA rice cooker’s keep-warm function maintains the perfect serving temperature for hours. Its automatic shut-off prevents overcooking and ensures safety. The non-stick inner pot makes cleanup easy and prevents rice from sticking. This rice cooker becomes an essential kitchen tool for Arizona residents who value convenience and consistency.

Key Features Table
| Feature | Description |
|---|---|
| Type | Digital rice cooker |
| Capacity | 4 cups uncooked / 8 cups cooked |
| Functions | Rice cooker, steamer, multicooker |
| Material | Stainless steel exterior |
| Size | 2 quarts |
| Model | ARC-914SBD |
| Use Cases | Rice, steaming, one-pot meals |
Pros & Cons Table
| Pros | Cons |
|---|---|
| Digital controls | Limited capacity |
| Versatile functions | Plastic interior |
| Consistent results | Requires counter space |
| Keep-warm function | Basic design |
| Automatic shut-off | Standard warranty |
| Non-stick pot | Limited color options |
| Easy cleanup | Higher price point |
Common Cleaning Tips
Regular cleaning maintains your AROMA rice cooker’s performance and longevity. Start by unplugging the machine and allowing it to cool completely after use. Remove the inner pot and wash it with warm, soapy water. Use a soft sponge or cloth to avoid scratching the non-stick surface. The exterior can be wiped down with a damp cloth.
For stubborn residue, soak the inner pot in warm, soapy water before cleaning. Avoid using abrasive scrubbers that could damage the non-stick coating. Clean the steam vent regularly to prevent clogs from rice starch buildup. Always ensure all components are completely dry before reassembling. Regular cleaning not only extends your rice cooker’s life but also ensures safe, hygienic cooking for your Arizona family.
Maintenance or Troubleshooting Tips
If your rice cooker isn’t cooking properly, check that the inner pot is properly seated and the machine is plugged in. For rice that’s undercooked, ensure you’re using the correct water-to-rice ratio for your grain type. If the machine won’t turn on, check the power cord and outlet for proper function.
If the rice cooker makes unusual noises, check for food debris in the heating element or under the inner pot. Clean the interior thoroughly to remove any obstructions. If the keep-warm function doesn’t work, ensure the machine is properly assembled and the settings are correct. For rice that sticks, check that you’re using enough water and the non-stick pot isn’t damaged. Regular maintenance prevents most common issues and keeps your AROMA rice cooker running smoothly.
What Real People Say — Voices from the Community
Arizona residents praise the AROMA Digital Rice Cooker for its consistency and versatility. Many highlight the digital controls for precise cooking of various grain types. Others love the steamer function for preparing complete meals in one appliance. The keep-warm feature receives compliments for maintaining perfect serving temperature.
Some users note the importance of the non-stick inner pot for easy cleanup. Others appreciate the compact size that fits well in their Arizona kitchens. The overall consensus is that the AROMA rice cooker provides excellent value and performance for Arizona homes, making it a smart investment for rice lovers.
Relevant FAQs
1. What is the capacity of the AROMA Digital Rice Cooker?
The AROMA Digital Rice Cooker has a 4-cup uncooked capacity that yields 8 cups of cooked rice. This size works well for small to medium families or meal prep for the week. It provides enough rice for most Arizona household needs.
2. What functions does the AROMA rice cooker offer?
The AROMA rice cooker offers rice cooking, steaming, and multicooker functions. This versatility makes it a true multicooker for various kitchen tasks. It handles everything from perfect rice to steamed vegetables to one-pot meals.
3. How do I clean the AROMA rice cooker?
Remove the inner pot after each use and wash with warm, soapy water. Wipe down the exterior with a damp cloth. Clean the steam vent regularly to prevent clogs. Always ensure all components are completely dry before reassembling.
4. Can I cook brown rice in the AROMA rice cooker?
Yes, the AROMA rice cooker works well for brown rice and other specialty grains. Use the appropriate water-to-rice ratio for your specific grain type. The digital controls provide precise settings for different rice varieties.
5. Does the AROMA rice cooker have a keep-warm function?
Yes, the AROMA Digital Rice Cooker features a keep-warm function. This maintains the perfect serving temperature for hours after cooking. It ensures your rice stays ready to serve when you need it.
6. What’s the difference between the AROMA Digital and basic rice cookers?
The AROMA Digital features precise digital controls and multiple cooking functions. Basic rice cookers typically have fewer settings and less versatility. The digital model provides more consistent results for various grain types and cooking modes.
Final Thought
The best AROMA Digital Rice Cooker in Arizona (AZ) offers a versatile, reliable solution for rice, steaming, and one-pot meals. Its digital controls, multiple functions, and consistent results make it perfect for Arizona kitchens. This rice cooker provides the perfect combination of convenience, efficiency, and value for your kitchen.
Invest in the AROMA Digital Rice Cooker to simplify your meal prep and enjoy perfect rice every time. Consider your specific needs for capacity, functions, and additional features. Choose a rice cooker that provides the performance and convenience your Arizona kitchen deserves. Create delicious, consistent rice dishes with this excellent multicooker.
Best Ninja Air Fryer in Tennessee (TN): Is It the Right Choice for Your Kitchen?
Tennessee’s love for Southern comfort food meets modern healthy cooking with the right air fryer. A quality machine delivers crispy results without the guilt or grease. It transforms your favorite dishes into lighter, healthier versions with ease.
The best Ninja Air Fryer in Tennessee (TN) offers a versatile solution for healthier cooking without sacrificing flavor. Its 4-in-1 functionality handles frying, roasting, reheating, and dehydrating with one appliance. This air fryer combines power, convenience, and efficiency for Tennessee kitchens. It provides the perfect tool for creating crispy, delicious meals with minimal oil.
Product at a Glance
Product List:
Best Ninja Air Fryer in Tennessee: Detailed Review
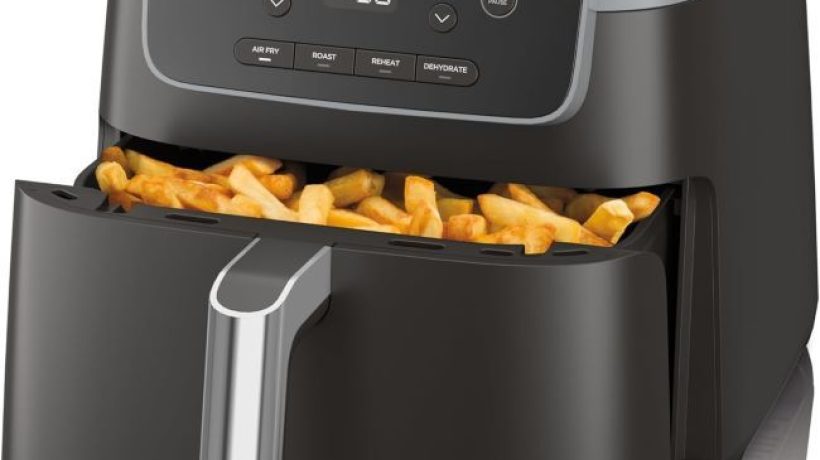
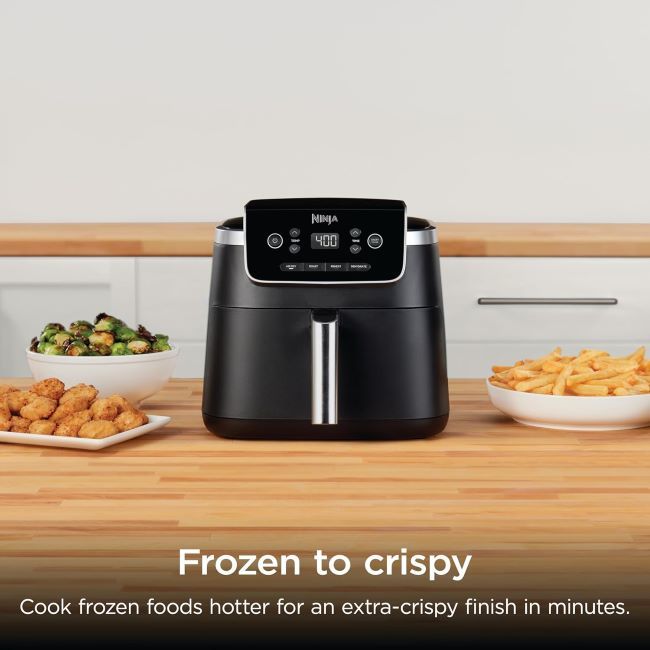
Ninja Air Fryer with Air Crisp | 5 QT Capacity
Why Best: 4-in-1 air fryer with Air Crisp technology for versatile cooking.
The Ninja Air Fryer with Air Crisp delivers exceptional performance for Tennessee kitchens. Its 5-quart capacity fits up to 4 pounds of fries or other foods. The 4-in-1 functionality includes Pro Air Fry, Roast, Reheat, and Dehydrate options. This grey model AF141 features a maximum temperature of 400°F for crispy results.
The 1750-watt power provides quick, even cooking for various dishes. Its nonstick basket and crisper plate make cleanup easy and prevent food from sticking. The compact design fits on most Tennessee kitchen countertops without taking up much space. This air fryer works well for everything from chicken wings to homemade fries to dehydrated snacks.
The Ninja Air Fryer’s Air Crisp technology circulates hot air efficiently for crispy, golden-brown results. Its precise temperature control ensures consistent cooking every time. The dishwasher-safe parts simplify cleanup after meal preparation. This machine becomes an essential tool for healthier cooking in Tennessee homes. It provides a convenient way to enjoy fried flavors without excess oil.
Key Features Table
| Feature | Description |
|---|---|
| Type | Air fryer |
| Capacity | 5 quarts |
| Functions | 4-in-1 |
| Max Temp | 400°F |
| Power | 1750 watts |
| Basket | Nonstick |
| Plate | Crisper plate |
| Color | Grey |
| Model | AF141 |
Pros & Cons Table
| Pros | Cons |
|---|---|
| 4-in-1 versatility | Requires counter space |
| 5 QT capacity | Higher price point |
| 400°F max temp | Limited to electric use |
| 1750W power | Needs regular cleaning |
| Nonstick basket | Standard warranty |
| Crisper plate | Bulkier design |
| Easy cleanup | Limited color options |
Common Cleaning Tips
Regular cleaning maintains your Ninja Air Fryer’s performance and longevity. Start by unplugging the machine and allowing it to cool completely after use. Remove the basket and crisper plate, then wash them with warm, soapy water. The nonstick coating makes cleanup easier and prevents food from sticking.
For stubborn residue, soak the basket and plate in warm, soapy water before scrubbing. Use a soft sponge or cloth to avoid scratching the nonstick surface. Wipe down the interior and exterior with a damp cloth to remove grease and fingerprints. Always ensure all components are completely dry before reassembling. Regular cleaning not only extends your air fryer’s life but also ensures safe, hygienic cooking for your Tennessee family.
Maintenance or Troubleshooting Tips
If your air fryer isn’t heating properly, check that it’s properly plugged in and the outlet is functioning. For machines that won’t turn on, ensure the basket is properly inserted and the door is closed. If food isn’t cooking evenly, rearrange the items in the basket for better air circulation.
If the air fryer makes unusual noises, check for food debris in the heating element or fan. Clean the interior thoroughly to remove any obstructions. If the temperature seems inconsistent, ensure the machine is on a stable, level surface. For machines that overheat, check that the vents aren’t blocked and the machine has proper airflow. Regular maintenance prevents most common issues and keeps your Ninja Air Fryer running smoothly.
What Real People Say — Voices from the Community
Tennessee home cooks praise the Ninja Air Fryer with Air Crisp for its versatility and performance. Many highlight the 4-in-1 functionality for handling various cooking tasks with one appliance. Others love the 5-quart capacity for preparing family-sized meals. The 400°F maximum temperature receives compliments for achieving crispy results.
Some users note the importance of the nonstick basket and crisper plate for easy cleanup. Others appreciate the 1750-watt power for quick, even cooking. The overall consensus is that the Ninja Air Fryer provides excellent value and performance for Tennessee kitchens, making it a smart investment for healthier cooking.
Relevant FAQs
1. What are the 4 functions of the Ninja Air Fryer?
The Ninja Air Fryer offers Pro Air Fry, Roast, Reheat, and Dehydrate functions. This versatility makes it a true multicooker for various cooking needs in your Tennessee kitchen. Each function provides optimal settings for different types of food preparation.
2. What is the capacity of the Ninja Air Fryer?
The Ninja Air Fryer has a 5-quart capacity. This size fits up to 4 pounds of fries or other foods. It works well for most family meal preparation needs in Tennessee kitchens.
3. What is the maximum temperature of the Ninja Air Fryer?
The Ninja Air Fryer features a maximum temperature of 400°F. This high temperature provides crispy, golden-brown results for various dishes. It works well for everything from frying to roasting to dehydrating.
4. How do I clean the Ninja Air Fryer?
Remove the basket and crisper plate after each use and wash with warm, soapy water. Wipe down the interior and exterior with a damp cloth. Avoid using abrasive scrubbers that could damage the nonstick surface. Always ensure all components are completely dry before reassembling.
5. Is the Ninja Air Fryer dishwasher safe?
The basket and crisper plate of the Ninja Air Fryer are typically dishwasher safe. However, hand washing is recommended to extend the air fryer’s life. The base should never be submerged in water. Always check the manufacturer’s instructions for your specific model.
6. What can I cook in the Ninja Air Fryer?
The Ninja Air Fryer works well for chicken wings, fries, roasted vegetables, and dehydrated snacks. Its versatile design handles various cooking tasks with ease. The 4-in-1 functionality provides optimal settings for different types of food preparation.
Final Thought
The best Ninja Air Fryer in Tennessee (TN) offers a versatile, efficient solution for healthier cooking. Its 4-in-1 functionality, 5-quart capacity, and 400°F maximum temperature make it perfect for Tennessee kitchens. This air fryer provides the perfect combination of convenience, performance, and value for your kitchen.
Invest in the Ninja Air Fryer to expand your cooking possibilities and enjoy crispy results without excess oil. Consider your specific needs for capacity, functions, and additional features. Choose an air fryer that provides the performance and convenience your Tennessee kitchen deserves. Transform your cooking routine with this excellent all-in-one appliance. To get even more from your countertop cooking setup, explore How to Cook Entire Meals Using a Smart Air Fryer Oven for practical tips on preparing complete, time-saving meals with multiple ingredients in a single appliance.
Best Ninja Kitchen System in North Carolina (NC): Perfect for Busy Families & Home Chefs?
North Carolina families need kitchen tools that keep up with their busy lifestyles. A versatile kitchen system replaces multiple appliances with one efficient machine. It transforms meal prep from a daily chore to a quick, enjoyable task.
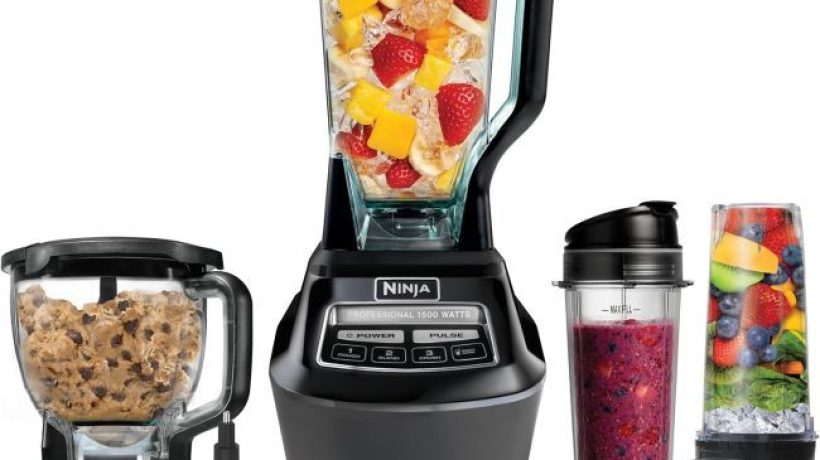
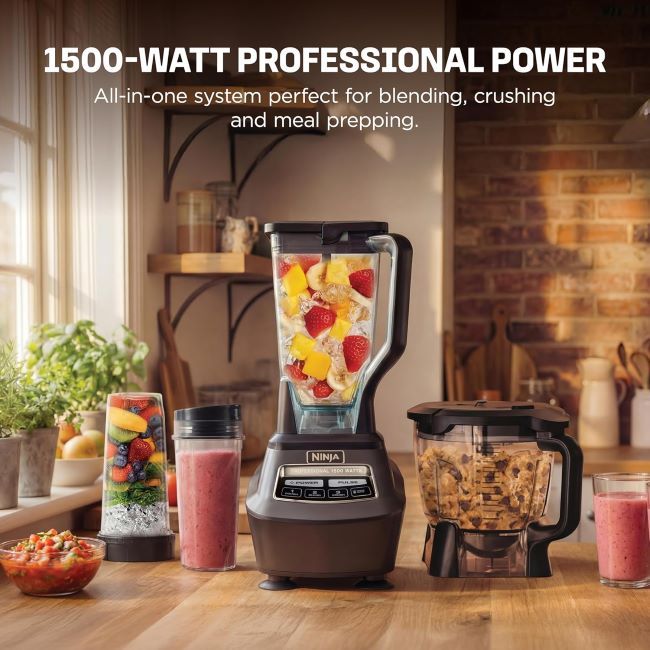
The best Ninja Kitchen System in North Carolina (NC) offers busy families and home chefs a versatile solution for various cooking needs. Its all-in-one design combines food processor and blender functions in one machine. This system handles everything from smoothies to dough with ease. It provides the perfect tool for creating quick, nutritious meals for North Carolina households.
Product at a Glance
Product List:
Best Ninja Kitchen System in North Carolina: Detailed Review
Ninja Kitchen System | All-in-One Food Processor & Blender
Why Best: All-in-one food processor and blender for versatile kitchen tasks.
The Ninja Kitchen System transforms your North Carolina kitchen into a versatile cooking hub. Its all-in-one design combines food processor and blender functions in a single machine. The 1500-watt motor provides powerful performance for various kitchen tasks. This black model BL770 includes a pitcher, two 16-ounce to-go cups, and an 8-cup bowl.
The system makes smoothies, salsa, dough, shakes, and frozen drinks with ease. Its versatile design handles everything from blending to food processing with one appliance. The included accessories provide multiple serving options for different recipes. This kitchen system becomes an essential tool for busy North Carolina families and home chefs.
The Ninja Kitchen System’s powerful motor crushes ice, blends frozen fruits, and processes tough ingredients with ease. Its food processor function handles chopping, mixing, and dough preparation. The blender function creates smooth, consistent results for drinks and sauces. This system provides comprehensive kitchen capabilities in one compact machine.
Key Features Table
| Feature | Description |
|---|---|
| Type | Kitchen system |
| Functions | Food processor & blender |
| Power | 1500W |
| Included | Pitcher, 2x 16oz cups, 8-cup bowl |
| Color | Black |
| Model | BL770 |
| Use Cases | Smoothies, salsa, dough, shakes, frozen drinks |
Pros & Cons Table
| Pros | Cons |
|---|---|
| All-in-one versatility | Higher price point |
| 1500W power | Bulkier design |
| Multiple accessories | Requires counter space |
| Versatile use | Needs regular cleaning |
| Powerful motor | Limited color options |
| Comprehensive functions | Complex setup |
| Durable construction | Standard warranty |
Common Cleaning Tips
Regular cleaning maintains your Ninja Kitchen System’s performance and hygiene. Start by unplugging the machine and disassembling the removable parts after each use. Wash the pitcher, cups, bowl, and lids with warm, soapy water. Use a soft brush to clean the blade assemblies and remove any food residue.
For stubborn residue, soak the parts in warm, soapy water before cleaning. Avoid using abrasive scrubbers that could damage the plastic components. Wipe down the base with a damp cloth to remove splatters and fingerprints. Always ensure all components are completely dry before reassembling. Regular cleaning not only extends your kitchen system’s life but also ensures safe, hygienic food preparation for your North Carolina family.
Maintenance or Troubleshooting Tips
If your Ninja Kitchen System isn’t blending properly, check that all parts are correctly assembled and the lid is properly secured. For machines that won’t turn on, ensure it’s properly plugged in and the outlet is functioning. If the motor seems weak, check for food obstructions in the blade assemblies and clean thoroughly.
If the machine makes unusual noises, inspect for loose parts or foreign objects in the blade assemblies. For leaks, ensure all parts are properly assembled and not damaged. If the food processor function doesn’t work correctly, check that you’re using the correct blade and setting for your task. Regular maintenance prevents most common issues and keeps your Ninja Kitchen System running smoothly.
What Real People Say — Voices from the Community
North Carolina families praise the Ninja Kitchen System for its versatility and performance. Many highlight the all-in-one design for replacing multiple kitchen appliances. Others love the powerful 1500-watt motor for handling tough ingredients with ease. The included accessories receive compliments for providing multiple serving options.
Some users note the importance of the comprehensive functions for creating various recipes. Others appreciate the to-go cups for easy portability of their creations. The overall consensus is that the Ninja Kitchen System provides excellent value and performance for North Carolina kitchens, making it a smart investment for busy families and home chefs.
Relevant FAQs
1. What comes with the Ninja Kitchen System?
The Ninja Kitchen System includes a pitcher, two 16-ounce to-go cups, and an 8-cup bowl. These accessories provide multiple serving options for different recipes. The system also includes the necessary blades for both blending and food processing functions.
2. What can I make with the Ninja Kitchen System?
The Ninja Kitchen System makes smoothies, salsa, dough, shakes, and frozen drinks. Its versatile design handles various kitchen tasks with ease. The food processor function works well for chopping, mixing, and dough preparation. The blender function creates smooth, consistent results for drinks and sauces.
3. How powerful is the Ninja Kitchen System?
The Ninja Kitchen System features a 1500-watt motor. This powerful motor handles tough ingredients like ice, frozen fruits, and tough vegetables with ease. It provides consistent, smooth results for various recipes in your North Carolina kitchen.
4. Is the Ninja Kitchen System dishwasher safe?
The removable parts of the Ninja Kitchen System are typically dishwasher safe. However, hand washing is recommended to extend the system’s life. The base should never be submerged in water. Always check the manufacturer’s instructions for your specific model.
5. How do I clean the Ninja Kitchen System?
Disassemble the removable parts and wash with warm, soapy water after each use. Use a soft brush to clean the blade assemblies. Wipe down the base with a damp cloth. Always ensure all components are completely dry before reassembling.
6. What’s the difference between the Ninja Kitchen System and a regular blender?
The Ninja Kitchen System combines food processor and blender functions in one machine. It includes multiple accessories for different tasks. A regular blender typically only handles blending functions. The Kitchen System provides more versatility for various kitchen tasks.
Final Thought
The best Ninja Kitchen System in North Carolina (NC) offers busy families and home chefs a versatile solution for various cooking needs. Its all-in-one design, powerful motor, and comprehensive functions make it perfect for North Carolina kitchens. This system provides the perfect combination of convenience, efficiency, and versatility.
Invest in the Ninja Kitchen System to simplify your meal prep and expand your cooking possibilities. Consider your specific needs for capacity, functions, and additional features. Choose a kitchen system that provides the performance and convenience your North Carolina kitchen deserves. Create quick, nutritious meals with this excellent all-in-one appliance. If you’re comparing different Ninja appliances, Ninja QB900B Master Prep Review provides a closer look at another popular blending and food preparation system, helping you evaluate its features, performance, and value before making your final choice.