
Affordable OXO Good Grips Salad Spinner in Nevada (NV): Perfect for Washing Fruits & Vegetables?
Nevada’s dry climate makes fresh produce a precious commodity for healthy eating. A quality salad spinner removes excess water and dirt from fruits and vegetables quickly. It transforms your prep time from tedious to efficient with minimal effort.
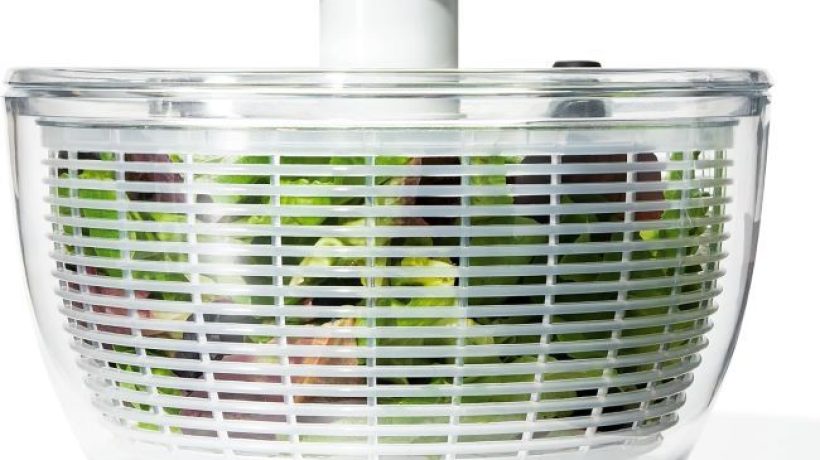
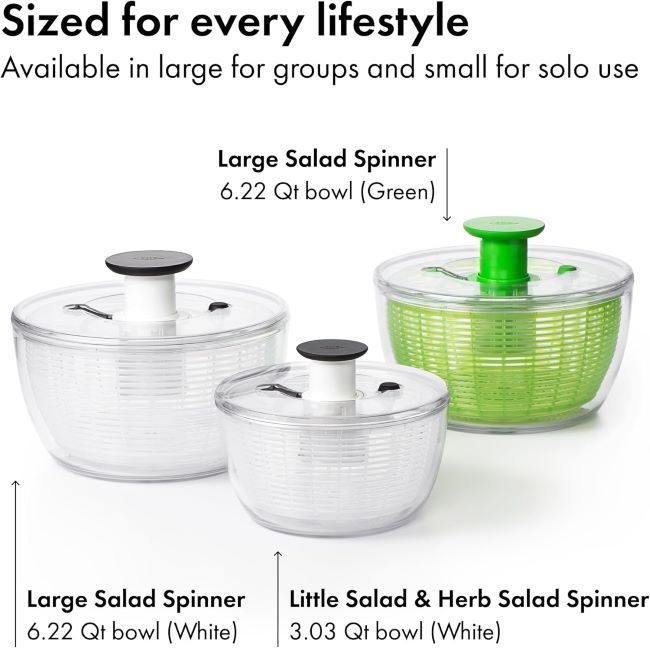
The affordable OXO Good Grips Salad Spinner in Nevada (NV) offers a practical solution for washing fruits and vegetables. Its 6.22-quart capacity handles large batches of produce with ease. This spinner combines efficiency, durability, and convenience for Nevada kitchens. It provides the perfect tool for preparing fresh, clean produce for your family meals.
Product at a Glance
Product List:
Affordable OXO Good Grips Salad Spinner in Nevada: Detailed Review
OXO Good Grips Salad Spinner | Lettuce Spinner | Fruit Washer
Why Best: Versatile spinner for washing lettuce, fruits, and vegetables.
The OXO Good Grips Salad Spinner provides an efficient way to wash and dry produce in Nevada kitchens. Its 6.22-quart capacity handles large batches of lettuce, fruits, and vegetables. The salad spinner design includes a strainer basket that fits inside the bowl. This allows for easy washing and spinning to remove excess water.
The spinner’s pump mechanism provides quick, effortless operation with one hand. Its durable construction withstands regular use in busy Nevada kitchens. The non-slip base keeps the spinner stable during use. This salad spinner works well for various produce types, from delicate greens to heartier vegetables.
The OXO spinner’s compact design fits easily in most kitchen cabinets or on the countertop. Its BPA-free materials ensure safe food preparation for your family. The strainer basket doubles as a colander for other kitchen tasks. This versatile tool becomes an essential part of your Nevada kitchen for preparing fresh, clean produce.
Key Features Table
| Feature | Description |
|---|---|
| Type | Salad spinner |
| Capacity | 6.22 quarts |
| Use Cases | Lettuce, fruits, vegetables |
| Mechanism | Pump |
| Design | Strainer basket |
| Base | Non-slip |
| Materials | BPA-free |
Pros & Cons Table
| Pros | Cons |
|---|---|
| Large capacity | Requires storage space |
| One-hand operation | Plastic construction |
| Versatile use | Limited to manual operation |
| Non-slip base | Needs regular cleaning |
| BPA-free materials | Standard warranty |
| Compact design | Higher price point |
| Durable construction | Limited color options |
Common Cleaning Tips
Regular cleaning maintains your OXO salad spinner’s performance and hygiene. Start by disassembling the spinner after each use. Wash the bowl, strainer basket, and lid with warm, soapy water. Use a soft brush to clean the strainer’s small holes where dirt can accumulate.
For stubborn residue, soak the parts in warm, soapy water before cleaning. Avoid using abrasive scrubbers that could damage the plastic components. The pump mechanism requires special attention to prevent food buildup. Always ensure all components are completely dry before storing to prevent mold and bacteria growth. Regular cleaning not only extends the spinner’s life but also ensures safe food preparation.
Maintenance or Troubleshooting Tips
If your spinner’s pump mechanism becomes stiff, check for food debris in the mechanism and clean thoroughly. For spinners that don’t spin properly, ensure the strainer basket is properly seated in the bowl. If the non-slip base loses its grip, clean it with a damp cloth to remove any residue.
If the spinner develops an odor, soak the parts in a vinegar and water solution to kill bacteria. For strainer baskets that become clogged, use a small brush or pipe cleaner to remove debris from the holes. If the spinner leaks, check that all parts are properly assembled and not damaged. Regular maintenance prevents most common issues and keeps your OXO salad spinner running smoothly.
What Real People Say — Voices from the Community
Nevada residents praise the OXO Good Grips Salad Spinner for its efficiency and versatility. Many highlight the large capacity for handling big batches of produce. Others love the one-hand pump operation for quick, easy use. The non-slip base receives compliments for providing stability during spinning.
Some users note the importance of the BPA-free materials for safe food preparation. Others appreciate the strainer basket’s versatility for other kitchen tasks. The overall consensus is that the OXO spinner provides excellent performance and convenience for Nevada kitchens, making it a smart investment for produce preparation.
Relevant FAQs
1. What is the capacity of the OXO Good Grips Salad Spinner?
The OXO Good Grips Salad Spinner has a 6.22-quart capacity. This size handles large batches of lettuce, fruits, and vegetables. It works well for most family meal preparation needs in Nevada kitchens.
2. Can I use the OXO spinner for other tasks besides washing produce?
Yes, the strainer basket works well as a colander for draining pasta or rinsing other foods. The bowl can also be used for serving or storing produce. This versatility makes it a valuable addition to your Nevada kitchen.
3. How do I clean the OXO salad spinner?
Disassemble the spinner and wash all parts with warm, soapy water after each use. Use a soft brush to clean the strainer’s small holes. Ensure all components are completely dry before storing to prevent mold and bacteria growth.
4. Is the OXO Good Grips Salad Spinner dishwasher safe?
The OXO Good Grips Salad Spinner is top-rack dishwasher safe. However, hand washing is recommended to extend the spinner’s life. The pump mechanism may be damaged by the dishwasher’s heat and water pressure over time.
5. How does the pump mechanism work?
The pump mechanism uses a simple up-and-down motion to spin the strainer basket. This creates centrifugal force that removes water from the produce. The one-hand operation makes it easy to use while holding the bowl with the other hand.
6. Can I use the OXO spinner for delicate greens?
Yes, the OXO spinner works well for delicate greens like lettuce and spinach. The gentle spinning action removes excess water without damaging the leaves. This makes it perfect for preparing fresh salads in your Nevada kitchen.
Final Thought
The affordable OXO Good Grips Salad Spinner in Nevada (NV) offers a practical solution for washing fruits and vegetables. Its large capacity, one-hand operation, and versatile design make it perfect for Nevada kitchens. This spinner provides the perfect combination of efficiency, durability, and convenience for produce preparation.
Invest in the OXO Good Grips Salad Spinner to simplify your produce preparation routine. Consider your specific needs for capacity, versatility, and storage space. Choose a spinner that provides the performance and convenience your Nevada kitchen deserves. Enjoy fresh, clean produce with this excellent kitchen tool. If you’re planning healthier meals, What Types of Food Are Best for Indoor Grilling? offers ideas for grilling vegetables, lean proteins, and other fresh ingredients that pair perfectly with crisp, freshly washed salads.
Affordable Ninja Nutri-Blender Pro with Auto-iQ in Washington (WA): A Smart Upgrade for Smoothies, Shakes & More?
Washington’s health-conscious lifestyle demands a blender that keeps up with active routines. A quality machine transforms ingredients into smooth, nutritious drinks with ease. It makes healthy living convenient and delicious for busy residents.
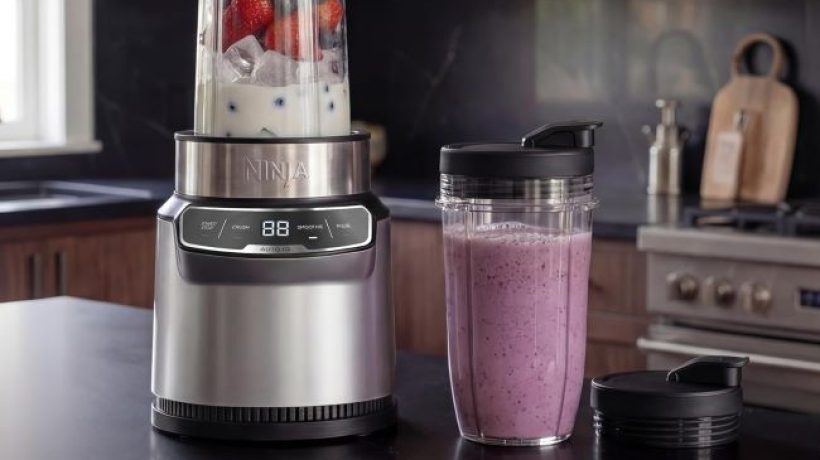
The affordable Ninja Nutri-Blender Pro with Auto-iQ in Washington (WA) offers a smart solution for smoothies, shakes, and more. Its Auto-iQ technology provides intelligent blending programs for perfect results. This blender combines power, convenience, and versatility for Washington kitchens. It provides the perfect tool for creating nutritious drinks and meals with minimal effort.
Product at a Glance
Product List:
Affordable Ninja Nutri-Blender Pro with Auto-iQ in Washington: Detailed Review
Ninja Nutri-Blender Pro with Auto-iQ | For Smoothies, Shakes, Frozen Drinks, Salsa, Dips
Why Best: Powerful blender with Auto-iQ technology and to-go cups.
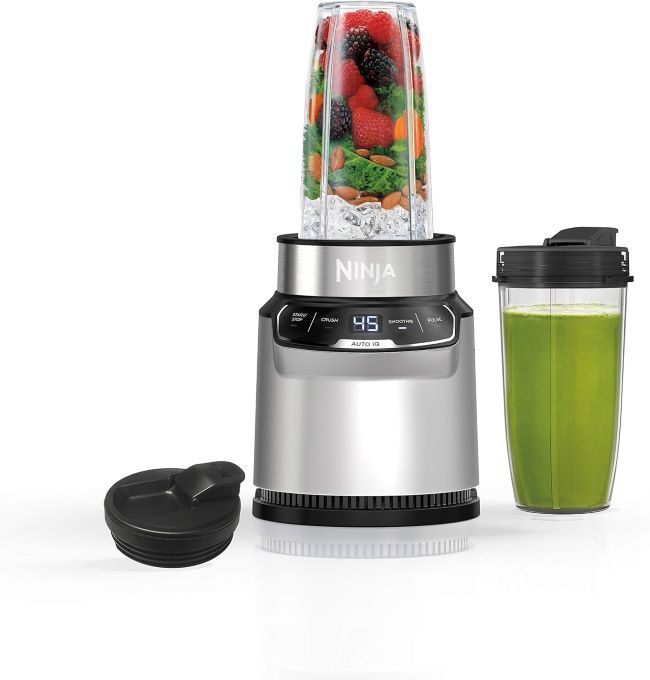
The Ninja Nutri-Blender Pro with Auto-iQ delivers exceptional blending performance for Washington’s health-focused residents. Its 1100-peak-watt motor handles tough ingredients with ease. The Auto-iQ technology provides intelligent programs that combine timed pulsing, blending, and pausing patterns. This ensures perfect results for smoothies, shakes, frozen drinks, salsa, and dips.
The included 2 24-ounce to-go cups with spout lids make it easy to blend and take your creations on the go. The silver design adds a sleek touch to your kitchen countertop. This model BN401 combines power and convenience for busy Washington lifestyles. It provides a smart upgrade for anyone looking to create nutritious drinks and meals quickly.
The Nutri-Blender Pro’s versatile design works well for various recipes beyond just drinks. Its powerful motor crushes ice, blends frozen fruits, and processes tough ingredients with ease. The to-go cups allow for easy portion control and portability. This blender becomes an essential kitchen tool for Washington residents who value health and convenience.
Key Features Table
| Feature | Description |
|---|---|
| Type | Nutri-Blender Pro |
| Technology | Auto-iQ |
| Use Cases | Smoothies, shakes, frozen drinks, salsa, dips |
| Cups | 2 x 24-oz to-go cups |
| Lids | Spout lids |
| Power | 1100-peak-watt |
| Color | Silver |
| Model | BN401 |
Pros & Cons Table
| Pros | Cons |
|---|---|
| Auto-iQ technology | Higher price point |
| 1100W power | Bulkier design |
| 2 to-go cups | Requires counter space |
| Versatile use | Needs regular cleaning |
| Spout lids included | Limited color options |
| Powerful motor | Standard warranty |
| Smart programs | Complex setup |
Common Cleaning Tips
Regular cleaning maintains your Ninja Nutri-Blender Pro’s performance and hygiene. Start by unplugging the blender and disassembling the removable parts. Wash the cups, lids, and blades with warm, soapy water after each use. Use a soft brush to clean the blade assembly and remove any food residue.
For stubborn residue, soak the parts in warm, soapy water before cleaning. Avoid using abrasive scrubbers that could damage the plastic components. Wipe down the base with a damp cloth to remove splatters and fingerprints. Always ensure all components are completely dry before reassembling. Regular cleaning not only extends your blender’s life but also ensures safe, hygienic use for your Washington family.
Maintenance or Troubleshooting Tips
If your blender isn’t blending properly, check that all parts are correctly assembled and the lid is properly secured. For machines that won’t turn on, ensure it’s properly plugged in and the outlet is functioning. If the motor seems weak, check for food obstructions in the blade assembly and clean thoroughly.
If the blender makes unusual noises, inspect for loose parts or foreign objects in the blade assembly. For machines that leak, ensure the cups and lids are properly assembled and not damaged. If the Auto-iQ programs don’t work correctly, check the control panel for proper operation. Regular maintenance prevents most common issues and keeps your Ninja Nutri-Blender Pro running smoothly.
What Real People Say — Voices from the Community
Washington residents praise the Ninja Nutri-Blender Pro with Auto-iQ for its performance and convenience. Many highlight the Auto-iQ technology for its intelligent blending programs. Others love the included to-go cups for easy portability of their creations. The 1100-peak-watt motor receives compliments for handling tough ingredients with ease.
Some users note the importance of the versatile design for creating various recipes beyond just smoothies. Others appreciate the spout lids for easy pouring and drinking on the go. The overall consensus is that the Nutri-Blender Pro provides excellent value and performance for Washington kitchens, making it a smart upgrade for health-conscious residents.
Relevant FAQs
1. What is Auto-iQ technology?
Auto-iQ is Ninja’s intelligent blending technology that combines timed pulsing, blending, and pausing patterns. It automatically adjusts the blending process for different recipes. This ensures perfect results for smoothies, shakes, and other creations with minimal effort.
2. What comes with the Ninja Nutri-Blender Pro?
The Nutri-Blender Pro comes with 2 24-ounce to-go cups and spout lids. These allow for easy blending and portability of your creations. The cups work well for individual servings and on-the-go consumption.
3. How powerful is the Ninja Nutri-Blender Pro?
The Nutri-Blender Pro features a 1100-peak-watt motor. This powerful motor handles tough ingredients like ice, frozen fruits, and tough vegetables with ease. It provides consistent, smooth results for various recipes.
4. Can I use the Ninja Nutri-Blender Pro for hot liquids?
No, the Ninja Nutri-Blender Pro is not designed for hot liquids. The to-go cups and lids are not suitable for hot contents. For hot liquids, consider a blender specifically designed for that purpose.
5. How do I clean the Ninja Nutri-Blender Pro?
Disassemble the removable parts and wash with warm, soapy water after each use. Use a soft brush to clean the blade assembly. Wipe down the base with a damp cloth. Always ensure all components are completely dry before reassembling.
6. What recipes can I make with the Ninja Nutri-Blender Pro?
The Nutri-Blender Pro works well for smoothies, shakes, frozen drinks, salsa, and dips. Its versatile design handles various recipes with ease. The Auto-iQ programs provide optimal settings for different creations.
Final Thought
The affordable Ninja Nutri-Blender Pro with Auto-iQ in Washington (WA) offers a smart upgrade for smoothies, shakes, and more. Its Auto-iQ technology, powerful motor, and to-go cups provide convenience and versatility. This blender makes healthy living easy and delicious for Washington residents.
Invest in the Ninja Nutri-Blender Pro to simplify your blending routine and expand your recipe possibilities. Consider your specific needs for power, capacity, and additional features. Choose a blender that provides the performance and convenience your Washington kitchen deserves. Create nutritious, delicious drinks and meals with this excellent smart upgrade. If you’re comparing Ninja models before making a decision, Ninja QB900B Master Prep Review examines another popular blender and food processor, highlighting its features, performance, and value to help you choose the best option for your kitchen.
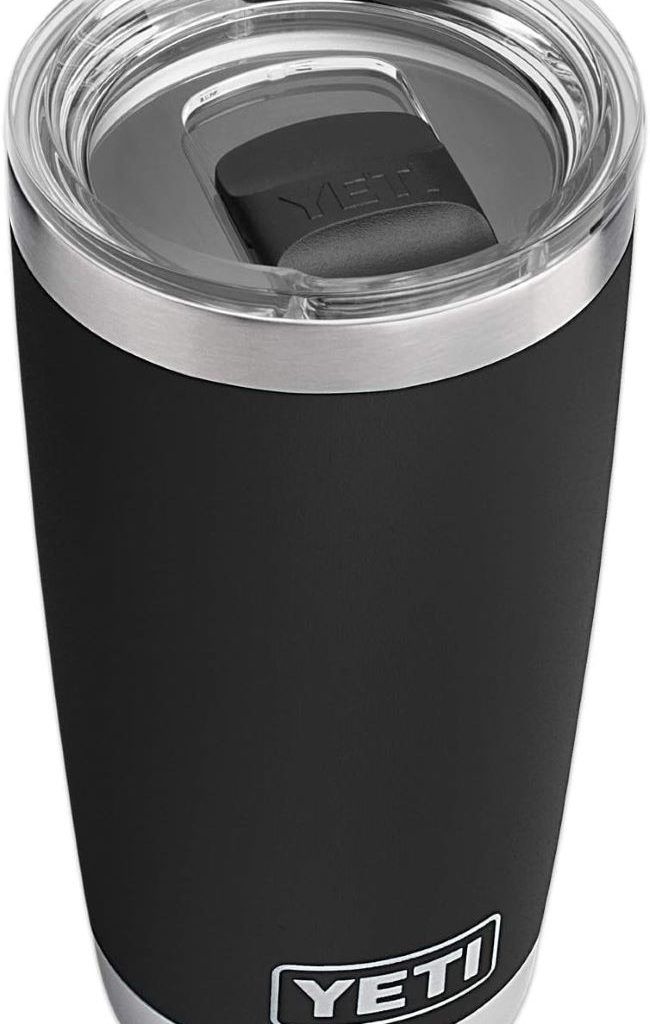
Affordable YETI Rambler 20 oz Tumbler in Utah (UT): Perfect for Work, Travel And Outdoor Adventures?

Utah’s outdoor lifestyle demands reliable hydration gear for every adventure. A quality tumbler keeps your drinks cold or hot for hours while withstanding rugged use. It transforms your hydration from a simple task to a seamless experience across all environments.
The affordable YETI Rambler 20 oz Tumbler in Utah (UT) offers a durable solution for work, travel, and outdoor activities. Its vacuum insulation maintains drink temperatures for extended periods. This stainless steel tumbler combines durability, portability, and style for Utah’s active residents. It provides the perfect companion for desk work, road trips, or mountain hikes.
Product at a Glance
Product List:
Affordable YETI Rambler 20 oz Tumbler in Utah: Detailed Review
YETI Rambler 20 oz Stainless Steel Vacuum Insulated Tumbler w/MagSlider Lid
Why Best: Premium vacuum insulated tumbler with MagSlider lid for versatile use.
The YETI Rambler 20 oz Tumbler delivers exceptional performance for Utah’s demanding lifestyle. Its vacuum insulation keeps drinks cold for up to 12 hours or hot for up to 6 hours. The stainless steel construction provides durability for both indoor and outdoor use. This tumbler handles the rigors of daily life with ease.
The MagSlider lid offers a strong magnetic seal that prevents spills while allowing for easy sipping. Its compact 20-ounce size fits most cup holders and backpack pockets. The tumbler’s narrow mouth makes it easy to drink from while preventing splashes. This design works well for coffee, water, tea, or your favorite beverages.
The YETI Rambler’s durable construction withstands drops, dings, and daily wear. Its sweat-free exterior prevents condensation rings on your desk or in your bag. The tumbler’s simple yet effective design makes it a favorite among Utah residents. It provides reliable hydration for workdays, commutes, or backcountry adventures.
Key Features Table
| Feature | Description |
|---|---|
| Type | Tumbler |
| Material | Stainless steel |
| Insulation | Vacuum |
| Capacity | 20 oz |
| Lid | MagSlider |
| Temperature Retention | Cold 12h, Hot 6h |
| Use Cases | Work, travel, outdoor |
Pros & Cons Table
| Pros | Cons |
|---|---|
| Vacuum insulation | Higher price point |
| MagSlider lid | Limited to 20 oz |
| Durable construction | Requires hand washing |
| Sweat-free exterior | Bulkier than some tumblers |
| Versatile use | Standard features |
| Temperature retention | Limited color options |
| Compact size | No straw lid included |
Common Cleaning Tips
Regular cleaning maintains your YETI Rambler’s performance and hygiene. Hand wash the tumbler with warm, soapy water after each use. Use a bottle brush to clean the interior and reach the bottom. For the MagSlider lid, disassemble it and clean each component separately. Avoid using abrasive scrubbers that could scratch the stainless steel finish.
For stubborn stains or odors, use a baking soda and water solution to soak the tumbler. Rinse thoroughly after cleaning to remove any residue. The narrow mouth makes it easy to add cleaning agents and ice. Always allow the tumbler to air dry completely before storing. Regular cleaning not only keeps your Rambler looking good but also ensures fresh-tasting hydration.
Maintenance or Troubleshooting Tips
If your tumbler develops an odor, try soaking it in a vinegar and water solution overnight. For lids that don’t seal properly, check that the MagSlider is properly aligned and clean. If the tumbler’s insulation performance decreases, check for damage to the vacuum seal. For scratches on the exterior, use a stainless steel polish to restore the finish.
If the MagSlider lid becomes difficult to open, check for debris in the mechanism and clean thoroughly. For tumblers that leak, ensure the lid is properly closed and the seal is clean. If the exterior shows signs of wear, the durable stainless steel construction typically withstands daily use well. Regular maintenance prevents most common issues and keeps your YETI Rambler performing at its best.
What Real People Say — Voices from the Community
Utah residents praise the YETI Rambler 20 oz Tumbler for its durability and temperature retention. Many highlight the vacuum insulation for keeping drinks cold during hot summer hikes. Others love the MagSlider lid for its strong seal and easy sipping. The stainless steel construction receives compliments for withstanding Utah’s rugged outdoor conditions.
Some users note the importance of the 20-ounce size for fitting in cup holders and backpacks. Others appreciate the sweat-free exterior that prevents condensation on their desks. The overall consensus is that the YETI Rambler provides excellent performance and durability for Utah’s active lifestyle.
Relevant FAQs
1. How long does the YETI Rambler keep drinks cold?
The YETI Rambler 20 oz Tumbler keeps drinks cold for up to 12 hours with ice. This makes it perfect for Utah’s hot summer days and outdoor adventures. The insulation performance may vary based on external temperatures and usage.
2. Is the YETI Rambler dishwasher safe?
No, the YETI Rambler is not dishwasher safe. Hand washing is recommended to maintain the tumbler’s performance and appearance. This ensures the vacuum insulation and finish remain in good condition for years of use.
3. What’s the difference between the Rambler and other YETI tumblers?
The Rambler features a narrower mouth and a more compact design compared to other YETI tumblers. It’s specifically designed for easy drinking and portability. The MagSlider lid provides a strong magnetic seal that prevents spills.
4. Can I use the YETI Rambler for hot drinks?
Yes, the YETI Rambler works well for hot drinks like coffee or tea. It keeps hot beverages warm for up to 6 hours. The insulated stainless steel construction maintains temperature for both hot and cold drinks.
5. Does the YETI Rambler fit in standard cup holders?
Yes, the 20-ounce YETI Rambler is designed to fit most standard cup holders. This makes it perfect for commutes, road trips, and outdoor activities where you need to keep your drink secure.
6. How do I clean the MagSlider lid?
Disassemble the MagSlider lid and wash each component with warm, soapy water. Use a soft brush to clean the magnetic seal. Ensure all parts are completely dry before reassembling. Regular cleaning maintains the lid’s performance and prevents odors.
Final Thought
The affordable YETI Rambler 20 oz Tumbler in Utah (UT) offers a premium solution for everyday hydration needs. Its vacuum insulation, MagSlider lid, and durable construction make it perfect for work, travel, and outdoor adventures. This tumbler provides the perfect combination of performance, durability, and style for Utah’s active lifestyle.
Invest in the YETI Rambler 20 oz Tumbler to simplify your daily hydration routine. Consider your specific needs for capacity, lid features, and intended use. Choose a tumbler that provides the performance and convenience your Utah lifestyle deserves. Stay hydrated in style with this excellent everyday companion.
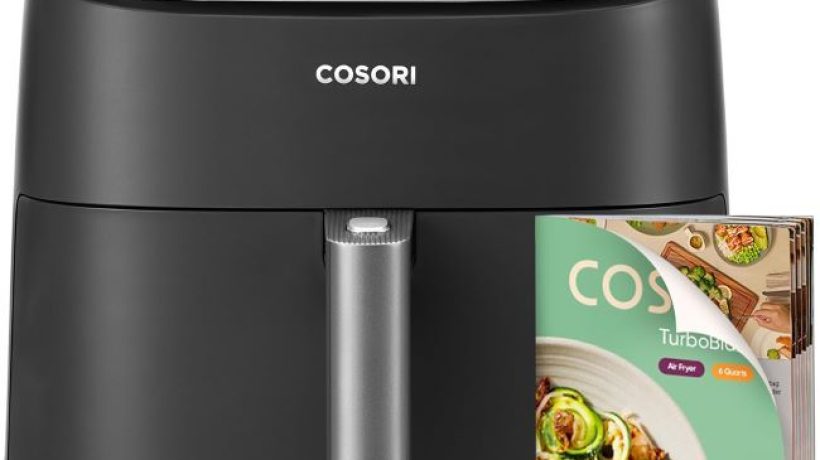
Affordable Cosori 9-in-1 TurboBlaze Air Fryer in Georgia (GA): Is It the Best Budget Air Fryer?
Georgia’s love for fried food meets modern healthy cooking with the right air fryer. A quality machine delivers crispy results without the guilt or grease. It transforms your favorite Southern dishes into lighter, healthier versions.
The affordable Cosori 9-in-1 TurboBlaze Air Fryer in Georgia (GA) offers a versatile solution for healthier cooking. Its 9 cooking functions handle everything from frying to baking with ease. This air fryer combines precise heating, even results, and a PFAS-free ceramic coating. It provides the perfect tool for Georgia kitchens looking to enjoy crispy food without excess oil.
Product at a Glance
Product List:
Affordable Cosori 9-in-1 TurboBlaze Air Fryer in Georgia: Detailed Review
Cosori 9-in-1 TurboBlaze Air Fryer 6 Qt
Why Best: 9-in-1 air fryer with precise heating and PFAS-free coating.
The Cosori 9-in-1 TurboBlaze Air Fryer delivers exceptional versatility for Georgia kitchens. Its 9 cooking functions include air fry, roast, bake, broil, dry, frozen, proof, reheat, and keep warm. The 6-quart capacity handles family-sized meals with ease. This dark gray air fryer features a PFAS-free ceramic coating for safer cooking.
The precise heating system ensures even results every time. Its temperature range from 90° to 450°F provides flexibility for various recipes. The TurboBlaze technology circulates hot air efficiently for crispy, golden-brown results. This air fryer works well for everything from chicken wings to homemade fries to baked goods.
The Cosori air fryer’s compact design fits on most Georgia kitchen countertops. Its intuitive controls make operation simple for cooks of all skill levels. The dishwasher-safe parts simplify cleanup after meal preparation. This machine becomes an essential tool for healthier cooking in Georgia homes. It provides a budget-friendly way to enjoy fried flavors without the guilt.

Key Features Table
| Feature | Description |
|---|---|
| Functions | 9-in-1 |
| Capacity | 6 quarts |
| Temperature Range | 90°–450°F |
| Coating | PFAS-free ceramic |
| Technology | TurboBlaze |
| Voltage | 120V |
| Color | Dark gray |
Pros & Cons Table
| Pros | Cons |
|---|---|
| 9-in-1 versatility | Learning curve |
| 6-quart capacity | Requires counter space |
| Precise heating | Higher price point |
| PFAS-free coating | Limited to electric use |
| Even results | Needs regular cleaning |
| TurboBlaze tech | Standard warranty |
| Dishwasher-safe parts | Bulkier design |
Common Cleaning Tips
Regular cleaning maintains your Cosori air fryer’s performance and longevity. Start by unplugging the machine and allowing it to cool completely after use. Remove the basket and pan, then wash them with warm, soapy water. The PFAS-free ceramic coating makes cleanup easier and safer.
For stubborn residue, soak the basket and pan in warm, soapy water before scrubbing. Use a soft sponge or cloth to avoid scratching the ceramic coating. Wipe down the exterior with a damp cloth to remove grease and fingerprints. Always ensure all components are completely dry before reassembling. Regular cleaning not only extends your air fryer’s life but also ensures safe, hygienic cooking for your Georgia family.
Maintenance or Troubleshooting Tips
If your air fryer isn’t heating properly, check that it’s properly plugged in and the outlet is functioning. For machines that won’t turn on, ensure the basket is properly inserted and the door is closed. If food isn’t cooking evenly, rearrange the items in the basket for better air circulation.
If the air fryer makes unusual noises, check for food debris in the heating element or fan. Clean the interior thoroughly to remove any obstructions. If the temperature seems inconsistent, ensure the machine is on a stable, level surface. For machines that overheat, check that the vents aren’t blocked and the machine has proper airflow. Regular maintenance prevents most common issues and keeps your Cosori air fryer running smoothly.
What Real People Say — Voices from the Community
Georgia home cooks praise the Cosori 9-in-1 TurboBlaze Air Fryer for its versatility and performance. Many highlight the 9 cooking functions for handling various recipes with one appliance. Others love the precise heating system for consistent, even results every time. The PFAS-free ceramic coating receives compliments for providing safer cooking.
Some users note the importance of the 6-quart capacity for family meals. Others appreciate the TurboBlaze technology for achieving crispy results without excess oil. The overall consensus is that the Cosori air fryer provides excellent value and performance for Georgia kitchens, making it a smart investment for healthier cooking.
Relevant FAQs
1. What are the 9 functions of the Cosori TurboBlaze?
The Cosori TurboBlaze offers air fry, roast, bake, broil, dry, frozen, proof, reheat, and keep warm functions. This versatility makes it a true multicooker for various cooking needs in your Georgia kitchen.
2. Is the 6-quart capacity right for my family?
The 6-quart capacity works well for most families of 3-5 people. It can handle a whole chicken, 4-6 servings of fries, or a batch of cookies. For larger families or frequent entertaining, consider the 8-quart model. For singles or couples, the 3-5 quart might be more appropriate.
3. What is PFAS-free ceramic coating?
PFAS-free ceramic coating means the air fryer basket doesn’t contain per- and polyfluoroalkyl substances. These are chemicals often found in non-stick coatings. The Cosori’s ceramic coating provides a safer, non-toxic alternative that’s still easy to clean and durable.
4. How do I clean the Cosori air fryer?
Remove the basket and pan after each use and wash with warm, soapy water. Wipe down the interior and exterior with a damp cloth. Avoid using abrasive scrubbers that could damage the ceramic coating. Always ensure all components are completely dry before reassembling.
5. What’s the temperature range of the Cosori TurboBlaze?
The Cosori TurboBlaze features a temperature range from 90° to 450°F. This wide range provides flexibility for various cooking tasks. Lower temperatures work for dehydrating or keeping food warm, while higher temperatures achieve crispy results.
6. Can I cook frozen foods directly in the Cosori air fryer?
Yes, the Cosori TurboBlaze has a dedicated frozen function for cooking frozen foods directly. This setting adjusts the cooking time and temperature automatically for optimal results. It works well for frozen fries, chicken nuggets, and other frozen foods.
Final Thought
The affordable Cosori 9-in-1 TurboBlaze Air Fryer in Georgia (GA) offers a versatile, budget-friendly solution for healthier cooking. Its 9 functions, precise heating, and PFAS-free ceramic coating make it a smart investment. This air fryer provides the perfect combination of convenience, efficiency, and safety for Georgia kitchens.
Invest in the Cosori TurboBlaze to expand your cooking possibilities and enjoy crispy results without excess oil. Consider your specific needs for capacity, functions, and additional features. Choose an air fryer that provides the performance and convenience your Georgia kitchen deserves. Transform your cooking routine with this excellent all-in-one appliance. If you’re exploring more advanced cooking options, Best Smart Air Fryer Oven compares feature-rich models with smart controls, multiple cooking functions, and convenient connectivity to help you choose the ideal appliance for your kitchen.
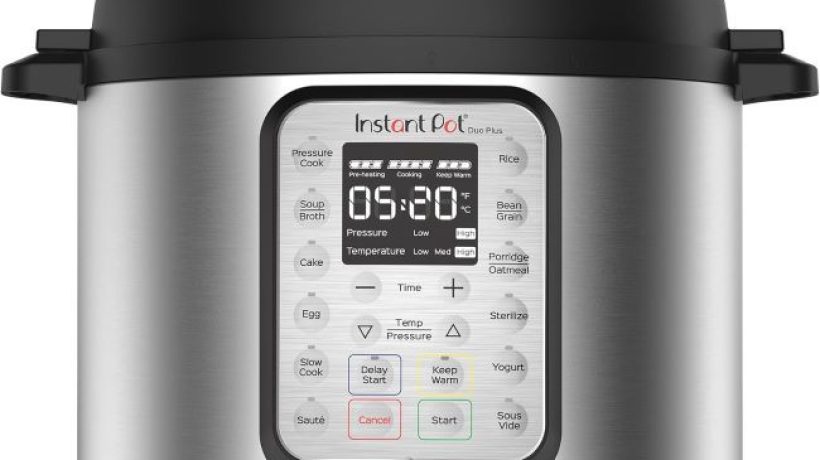
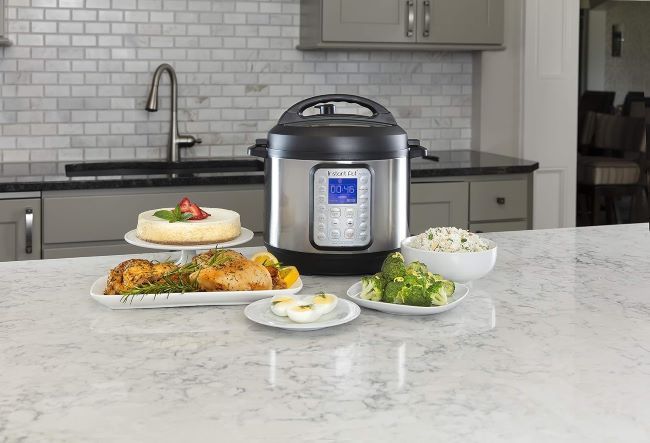
Affordable Instant Pot Duo Plus 9-in-1 Multicooker in Ohio (OH): Is It the Best Budget Multicooker?
Ohio families need versatile kitchen tools that save time and simplify meal prep. A quality multicooker replaces multiple appliances with one efficient machine. It transforms busy weeknights from stressful to manageable with minimal effort.
The affordable Instant Pot Duo Plus 9-in-1 Multicooker in Ohio (OH) offers a budget-friendly solution for versatile cooking. Its 9-in-1 functionality handles everything from pressure cooking to yogurt making. This multicooker combines convenience, efficiency, and versatility for Ohio kitchens. It provides the perfect all-in-one solution for busy families and home cooks.
Product at a Glance
Product List:
Affordable Instant Pot Duo Plus 9-in-1 Multicooker in Ohio: Detailed Review
Instant Pot Duo Plus 9-in-1 Multicooker, Pressure Cooker, Slow Cook, Rice Maker, Steamer, Sauté, Yogurt, Warmer & Sterilizer
Why Best: 9-in-1 multicooker with smart features and recipe app.
The Instant Pot Duo Plus 9-in-1 Multicooker transforms your Ohio kitchen into a versatile cooking hub. Its 9 functions replace multiple appliances: pressure cooker, slow cooker, rice maker, steamer, sauté pan, yogurt maker, warmer, and sterilizer. The 6-quart capacity works well for families and meal prep. This stainless steel multicooker combines durability with modern convenience.
The included app with over 800 recipes provides inspiration and guidance for every meal. Its smart programs make cooking various dishes effortless and consistent. The Duo Plus features an improved display and more customizable settings than previous models. This multicooker handles everything from quick weeknight dinners to elaborate weekend meals.
The Instant Pot’s pressure cooking function reduces cooking time by up to 70% compared to traditional methods. Its slow cooker setting works perfectly for Ohio’s hearty stews and chili recipes. The rice maker function ensures perfect rice every time without watching the pot. This multicooker becomes an essential kitchen tool for Ohio’s busy families and cooking enthusiasts.
Key Features Table
| Feature | Description |
|---|---|
| Functions | 9-in-1 |
| Capacity | 6 quarts |
| Material | Stainless steel |
| App | Over 800 recipes |
| Display | Improved |
| Settings | Customizable |
| Cooking | Pressure, slow, rice, steam, sauté |
| Specialty | Yogurt, warmer, sterilizer |
Pros & Cons Table
| Pros | Cons |
|---|---|
| 9-in-1 versatility | Learning curve |
| 6-quart capacity | Requires counter space |
| Recipe app included | Higher price point |
| Improved display | Limited to electric use |
| Customizable settings | Needs regular cleaning |
| Faster cooking | Standard warranty |
| Durable construction | Bulkier design |
Common Cleaning Tips
Regular cleaning maintains your Instant Pot’s performance and longevity. Start by unplugging the machine and allowing it to cool completely after use. Remove the inner pot and wash it with warm, soapy water. Clean the lid and sealing ring with a damp cloth, ensuring no food residue remains. The steam release valve requires special attention to prevent clogs.
For the exterior, wipe down with a damp cloth to remove splatters and fingerprints. Avoid using abrasive scrubbers that could scratch the stainless steel surface. For stubborn residue on the inner pot, soak it in warm, soapy water before cleaning. Always ensure all components are completely dry before reassembling. Regular cleaning not only extends your Instant Pot’s life but also ensures safe, hygienic cooking for your Ohio family.
Maintenance or Troubleshooting Tips
If your Instant Pot isn’t coming to pressure, check that the sealing ring is properly installed and the steam release valve is set to sealing. For machines that won’t turn on, ensure it’s properly plugged in and the outlet is functioning. If the display shows error codes, consult the user manual for specific troubleshooting steps.
If food burns on the bottom of the inner pot, ensure you’re using enough liquid and scraping the bottom occasionally during cooking. For sealing rings that develop odors, soak them in a vinegar and water solution to remove smells. If the steam release valve becomes clogged, clean it carefully with a pipe cleaner or small brush. Regular maintenance prevents most common issues and keeps your Instant Pot running smoothly.
What Real People Say — Voices from the Community
Ohio home cooks praise the Instant Pot Duo Plus for its versatility and time-saving convenience. Many highlight the 9-in-1 functionality for replacing multiple kitchen appliances. Others love the included recipe app for meal inspiration and guidance. The 6-quart capacity receives compliments for handling family-sized meals.
Some users note the importance of the improved display for easier operation. Others appreciate the customizable settings that allow for precise cooking control. The overall consensus is that the Duo Plus provides excellent value and performance for Ohio kitchens, making it a smart investment for busy families.
Relevant FAQs
1. What are the 9 functions of the Instant Pot Duo Plus?
The Duo Plus functions as a pressure cooker, slow cooker, rice cooker, steamer, sauté pan, yogurt maker, warmer, and sterilizer. This versatility makes it a true multicooker for various cooking needs in your Ohio kitchen.
2. Is the 6-quart size right for my family?
The 6-quart capacity works well for most families of 4-6 people. It can cook up to 6 cups of rice or a whole chicken. For larger families or frequent entertaining, consider the 8-quart model. For singles or couples, the 3-quart might be more appropriate.
3. Can I use the Instant Pot for canning?
No, the Instant Pot Duo Plus is not approved for canning. Pressure canning requires specific equipment and pressures that exceed the Duo Plus’s capabilities. For canning, use a dedicated pressure canner that meets USDA guidelines.
4. How do I clean the sealing ring?
Remove the sealing ring and wash it with warm, soapy water. For odors, soak it in a vinegar and water solution. Ensure it’s completely dry before reinserting. Replace the sealing ring if it becomes cracked, deformed, or develops persistent odors.
5. What’s the difference between the Duo Plus and other Instant Pot models?
The Duo Plus features an improved display, more customizable settings, and the included recipe app. It offers 9 functions compared to the 7 functions of the basic Duo model. The Plus model also includes a sterilize function for baby bottles and jars.
6. Can I cook frozen foods directly in the Instant Pot?
Yes, you can cook frozen foods directly in the Instant Pot. However, it may take longer to come to pressure. For best results, add a little extra liquid and cooking time. The sauté function can help thaw foods before pressure cooking.
Final Thought
The affordable Instant Pot Duo Plus 9-in-1 Multicooker in Ohio (OH) offers a budget-friendly, versatile solution for busy kitchens. Its 9 functions, recipe app, and improved features make it a smart investment for Ohio families. This multicooker provides the perfect combination of convenience, efficiency, and versatility.
Invest in the Instant Pot Duo Plus to simplify your meal prep and expand your cooking possibilities. Consider your specific needs for capacity, functions, and additional features. Choose a multicooker that provides the performance and convenience your Ohio kitchen deserves. Transform your cooking routine with this excellent all-in-one appliance. If you’re comparing similar kitchen appliances, Affordable Slow Cookers & Multi-Cookers highlights budget-friendly options that deliver excellent versatility, making it easier to find the right model for your cooking style and budget.
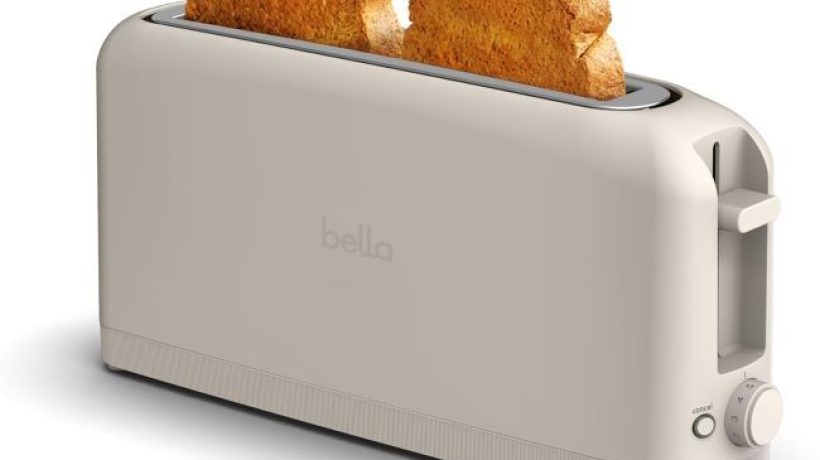
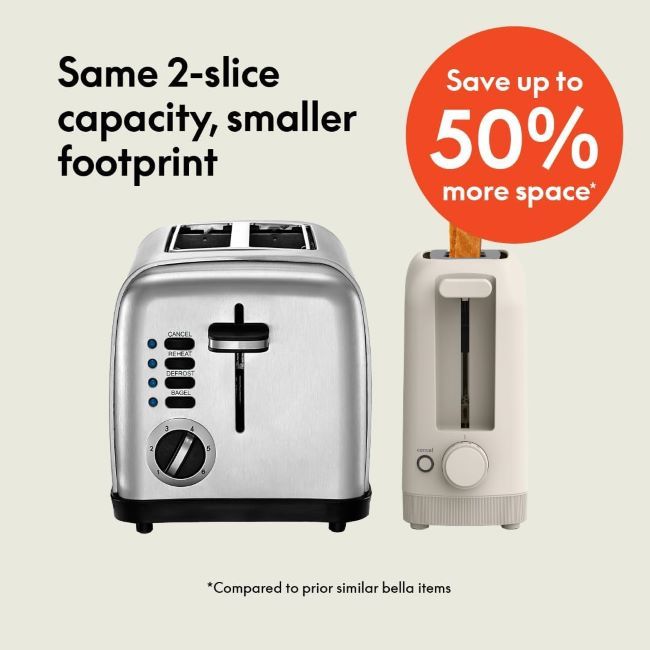
Affordable bella 2 Slice Slim Toaster in Texas (TX): Perfect for Small Spaces And Thick Bread?
Texas mornings call for perfect toast to start the day right. A quality toaster transforms your breakfast from ordinary to extraordinary. It delivers consistent, golden-brown results with minimal effort and counter space.
The affordable bella 2 Slice Slim Toaster in Texas (TX) offers a space-saving solution for perfect toast every time. Its slim design fits in the tightest kitchen corners while accommodating thick breads. This toaster combines versatility, convenience, and style for Texas homes. It provides the perfect balance of performance and compact size for your morning routine.
Product at a Glance
Product List:
Affordable bella 2 Slice Slim Toaster in Texas: Detailed Review
bella 2 Slice Slim Toaster, Fits-anywhere™ Kitchenware
Why Best: Slim toaster with extra-long slots for thick breads.
The bella 2 Slice Slim Toaster delivers perfect toast in a compact, space-saving design. Its Fits-anywhere™ kitchenware concept makes it ideal for Texas kitchens with limited counter space. The 6-setting shade control allows for customizing your toast to the perfect brownness. This toaster includes reheat and cancel buttons for added convenience.
The extra-long 10-inch slots accommodate thick breads like sourdough and Texas toast. Its anti-jam and auto shutoff features prevent common toasting mishaps. The 900-watt power provides quick, even toasting for consistent results. The oatmilk color adds a stylish touch to your kitchen decor.
The bella toaster’s slim profile fits between other appliances or against the wall. Its lightweight design makes it easy to move and store when not in use. The even toasting ensures both slices cook uniformly for perfect results every time. This toaster becomes an essential kitchen tool for Texas breakfast lovers.
Key Features Table
| Feature | Description |
|---|---|
| Type | 2 slice toaster |
| Design | Slim, Fits-anywhere™ |
| Slots | 10″ long |
| Shade Control | 6 settings |
| Buttons | Reheat, cancel |
| Safety | Anti-jam, auto shutoff |
| Power | 900 watts |
| Color | Oatmilk |
Pros & Cons Table
| Pros | Cons |
|---|---|
| Slim design | Limited to 2 slices |
| Fits-anywhere | Requires counter space |
| 10″ long slots | Basic features |
| 6 shade settings | Standard warranty |
| Reheat & cancel | Higher price point |
| Anti-jam | Limited color options |
| Auto shutoff | Plastic construction |
Common Cleaning Tips
Regular cleaning maintains your bella toaster’s performance and appearance. Start by unplugging the toaster and allowing it to cool completely. Remove the crumb tray and empty any accumulated crumbs. Wipe down the exterior with a damp cloth to remove grease and fingerprints.
For the slots, use a soft brush or damp cloth to remove crumbs and residue. Avoid using abrasive scrubbers that could scratch the interior. For stubborn residue, use a mixture of baking soda and water to gently scrub the slots. Always ensure the toaster is completely dry before plugging it back in. Regular cleaning not only keeps your toaster looking good but also prevents fire hazards.
Maintenance or Troubleshooting Tips
If your toaster stops working, check that it’s properly plugged in and the outlet is functioning. For machines that won’t toast, ensure the bread is properly inserted and the lever is fully depressed. If the toaster gets stuck, unplug it and allow it to cool before gently removing the bread.
If the toaster makes unusual noises, check for crumbs or foreign objects in the slots. Clean the interior thoroughly to remove any obstructions. If the shade seems inconsistent, check that you’re using the correct setting for your bread type. For toasters that don’t brown evenly, ensure the bread is centered in the slots. Regular maintenance prevents most common issues and keeps your bella toaster running smoothly.
What Real People Say — Voices from the Community
Texas toast lovers praise the bella 2 Slice Slim Toaster for its performance and space-saving design. Many highlight the extra-long slots for accommodating thick breads like sourdough. Others love the Fits-anywhere™ concept for their small kitchen spaces. The 6 shade settings receive compliments for allowing customization of toast darkness.
Some users note the importance of the anti-jam feature for preventing common toasting issues. Others appreciate the reheat and cancel buttons for added convenience. The overall consensus is that the bella toaster provides excellent toasting performance in a compact package perfect for Texas kitchens.
Relevant FAQs
1. How wide are the slots on the bella toaster? The bella 2 Slice Slim Toaster features extra-long 10-inch slots. This length accommodates thick breads like sourdough and Texas toast. The width is standard for a 2-slice toaster, fitting most bread types.
2. Can I toast bagels in the bella toaster? Yes, the bella toaster works well for bagels and other thick bread products. The 10-inch slots provide enough space for most bagel sizes. Use a lower shade setting for bagels as they often toast faster than regular bread.
3. How do I clean the crumb tray? Remove the crumb tray and empty any accumulated crumbs. Wash it with warm, soapy water and dry thoroughly before reinserting. Regular cleaning of the crumb tray prevents crumb buildup and potential fire hazards.
4. What’s the difference between the reheat and cancel buttons? The reheat button warms already toasted bread without browning it further. The cancel button stops the toasting cycle immediately. Both buttons provide added convenience for your toasting needs.
5. Can I use the bella toaster for frozen bread? Yes, the bella toaster can handle frozen bread. Use a higher shade setting and longer toasting time for frozen products. The anti-jam feature helps prevent issues with thicker frozen breads.
6. How often should I clean my bella toaster? Clean the crumb tray after each use to prevent buildup. Wipe down the exterior weekly or as needed. For the slots, clean them monthly or when you notice residue accumulation. Regular cleaning maintains performance and prevents fire hazards.
Final Thought
The affordable bella 2 Slice Slim Toaster in Texas (TX) offers a perfect combination of performance and space-saving design. Its extra-long slots, 6 shade settings, and Fits-anywhere™ concept make it ideal for Texas kitchens. This toaster provides consistent, golden-brown results for all your breakfast needs.
Invest in the bella 2 Slice Slim Toaster to simplify your morning routine and enjoy perfect toast. Consider your specific needs for slot size, shade settings, and kitchen space. Choose a toaster that provides the performance and convenience your Texas kitchen deserves. Start each day with the perfect slice of toast tailored to your taste.
Affordable Etekcity Food Kitchen Scale in Illinois (IL): Is It the Right Scale for Your Kitchen?

Precise measurements transform good recipes into great ones every time. A quality kitchen scale eliminates guessing and ensures consistent results. It brings professional accuracy to your Illinois kitchen for baking, cooking, and meal prep.
The affordable Etekcity Food Kitchen Scale in Illinois (IL) offers home cooks a simple way to achieve restaurant-quality precision. Its digital display provides accurate readings in grams and ounces. This scale works well for weight loss tracking, baking projects, and keto meal prep. It fits seamlessly into any Illinois kitchen for better cooking results.
Product at a Glance
Product List:
Affordable Etekcity Food Kitchen Scale in Illinois: Detailed Review
Etekcity Food Kitchen Scale, Digital Grams and Ounces for Weight Loss, Baking, Cooking, Keto and Meal Prep
Why Best: Digital scale with stainless steel platform for accurate measurements.
The Etekcity Food Kitchen Scale provides precise measurements for various cooking and dietary needs. Its digital LCD display shows readings in both grams and ounces for versatile use. The medium-sized 304 stainless steel platform offers durability and easy cleaning. This scale works well for weight loss tracking, baking projects, cooking measurements, and keto meal prep.
The scale’s accurate sensors ensure consistent measurements for your recipes. Its compact design fits easily on any kitchen counter or in a drawer. The digital display provides clear, easy-to-read measurements for precise cooking. This scale helps Illinois home cooks achieve professional-level accuracy in their kitchens.
The Etekcity scale’s tare function allows for measuring multiple ingredients in one container. Its auto-off feature conserves battery life when not in use. The scale operates on batteries for portability and convenience. This kitchen tool becomes essential for anyone serious about precise cooking and baking in Illinois.

Key Features Table
| Feature | Description |
|---|---|
| Display | LCD digital |
| Units | Grams and ounces |
| Platform | 304 stainless steel |
| Size | Medium |
| Use Cases | Weight loss, baking, cooking, keto, meal prep |
| Function | Tare |
| Power | Battery-operated |
Pros & Cons Table
| Pros | Cons |
|---|---|
| Precise measurements | Requires batteries |
| Digital display | Limited capacity |
| Stainless steel platform | Basic design |
| Versatile use | Needs calibration |
| Tare function | Standard features |
| Auto-off | Limited size options |
| Portable | Higher price point |
Common Cleaning Tips
Regular cleaning maintains your Etekcity scale’s accuracy and hygiene. Wipe down the stainless steel platform with a damp cloth after each use. Use a mild dish soap for stubborn residue or spills. Avoid using abrasive scrubbers that could scratch the stainless steel surface. The digital display can be cleaned with a soft, slightly damp cloth.
For deeper cleaning, remove the platform if possible and wash it separately. Ensure the scale is completely dry before using it again. Avoid submerging the scale in water as this could damage the electronic components. Regular cleaning not only keeps your scale looking good but also ensures accurate measurements for your Illinois kitchen.
Maintenance or Troubleshooting Tips
If your scale provides inaccurate readings, check that it’s on a flat, stable surface. For scales that won’t turn on, replace the batteries with fresh ones. If the display shows erratic readings, ensure there’s no debris or spills on the platform. Clean the platform thoroughly and recalibrate if needed.
If the scale doesn’t respond to the tare function, check that you’re pressing the button correctly. For scales that turn off too quickly, the auto-off feature may be activated. Simply press the power button to turn it back on. If the scale still doesn’t work, check the battery contacts for corrosion and clean them if necessary. Regular maintenance prevents most common issues and keeps your Etekcity scale accurate.
What Real People Say — Voices from the Community
Illinois home cooks praise the Etekcity Food Kitchen Scale for its accuracy and versatility. Many highlight the digital display for its clear, easy-to-read measurements. Others love the stainless steel platform for its durability and easy cleaning. The scale receives compliments for its performance in various cooking and dietary applications.
Some users note the importance of the tare function for measuring multiple ingredients. Others appreciate the compact design that fits well in their kitchens. The overall consensus is that the Etekcity scale provides excellent precision and value for Illinois home cooks who demand accuracy in their recipes.
Relevant FAQs
1. How accurate is the Etekcity Food Kitchen Scale?
The Etekcity scale provides precise measurements typically within 1-2 grams of accuracy. This level of precision works well for most home cooking and baking needs. For professional applications, consider scales with even higher precision.
2. What’s the maximum capacity of the Etekcity scale?
The Etekcity Food Kitchen Scale typically has a maximum capacity of around 11 pounds or 5 kilograms. This capacity works well for most home cooking and baking projects. For larger quantities, consider a scale with higher capacity.
3. Can I use this scale for liquids?
Yes, you can use the Etekcity scale for measuring liquids in a container. The tare function allows you to measure the liquid weight accurately. Ensure the container is stable on the platform to prevent spills.
4. How do I calibrate my Etekcity scale?
Most Etekcity scales come pre-calibrated from the factory. If you need to recalibrate, check the manufacturer’s instructions for your specific model. This typically involves placing a known weight on the scale and adjusting the settings.
5. What batteries does the Etekcity scale use?
The Etekcity Food Kitchen Scale typically uses AAA batteries for power. The exact battery type may vary by model. The auto-off feature helps conserve battery life when the scale isn’t in use.
6. Can I use this scale for portion control in meal prep?
Yes, the Etekcity scale works excellently for portion control in meal prep. Its precise measurements help you track serving sizes accurately. This makes it ideal for weight loss programs, keto diets, or any dietary plan requiring precise measurements.
Final Thought
The affordable Etekcity Food Kitchen Scale in Illinois (IL) offers home cooks a simple, accurate solution for precise measurements. Its digital display, stainless steel platform, and versatile functionality make it perfect for various cooking needs. This scale brings professional accuracy to your Illinois kitchen without the professional price.
Invest in the Etekcity Food Kitchen Scale to elevate your cooking and baking results. Consider your specific needs for capacity, precision, and additional features. Choose a scale that provides the accuracy and convenience your Illinois kitchen deserves. Achieve consistent, professional-quality results with every recipe.
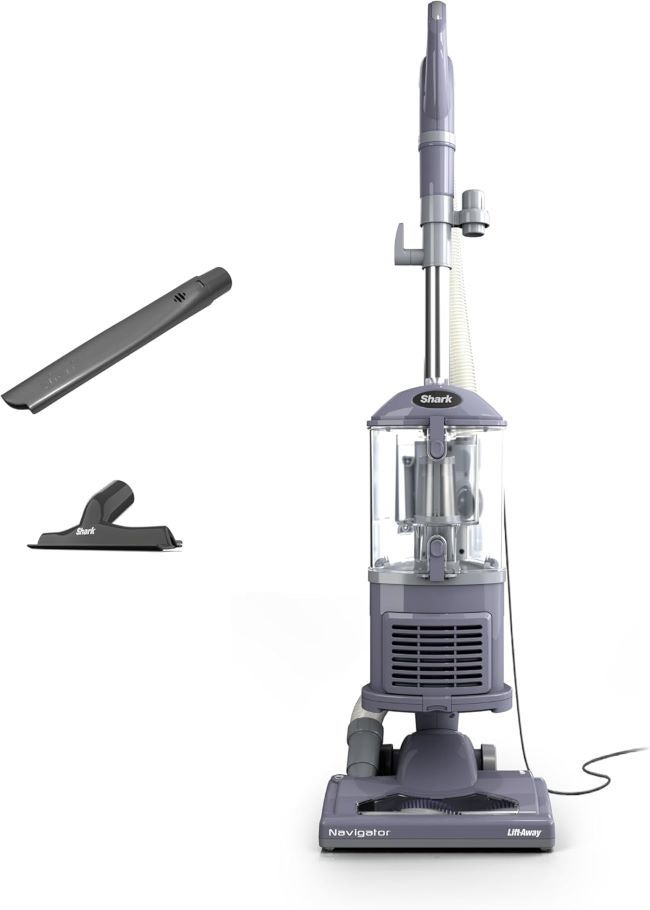
Affordable Shark Navigator Lift-Away Vacuum in New York (NY): The Best Choice for Pet Hair?

Pet hair seems to multiply faster than New York City traffic at rush hour. A quality vacuum becomes essential for keeping your home clean and fresh. It transforms the battle against fur from a losing struggle to a manageable task.
The affordable Shark Navigator Lift-Away Vacuum in New York (NY) offers pet owners a powerful solution for stubborn hair. Its lift-away design tackles floors, upholstery, and tight spaces with ease. This vacuum combines strong suction, versatile attachments, and HEPA filtration for cleaner air. It provides the perfect tool for pet hair removal in New York apartments and homes.
Product at a Glance
Product List:
Affordable Shark Navigator Lift-Away Vacuum in New York: Detailed Review
Shark Upright Vacuum Cleaner | Navigator Lift-Away | Pet Hair, Carpet & Hard Floor Cleaning
Why Best: Versatile upright vacuum with lift-away canister for pet hair.
The Shark Navigator Lift-Away Upright Vacuum Cleaner provides powerful cleaning performance for New York homes. Its lift-away design allows you to detach the canister for portable cleaning power. The HEPA filter captures dust, allergens, and pet dander for cleaner air. This lavender model includes upholstery and crevice tools for versatile cleaning.
The vacuum’s swivel steering makes it easy to maneuver around furniture and into tight spaces. Its large dust cup capacity reduces the frequency of emptying during cleaning sessions. The pet hair specific design tackles stubborn fur on carpets, hard floors, and upholstery. This vacuum works well for both daily maintenance and deep cleaning tasks.
The Navigator Lift-Away’s powerful suction removes embedded dirt and pet hair from various surfaces. Its lightweight design makes it easy to carry between rooms or up stairs. The vacuum’s versatile attachments allow for cleaning above-floor surfaces like furniture and curtains. This machine provides a comprehensive cleaning solution for New York pet owners.
Key Features Table
| Feature | Description |
|---|---|
| Type | Upright vacuum |
| Design | Navigator Lift-Away |
| Specialty | Pet hair |
| Filtration | HEPA filter |
| Steering | Swivel |
| Dust Cup | Large capacity |
| Tools | Upholstery & crevice |
| Color | Lavender |
| Model | NV352 |
Pros & Cons Table
| Pros | Cons |
|---|---|
| Lift-away design | Corded operation |
| HEPA filtration | Requires assembly |
| Swivel steering | Bulkier storage |
| Large dust cup | Higher price point |
| Versatile tools | Limited color options |
| Powerful suction | Needs regular maintenance |
| Pet hair specific | Standard warranty |
Common Cleaning Tips
Regular cleaning maintains your Shark Navigator Lift-Away’s performance and longevity. Empty the dust cup after each use to prevent clogs and maintain suction power. Clean the HEPA filter monthly by tapping it gently to remove dust or rinsing with water. Wipe down the exterior with a damp cloth to remove dirt and pet hair.
For the brush roll, remove any wrapped hair or threads regularly to prevent damage. Use a soft brush to clean the upholstery and crevice tools after each use. Always ensure all components are completely dry before reassembling. Regular cleaning not only extends the vacuum’s life but also ensures optimal cleaning performance in your New York home.
Maintenance or Troubleshooting Tips
If your vacuum loses suction, check for clogs in the hose, brush roll, or filters. Remove any obstructions to restore proper airflow. For machines that won’t turn on, ensure the power cord is properly connected and the outlet is functioning. If the brush roll isn’t spinning, check for tangled hair or debris and clean thoroughly.
If the vacuum makes unusual noises, inspect for loose parts or foreign objects in the brush roll. For HEPA filters that appear dirty, replace them according to the manufacturer’s recommendations. If the lift-away canister doesn’t detach properly, check the release mechanism for obstructions. Regular maintenance prevents most common issues and keeps your Shark Navigator running smoothly.
What Real People Say — Voices from the Community
New York pet owners praise the Shark Navigator Lift-Away for its performance on pet hair. Many highlight the lift-away design for its versatility in cleaning various surfaces. Others love the HEPA filtration for improving indoor air quality in their apartments. The swivel steering receives compliments for making it easy to maneuver around furniture.
Some users note the importance of the large dust cup capacity for reducing cleaning interruptions. Others appreciate the included upholstery and crevice tools for tackling pet hair on furniture. The overall consensus is that the Navigator Lift-Away provides an excellent cleaning solution for New York homes with pets.
Relevant FAQs
1. How often should I empty the dust cup?
Empty the dust cup after each use or when it reaches the max fill line. This prevents clogs and maintains optimal suction power. The large capacity of the Navigator Lift-Away reduces the frequency of emptying during cleaning sessions.
2. Can I use the Shark Navigator Lift-Away on hard floors?
Yes, the Navigator Lift-Away works well on both carpets and hard floors. Its versatile design handles various surface types with ease. The vacuum’s powerful suction removes dirt and pet hair from hardwood, tile, and other hard floor surfaces.
3. How do I clean the HEPA filter?
Tap the HEPA filter gently to remove dust or rinse it with water. Allow it to air dry completely before reinserting. Replace the filter according to the manufacturer’s recommendations. Regular cleaning maintains the filter’s effectiveness and air quality.
4. What’s the difference between the lift-away and traditional upright vacuums?
The lift-away design allows you to detach the canister for portable cleaning power. This makes it easier to clean above-floor surfaces and tight spaces. Traditional uprights typically don’t offer this versatility for cleaning various surfaces.
5. How do I prevent pet hair from tangling in the brush roll?
Regularly remove wrapped hair and threads from the brush roll after each use. Use a seam ripper or scissors to carefully cut away tangled hair. The Navigator Lift-Away’s design helps minimize hair tangling during cleaning.
6. Can I use the Shark Navigator Lift-Away for cleaning my car?
Yes, the lift-away canister design makes it suitable for cleaning car interiors. Use the upholstery tool for seats and the crevice tool for tight spaces. The vacuum’s portable power provides effective cleaning for your vehicle’s surfaces.
Final Thought
The affordable Shark Navigator Lift-Away Vacuum in New York (NY) provides pet owners with a powerful, versatile cleaning solution. Its lift-away design, HEPA filtration, and pet hair specific features make it perfect for New York homes. This vacuum tackles stubborn fur and dirt on various surfaces with ease.
Invest in the Shark Navigator Lift-Away to simplify your cleaning routine and maintain a fur-free home. Consider your specific needs for surface types, home size, and pet hair volume. Choose a vacuum that provides the performance and convenience your New York lifestyle deserves. Keep your home clean and fresh with this excellent pet hair solution. To keep your vacuum performing at its best, Shark Vacuum Troubleshooting covers common issues, maintenance tips, and practical fixes that can help extend the life and efficiency of your Shark cleaner.
Affordable Zulay Kitchen Milk Frother in Florida (FL): What Every Coffee Lover Should Know

Florida’s coffee culture thrives on both beachside cafés and home kitchens. A quality milk frother transforms your daily brew into a café-worthy experience. It elevates your coffee, lattes, and cappuccinos with minimal effort.
The affordable Zulay Kitchen Milk Frother in Florida (FL) offers coffee lovers a simple way to create professional-quality froth at home. Its handheld design provides convenience and control for various beverages. This electric whisk makes it easy to achieve the perfect texture for your favorite drinks. It brings café quality to your Florida kitchen without the café price.
Product at a Glance
Product List:
Affordable Zulay Kitchen Milk Frother in Florida: Detailed Review
Zulay Kitchen Milk Frother Handheld Electric Whisk – Frother Wand, Durable
Why Best: Handheld electric whisk for effortless milk frothing.
The Zulay Kitchen Milk Frother Handheld Electric Whisk delivers powerful frothing performance in a compact, portable design. Its electric whisk design creates smooth, creamy froth for lattes, cappuccinos, and other coffee drinks. The durable construction withstands regular use in busy Florida kitchens. This frother wand operates with the touch of a button for convenience.
The handheld design allows for precise control over the frothing process. It works with various milk types including dairy, almond, soy, and oat milk. The quick operation takes just seconds to create the perfect froth texture. This electric whisk eliminates the need for manual whisking or expensive machines. It provides professional results with minimal effort and cleanup.
The Zulay frother’s compact size makes it easy to store in any kitchen. Its lightweight design ensures comfortable use for extended frothing sessions. The durable materials resist wear and tear from daily use. This frother wand becomes an essential tool for Florida coffee enthusiasts. It transforms your home coffee experience with consistent, high-quality results.

Key Features Table
| Feature | Description |
|---|---|
| Type | Handheld electric whisk |
| Design | Frother wand |
| Operation | Button-activated |
| Milk Compatibility | Dairy, almond, soy, oat |
| Speed | Quick frothing |
| Construction | Durable |
| Size | Compact |
| Weight | Lightweight |
Pros & Cons Table
| Pros | Cons |
|---|---|
| Handheld convenience | Requires batteries |
| Quick frothing | Limited to small quantities |
| Versatile milk use | Basic design |
| Durable construction | Needs charging |
| Compact size | Single speed |
| Lightweight | Limited capacity |
| Easy cleanup | Standard features |
Common Cleaning Tips
Regular cleaning maintains your Zulay milk frother’s performance and hygiene. Rinse the whisk attachment with warm water immediately after each use. Use a mild dish soap for deeper cleaning of the frothing wand. Avoid submerging the handle in water as it contains electrical components. The quick cleanup process ensures your frother remains ready for the next use.
For stubborn milk residue, soak the whisk in warm, soapy water for a few minutes before rinsing. Use a soft brush to clean between the whisk’s tines if needed. Always dry the frother completely before storing to prevent mold and bacteria growth. Regular cleaning not only extends the frother’s life but also ensures the best tasting results in your beverages.
Maintenance or Troubleshooting Tips
If your frother stops working, check the battery level first. Replace the batteries if they’re depleted. For frothers that don’t create enough froth, ensure you’re using the correct technique and fresh milk. If the whisk becomes clogged with dried milk, soak it in warm water to loosen the residue.
If the frother makes unusual noises, check for obstructions in the whisk mechanism. Clean the whisk thoroughly to remove any debris. If the frother doesn’t turn on, ensure the batteries are properly inserted and the button is functioning correctly. Regular maintenance prevents most common issues and keeps your Zulay frother performing at its best.
What Real People Say — Voices from the Community
Florida coffee lovers praise the Zulay Kitchen Milk Frother for its performance and convenience. Many highlight the handheld design for its ease of use and storage. Others love the quick frothing capability that saves time in busy mornings. The durable construction receives compliments for withstanding regular use.
Some users note the importance of using fresh, cold milk for the best frothing results. Others appreciate the versatility with different milk types for various dietary preferences. The overall consensus is that the Zulay frother provides an excellent combination of convenience, performance, and value for Florida coffee enthusiasts.
Relevant FAQs
1. What types of milk work best with the Zulay frother?
The Zulay frother works well with dairy milk, almond milk, soy milk, and oat milk. Whole milk typically creates the creamiest froth. Skim milk produces lighter froth. Plant-based milks may require slightly different techniques for optimal results.
2. How long does it take to froth milk with the Zulay frother?
The Zulay frother typically creates perfect froth in 15-30 seconds. The exact time may vary based on the milk type and desired froth consistency. This quick operation makes it perfect for busy Florida mornings.
3. Does the Zulay frother require batteries?
Yes, the Zulay Kitchen Milk Frother Handheld Electric Whisk requires batteries for operation. It typically uses AA batteries for power. The battery life varies based on usage frequency. Always keep spare batteries on hand for uninterrupted frothing.
4. Can I use the Zulay frother for other kitchen tasks?
Yes, the Zulay frother works well for various kitchen tasks beyond milk frothing. It can mix protein shakes, salad dressings, and sauces. The whisk attachment creates smooth, consistent results for many recipes. This versatility makes it a valuable addition to any Florida kitchen.
5. How do I clean the Zulay frother properly?
Rinse the whisk attachment with warm water after each use. Use mild dish soap for deeper cleaning. Avoid submerging the handle in water. Clean between the whisk’s tines with a soft brush if needed. Always dry completely before storing to prevent bacteria growth.
6. What’s the difference between the Zulay frother and more expensive models?
The Zulay frother offers excellent performance at an affordable price point. More expensive models may include additional speed settings or attachments. However, the Zulay provides professional-quality froth that rivals higher-priced options. It delivers great value for Florida coffee lovers.
Final Thought
The affordable Zulay Kitchen Milk Frother in Florida (FL) offers coffee lovers a simple, effective way to elevate their home brews. Its handheld design, quick operation, and versatile milk compatibility make it perfect for Florida kitchens. This frother brings café quality to your daily coffee routine without the café price.
Invest in the Zulay Kitchen Milk Frother to transform your home coffee experience. Consider your specific needs for frothing capacity, milk types, and kitchen space. Choose a frother that provides the performance and convenience your Florida lifestyle deserves. Create professional-quality beverages in the comfort of your own kitchen.
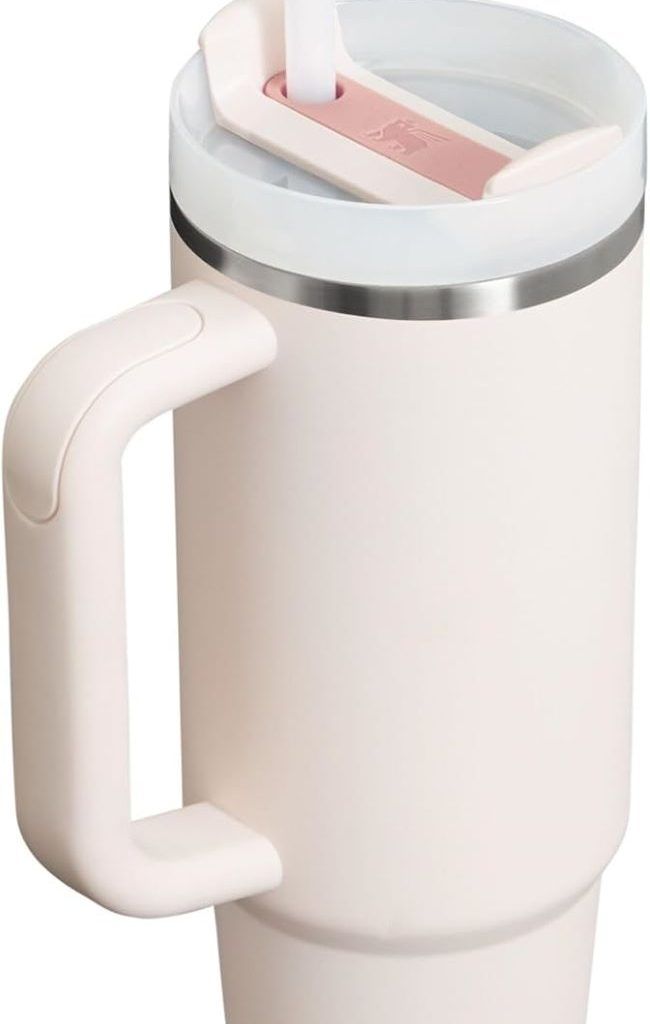
Affordable STANLEY Quencher H2.0 Tumbler in California (CA): A Smart Buy for Everyday Hydration?

California’s active lifestyle demands reliable hydration on the go. A quality tumbler keeps your drinks cold or hot for hours while fitting your car cup holder. It transforms your daily hydration from a chore to a seamless habit.
The affordable STANLEY Quencher H2.0 Tumbler in California (CA) offers a smart solution for everyday hydration needs. Its insulated stainless steel construction maintains drink temperatures for extended periods. This tumbler combines convenience, durability, and style for California’s busy residents. It provides the perfect companion for commutes, workouts, or outdoor adventures across the Golden State.
Product at a Glance
Product List:
Affordable STANLEY Quencher H2.0 Tumbler in California: Detailed Review
STANLEY Quencher H2.0 Tumbler with Handle and Straw 30 oz
Why Best: Insulated stainless steel tumbler with innovative FlowState lid.
The STANLEY Quencher H2.0 Tumbler delivers exceptional performance for California’s hydration needs. Its 30-ounce capacity provides ample liquid for daily activities without being too bulky. The FlowState 3-position lid offers versatile drinking options for different situations. This rose quartz 2.0 color adds a stylish touch to your hydration routine.
The cup holder compatible design makes it perfect for California commutes and road trips. Its insulated stainless steel construction keeps drinks cold for up to 7 hours or hot for up to 2 hours. The BPA-free materials ensure safe hydration for you and your family. The included handle and straw provide convenient drinking options. This tumbler combines form and function for everyday use.
The Quencher H2.0’s durable construction withstands the rigors of daily use. Its leak-resistant lid prevents spills in your car or bag. The wide mouth makes it easy to add ice and clean. This tumbler works well for water, coffee, tea, or your favorite beverages. It fits seamlessly into California’s active lifestyle.
Key Features Table
| Feature | Description |
|---|---|
| Capacity | 30 oz |
| Lid | FlowState 3-position |
| Cup Holder Compatibility | Yes |
| Material | Insulated stainless steel |
| Safety | BPA-free |
| Color | Rose Quartz 2.0 |
| Handle | Included |
| Straw | Included |
Pros & Cons Table
| Pros | Cons |
|---|---|
| Insulated stainless steel | Limited to 30 oz |
| FlowState lid | Higher price point |
| Cup holder compatible | Requires hand washing |
| BPA-free | Limited color options |
| Handle and straw included | Standard features |
| Durable construction | Bulkier than some tumblers |
| Leak-resistant | Single size option |
Common Cleaning Tips
Regular cleaning maintains your STANLEY Quencher H2.0’s performance and hygiene. Hand wash the tumbler with warm, soapy water after each use. Use a bottle brush to clean the interior and reach the bottom. For the FlowState lid, disassemble it and clean each component separately. Avoid using abrasive scrubbers that could damage the stainless steel finish.
For stubborn stains or odors, use a baking soda and water solution to soak the tumbler. Rinse thoroughly after cleaning to remove any residue. The wide mouth makes it easy to add cleaning agents and ice. Always allow the tumbler to air dry completely before storing. Regular cleaning not only keeps your tumbler looking good but also ensures safe, fresh-tasting hydration.
Maintenance or Troubleshooting Tips
If your tumbler develops an odor, try soaking it in a vinegar and water solution overnight. For leaks from the lid, ensure all components are properly assembled and the lid is fully closed. If the straw becomes clogged, remove it and clean with a pipe cleaner or straw cleaning brush.
If the tumbler’s insulation performance decreases, check for damage to the vacuum seal. For scratches on the exterior, use a stainless steel polish to restore the finish. If the handle becomes loose, check the attachment points and tighten if possible. Regular maintenance prevents most common issues and keeps your STANLEY Quencher H2.0 performing at its best.
What Real People Say — Voices from the Community
California residents praise the STANLEY Quencher H2.0 for its performance and convenience. Many highlight the FlowState lid for its versatility in different drinking situations. Others love the cup holder compatibility for easy use during commutes. The rose quartz 2.0 color receives compliments for its stylish appearance.
Some users note the importance of the 30-ounce capacity for their daily hydration needs. Others appreciate the included handle and straw for convenient drinking. The overall consensus is that the Quencher H2.0 provides an excellent combination of functionality and style for California’s active lifestyle.
Relevant FAQs
1. How long does the STANLEY Quencher H2.0 keep drinks cold?
The Quencher H2.0 keeps drinks cold for up to 7 hours with ice. This makes it perfect for California’s warm climate and active lifestyle. The insulation performance may vary based on external temperatures and usage.
2. Is the STANLEY Quencher H2.0 dishwasher safe?
No, the Quencher H2.0 is not dishwasher safe. Hand washing is recommended to maintain the tumbler’s performance and appearance. This ensures the lid components and finish remain in good condition for years of use.
3. Does the FlowState lid really have 3 positions?
Yes, the FlowState lid features 3 distinct positions for different drinking preferences. These include a closed position, a straw position, and a wide-open position. This versatility makes it suitable for various activities and beverages.
4. What sizes are available for the Quencher H2.0?
The Quencher H2.0 is currently available in a 30-ounce size. This capacity provides a good balance between portability and hydration needs. It fits most cup holders and is suitable for daily use.
5. Can I use the STANLEY Quencher H2.0 for hot drinks?
Yes, the Quencher H2.0 works well for hot drinks like coffee or tea. It keeps hot beverages warm for up to 2 hours. The insulated stainless steel construction maintains temperature for both hot and cold drinks.
6. Is the rose quartz 2.0 color the only option? The rose quartz 2.0 is one of the available color options for the Quencher H2.0. Stanley typically offers multiple color choices for their tumblers. Check the current product listings for the most up-to-date color options.
Final Thought
The affordable STANLEY Quencher H2.0 Tumbler in California (CA) offers a smart solution for everyday hydration needs. Its insulated stainless steel construction, innovative FlowState lid, and cup holder compatibility make it perfect for California’s active lifestyle. This tumbler provides the perfect combination of convenience, durability, and style.
Invest in the STANLEY Quencher H2.0 to simplify your daily hydration routine. Consider your specific needs for capacity, lid features, and color options. Choose a tumbler that provides the performance and convenience your California lifestyle deserves. Stay hydrated in style with this excellent everyday companion. If you’re also interested in preparing healthy snacks at home, How Does a Food Dehydrator Work explains the dehydration process and how it can help you create nutritious dried fruits, vegetables, and other foods to enjoy alongside your favorite beverages.