How to Foam Milk With a Zulay Kitchen Frother

How to Empty a Shark Navigator Lift Away?
August 11, 2026
Amazon Basics 20x20x1 Air Filter Whistling: Causes and Fixes
August 11, 2026
Yes, you can create smooth, creamy milk foam with a Zulay Kitchen frother in just a few minutes. Start with cold milk, warm it gently, then froth it with controlled movements for better texture.
A handheld frother works especially well with roughly 6 to 8 ounces of milk per drink. For the best texture, keep warmed milk around 140°F to 150°F and avoid boiling it.
The Zulay kitchen milk frother makes this process simple because its compact whisk creates foam quickly. However, technique matters more than speed when you want fine, stable bubbles.
This guide explains each step, from choosing milk to controlling foam thickness. You will also learn how to fix common problems and clean the frother correctly.
What Makes the Zulay Kitchen Frother Effective?
The Zulay Kitchen frother uses a small whisk to introduce air into liquid. As the whisk spins, it breaks the milk surface and creates thousands of tiny bubbles.
However, simply moving the whisk around does not guarantee creamy foam. You need the right milk temperature, whisk position, movement, and timing.
Milk proteins help stabilize the bubbles after air enters the liquid. Therefore, gentle heating and controlled frothing produce a smoother result than aggressive mixing.
Prepare the Milk Before Frothing
Good foam begins before you turn on the frother. Select your milk, measure the amount, and warm it gradually.
Choose the Right Milk
Whole milk usually produces rich foam with a smooth and creamy mouthfeel. Lower fat milk can create lighter foam with a slightly firmer texture.
Meanwhile, oat milk often creates excellent foam when you use a barista style variety. Almond and soy milk can also foam, although results vary between brands.
If you want consistent results, test one milk brand several times before changing your routine. Different protein and fat levels can change foam quality significantly.
Measure the Milk Carefully
Fill your cup only partway because milk expands as you froth it. A tall container gives the foam enough room to rise without spilling.
For one coffee, start with about 6 ounces of milk. You can increase the amount after learning how much foam your drink needs.
Warm the Milk Gently
Warm the milk on the stove or inside a microwave safe container. Stop heating when the milk feels hot but remains comfortable to handle.
A temperature between 140°F and 150°F works well for many milk based coffee drinks. Avoid boiling because excessive heat can damage texture and create a cooked flavor.
When using a microwave, heat the milk in short intervals. Stir between intervals so the temperature spreads evenly throughout the container.
How to Foam Milk With a Zulay Kitchen Frother
Once your milk reaches the right temperature, place the container on a stable surface. Keep the frother nearby and hold it comfortably in your dominant hand.
Step 1: Insert the Whisk Correctly
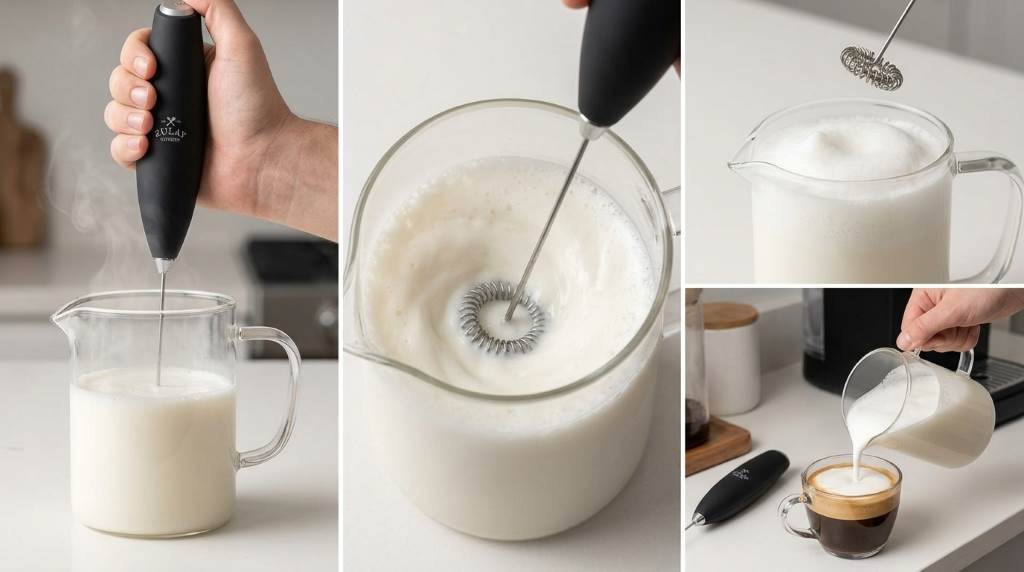
Place the whisk slightly below the milk surface before switching it on. Do not push the whisk directly against the bottom of the container.
Keeping the whisk submerged prevents unnecessary splashing during the first few seconds. It also helps the motor work without excessive resistance.
Step 2: Start Frothing Slowly
Turn on the frother while keeping the whisk just beneath the surface. Start with gentle movement rather than immediately moving the whisk around.
After a few seconds, you should notice the milk becoming lighter and thicker. That visual change indicates that air has entered the milk.
Step 3: Create a Gentle Whirlpool
Move the frother slightly around the container while maintaining a shallow position. This movement helps distribute air throughout the milk.
Next, tilt the container slightly and guide the whisk in small circles. Avoid large movements because they can create oversized bubbles.
Step 4: Build Fine Foam
Keep the whisk near the surface for several seconds to increase foam volume. Then lower it slightly to blend the foam with the liquid underneath.
This two stage technique creates a more integrated texture. It also reduces the thick layer of dry bubbles that can form on top.
Step 5: Stop at the Right Moment
Stop frothing when the milk looks glossy, creamy, and evenly aerated. Most drinks need only a short frothing session rather than prolonged mixing.
Over frothing can produce large bubbles and reduce the smooth texture you want. Therefore, watch the milk instead of relying only on a timer.
How to Create Different Milk Foam Textures
Different coffee drinks need different foam levels. You can adjust your technique without changing the frother itself.
- Latte: Create thin, silky foam with more liquid milk underneath.
- Cappuccino: Froth longer to create a thicker layer of airy foam.
- Macchiato: Make dense foam and spoon a smaller amount onto espresso.
- Hot chocolate: Create moderate foam for a creamy topping without excessive bubbles.
- Iced coffee: Froth cold milk briefly for a lighter topping before serving.
For latte style foam, keep the whisk slightly deeper after initial aeration. This approach blends air into the milk instead of creating a large foam cap.
For cappuccino style foam, spend more time near the surface. That technique introduces more air and produces greater foam volume.
Common Mistakes That Ruin Milk Foam
Even a good frother can produce poor results when technique goes wrong. Fortunately, most problems have simple fixes.
Using Boiling Hot Milk
Very hot milk often loses its fresh flavor and develops a less pleasant texture. Always heat gradually and stop before the milk reaches a boil.
Keeping the Whisk Too Deep
A deeply submerged whisk mainly stirs the milk instead of adding enough air. Keep it near the surface during the initial aeration stage.
Keeping the Whisk Too High
If the whisk rises above the surface, it can create splashes and large bubbles. Keep the whisk tip submerged while maintaining gentle surface movement.
Frothing Too Long
Longer frothing does not always create better foam. Stop when the milk reaches your desired volume and texture.
Using an Oversized Container
A very wide container can make the frother less effective because the whisk moves through too much empty space. A narrow, tall vessel usually provides better control.
How to Improve Foam Quality Every Time
Consistency comes from repeating the same process under similar conditions. Start with the same milk quantity and temperature during each attempt.
Then use the same container and frothing pattern until you understand the results. Once your technique feels natural, experiment with different milk varieties.
- Use fresh milk for the cleanest flavor and texture.
- Warm the milk gradually instead of overheating it.
- Keep the whisk submerged during operation.
- Use small circular movements instead of aggressive stirring.
- Blend surface foam with the underlying milk.
- Stop immediately when the desired texture appears.
Also, tap the container gently against the counter after frothing. This action can break larger bubbles and leave smaller bubbles behind.
Next, swirl the milk before pouring it into your coffee. The swirling motion helps create a more uniform, glossy texture.
How to Pour the Foam Into Coffee
Pouring matters because excellent foam can still look poor with careless handling. Start with a slow pour to combine milk with the coffee.
As the cup fills, bring the container closer to the coffee surface. Then increase the pour slightly to guide the foam toward the top.
For simple latte art, use glossy foam rather than stiff bubbles. Smooth microfoam flows more predictably and creates cleaner patterns.
How to Foam Cold Milk
You can also use the Zulay Kitchen frother for cold milk foam. Cold foam works particularly well with iced coffee and chilled drinks.
Start with refrigerated milk and use a tall container. Keep the whisk near the surface and move it gently until the foam becomes light.
Cold milk behaves differently from warm milk, so expect a different texture. A shorter frothing time often works better for cold preparations.
How to Clean the Zulay Kitchen Frother
Cleaning the frother immediately after use prevents milk residue from drying around the whisk. Fortunately, the cleaning process takes very little time.
- Fill a cup with warm water.
- Place the whisk inside the water.
- Run the frother briefly to remove milk residue.
- Rinse the whisk under clean water.
- Dry the whisk thoroughly before storage.
Keep the motor housing away from running water unless the manufacturer specifically allows washing it. Instead, wipe the handle with a slightly damp cloth.
Regular cleaning also helps prevent unpleasant odors and buildup. Therefore, clean the whisk after every milk based drink.
Quick Troubleshooting Guide
| Problem | Likely Cause | Practical Fix |
|---|---|---|
| Large bubbles | Whisk moves too aggressively | Use smaller, slower movements |
| Thin foam | Whisk stays too deep | Raise the whisk closer to the surface |
| Milk splashes | Whisk rises above the surface | Keep the whisk tip submerged |
| Foam disappears quickly | Milk overheated or poorly aerated | Use moderate heat and controlled frothing |
| Uneven texture | Foam remains separated | Swirl the milk before pouring |
Is a Zulay Kitchen Frother Good for Daily Coffee?
Yes, a handheld frother works well for everyday coffee when you value speed and simple cleanup. Its compact design also makes it practical for kitchens with limited storage.
However, a handheld frother does not replace every professional espresso machine function. It creates aerated milk, while espresso machines can provide more advanced steam based microfoam control.
For everyday lattes, cappuccinos, hot chocolate, and cold foam, the frother offers a straightforward solution. Your technique will largely determine the final texture.
A Simple Routine for Better Results
If you want repeatable foam, create a short routine and follow it consistently. Measure the milk, heat it gently, froth near the surface, then blend the foam.
After several attempts, you will recognize the right texture by sight and sound. At that point, you can adjust the foam for different drinks without measuring every step.
Most importantly, focus on fine bubbles rather than maximum volume. Creamy foam should look glossy and feel smooth rather than dry or airy.
Frequently Asked Questions
Can you froth hot milk with a Zulay Kitchen frother?
Yes, you can froth warm milk effectively when you avoid boiling temperatures and keep the whisk slightly below the surface.
How long should you froth milk?
Froth until the milk becomes creamy and reaches your preferred volume, which usually takes only a short session.
Can you froth oat milk with this frother?
Yes, oat milk can create excellent foam, especially when you use a barista style variety designed for coffee.
Why does my milk have large bubbles?
Large bubbles usually appear when the whisk moves too aggressively or remains too close to the surface.
How do you clean the frother after use?
Run the whisk briefly in warm water, rinse it thoroughly, and wipe the handle without immersing the motor housing.
Final Thoughts
Learning how to foam milk with a Zulay Kitchen frother requires more technique than complicated equipment. Start with suitable milk, moderate heat, controlled aeration, and gentle blending.
Once you understand how whisk depth affects bubbles, you can create different textures for nearly any coffee drink. Practice the same method several times, then adjust it according to your preferred foam.
Try the process with your favorite milk and coffee today, then refine the timing until the foam matches your drink. A few careful adjustments can turn an ordinary homemade coffee into a smoother café style experience.