How to Install the GE XWFE Refrigerator Filter
Mercedes Steering Rack Reconditioning vs Replacement
August 13, 2026
Can a Jeevony Magnetic Dryer Vent Coupling Help?
August 16, 2026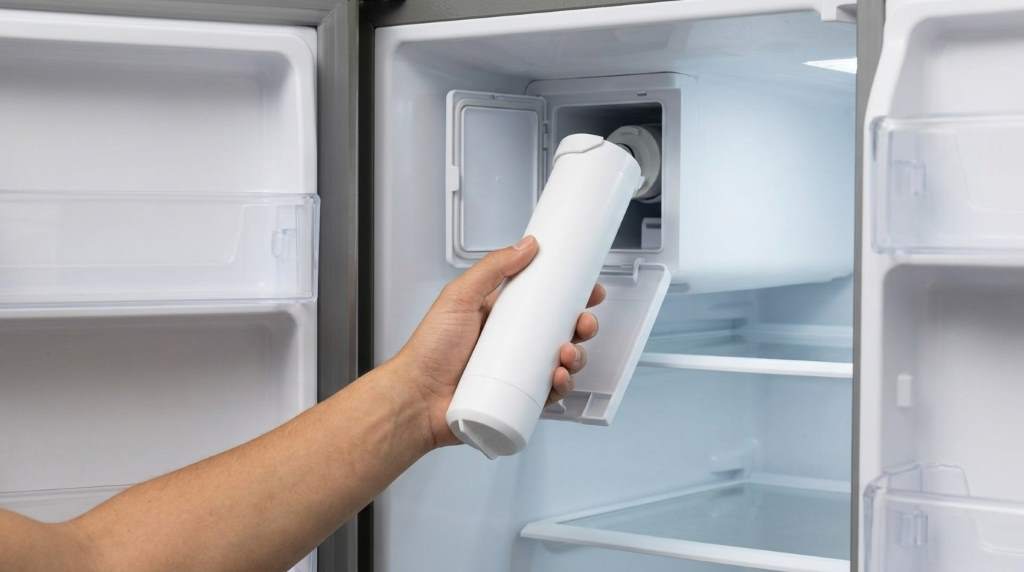
Installing a GE XWFE refrigerator filter takes only a few minutes and requires no special tools. Simply remove the old filter, insert the new GE XWFE filter, and flush several gallons of water through the dispenser. Following the correct process helps maintain water quality, improve taste, and protect your refrigerator’s filtration system.
Clean drinking water remains a top household priority. Studies show that many homeowners prefer filtered refrigerator water over tap water for daily use. Therefore, understanding proper filter installation helps maintain consistent water quality and appliance performance.
If you recently purchased a replacement GE XWFE refrigerator filter, proper installation matters. Although the process appears simple, small mistakes can affect water flow and filtration efficiency. This guide explains each step clearly while helping you avoid common installation issues.
Understanding the GE XWFE Refrigerator Filter
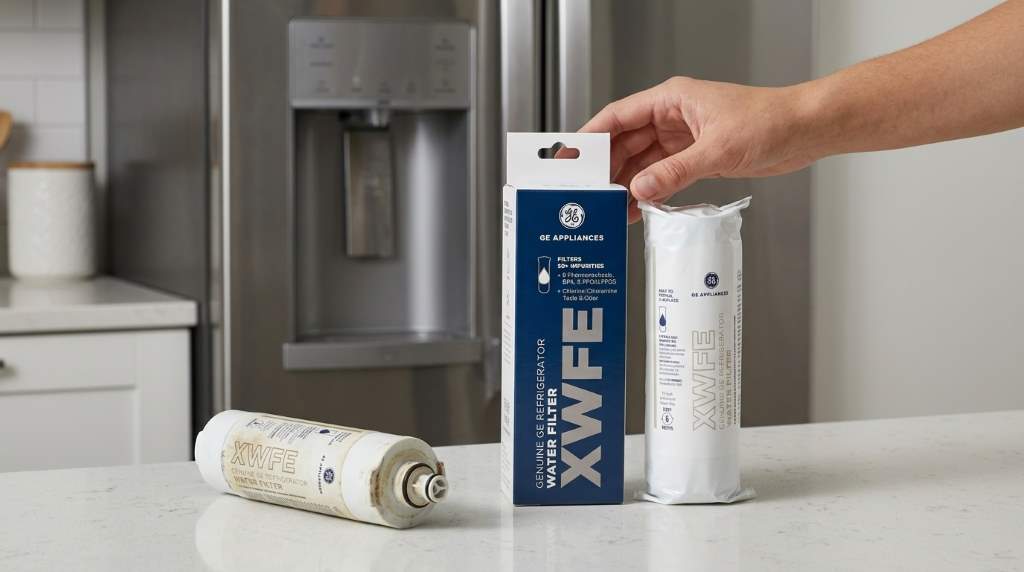
The GE XWFE filter removes common contaminants from refrigerator water systems. It also helps reduce unwanted tastes and odors from drinking water.
Unlike older filter models, the XWFE includes advanced authentication technology. As a result, compatible refrigerators can recognize approved replacement filters automatically.
What Makes the XWFE Filter Different?
The XWFE filter features a built in chip that communicates with compatible refrigerators. Consequently, users receive filter status information directly through the appliance display.
This technology helps ensure proper filter performance over time. Moreover, it allows homeowners to track replacement schedules more accurately.
When Should You Replace the Filter?
Most manufacturers recommend replacing the filter every six months. However, households with higher water usage may need more frequent replacements.
Several signs indicate replacement time has arrived. Therefore, monitor your refrigerator for these common symptoms:
- Reduced water dispenser flow
- Unpleasant taste or odor
- Ice quality changes
- Filter replacement indicator light
- Cloudy drinking water
Items Needed Before Installation
Preparation helps ensure a smooth replacement process. Fortunately, only a few basic items are necessary.
- New GE XWFE refrigerator filter
- Clean towel
- Small container for drips
- Access to the water dispenser
Gather these items before beginning the replacement. Then proceed with the installation steps without interruption.
How to Install the GE XWFE Refrigerator Filter
Step 1: Locate the Filter Housing
Most compatible refrigerators place the filter inside the fresh food compartment. Usually, the housing sits in the upper right corner.
Open the refrigerator door completely before starting. Then identify the filter cartridge and housing assembly.
Step 2: Remove the Old Filter
Turn the existing filter counterclockwise if required by your model. Next, gently pull the filter straight out from the housing.
Some water may drip during removal. Therefore, keep a towel nearby to catch excess moisture.
Step 3: Inspect the Filter Area
Check the housing for debris or moisture buildup. Additionally, inspect the connection point for visible damage.
Cleaning the area helps ensure a secure seal. As a result, the new filter can function correctly.
Step 4: Prepare the New Filter
Remove all packaging materials from the replacement filter. Then examine the O rings for any defects.
Never install a damaged filter cartridge. Instead, replace it immediately if defects appear.
Step 5: Insert the New Filter
Align the filter with the housing according to the directional markings. Next, push the filter into place carefully.
Rotate the filter clockwise until it locks securely. Afterwards, verify that the cartridge sits flush within the housing.
Step 6: Reset the Filter Indicator
Many GE refrigerators include a filter reset function. Therefore, follow your refrigerator’s menu instructions to reset the indicator.
This step helps maintain accurate replacement reminders. Consequently, future maintenance becomes easier to manage.
Step 7: Flush the System
Dispense several gallons of water after installation. This process removes trapped air and loose carbon particles.
Water may appear cloudy initially. However, clarity usually returns after adequate flushing.
Common Installation Mistakes to Avoid
Many filter issues result from simple installation errors. Fortunately, most problems are easy to prevent.
- Installing the filter at an incorrect angle
- Skipping the flushing process
- Forgetting to reset the filter indicator
- Using incompatible replacement filters
- Failing to fully lock the cartridge
Avoiding these mistakes improves filtration performance. Furthermore, it helps extend refrigerator system reliability.
Troubleshooting After Installation
Water Flow Is Slow
Slow flow often indicates trapped air inside the system. Therefore, continue flushing additional water through the dispenser.
If the issue remains, remove and reinstall the filter. Then verify proper seating within the housing.
Filter Will Not Lock Into Place
Incorrect alignment commonly causes locking problems. Consequently, remove the cartridge and inspect positioning marks carefully.
Never force the filter into place. Instead, align it properly before attempting installation again.
Filter Warning Light Remains On
Most refrigerators require a manual reset after replacement. Therefore, consult your refrigerator controls and perform the reset procedure.
If the warning persists, verify filter compatibility. Additionally, ensure the cartridge is fully installed.
Water Tastes Different
New filters often require additional flushing. Therefore, dispense more water before evaluating taste quality.
Normal taste should return quickly after flushing. Otherwise, inspect installation and filter authenticity.
Benefits of Proper Filter Installation
Correct installation supports consistent water filtration performance. It also helps maintain reliable ice production.
Additionally, proper replacement reduces strain on internal water components. Consequently, long term refrigerator performance may improve.
Many homeowners notice better tasting water immediately. Furthermore, regular filter maintenance promotes cleaner everyday hydration.
Maintenance Tips for Long Term Performance
Mark replacement dates on a calendar or phone reminder. This habit helps prevent overdue filter changes.
Store replacement filters in a clean, dry environment. Additionally, keep packaging intact until installation day.
Monitor water flow regularly throughout the filter lifespan. Therefore, you can identify performance changes before major issues develop.
| Maintenance Task | Recommended Frequency |
|---|---|
| Replace filter | Every 6 months |
| Flush new filter | After every installation |
| Check water flow | Monthly |
| Reset indicator | After replacement |
Conclusion
Installing a GE XWFE refrigerator filter requires only a few straightforward steps. Nevertheless, careful installation and proper flushing significantly improve filtration performance.
Replace your filter on schedule and follow these instructions closely. Start your next filter installation confidently and enjoy cleaner, better tasting water every day.
FAQs
How long does it take to install a GE XWFE refrigerator filter?
Most installations take less than five minutes.
Do I need tools to replace the filter?
No, the replacement process typically requires no tools.
Why should I flush water after installation?
Flushing removes trapped air and loose carbon particles.
How often should I replace the GE XWFE filter?
Most households should replace it every six months.
Can I use the refrigerator immediately after installation?
Yes, but flush the recommended amount of water first.