
How to clean old tiles?

The old floors are characterized by their design, color and their liveliness. Thanks to their uniqueness, they bring a special touch to the home. If you have this type of tile at home and wonder how to clean the old floor, you have come to the perfect article. Here, we provide you with the keys to help you recover the color of the tiles, polish the old floor and leave it as new. Next, we give you the best tips to know how to clean old tiles and make them shine. Take note!
How to Clean Your Lampshades Correctly

Lampshades are one kind of metal or something like that which is used with lamps and chandeliers to direct and shield. The lampshade is used in almost all houses. It has some advantages like it protects eyes from direct light, it can direct the light in a fixed way, to soften and more comfortable, to increase the beauty of a room. There are different types of lampshades. Empire, bell, drum, novelty, rectangular, square, bowl are the most common and uses lamp shades.
Empire: This shade looks like a big glass that is set reversely. It is a standard shape as a lampshade. It spread the light downward and look classic.
Bell: It also looks like Empire but the lower part is more spreader than Empire and it has a thick beam through the body.
Drum: It looks like a cylindrical shape. Drum shade allows the light to downward and upward equally.
Clean Lamp Shades
The lamp needs to clean regularly especially the lampshade. If you don’t clean the lampshade regularly then the activity of the lampshade will be decreased day by day. And you have to know how to clean the lampshade otherwise you will damage it when you are going to clean it. There is various type of and they are made of different type of material. So the process will not to same for every lampshade. So do not worry you can do it yourself. Just follow some rules and guides then you will be a master in the lampshade cleaning.
Fabric Lamp Shade
This type of shade can also accumulate dirt, dust and become yellowed after a period. But it is an exciting thing that if you follow some rules your lampshade will back to its previous situation. First unplugging the lamp then remove all excess dirt and dust. Remove the surface dirt and dust from both inside and outside of the shade. Take a hairdryer to remove existing dirt and dust. Use a hairdryer at the full speed and not hold the hairdryer to the shade. Keep 8 to 10 inches gap between shade and hairdryer.
Parchment Lamp Shade
Turn off the lamp and wait few minutes to cool it. Remove the dirt carefully. To remove the dust you can use a microfiber cloth. Before use the cloth you can remove the excess dust by the use hairdryer. Use a hairdryer to remove dust from inside and outside then use the cloth.
Plastic Lamp Shade
Plastic has some advantages, especially when it needs to clean. though it is not sensible like other shades you have to be careful otherwise your shade will damage. Take ½ cup of delicate detergent of course it is laundry detergent. Now take a medium-size bowl and take 3 to 4 tablespoons of lukewarm water. Beat the mixture until they mix up well then dip a clean rag into the mixture and wipe both sides of the shade. After wipe down keep it in a dry place to dry up.
Glass Lamp Shade
This shade is washable. Your cleaning process is easier than before. But it can be broke or scratch anytime if you drop it. Otherwise, there is no trouble in cleaning a glass lamp shade. Since it is glass so you can use a dishwasher to clean the shade. If you don’t have a dishwasher then don’t be sad there is another process to clean up a glass lamp shade. Take the medium size of the bowl and pour with lukewarm water. Now take some soapy water and white vinegar. And mix them with bowl water. Take a soft cloth and rub it gently. After cleaning, keep the shade in a dry place to dry up.
You may also like to read, How to clean a grinder? A complete guide of easily doing it in just 60 seconds
How to clean a grinder? A complete guide of easily doing it in just 60 seconds
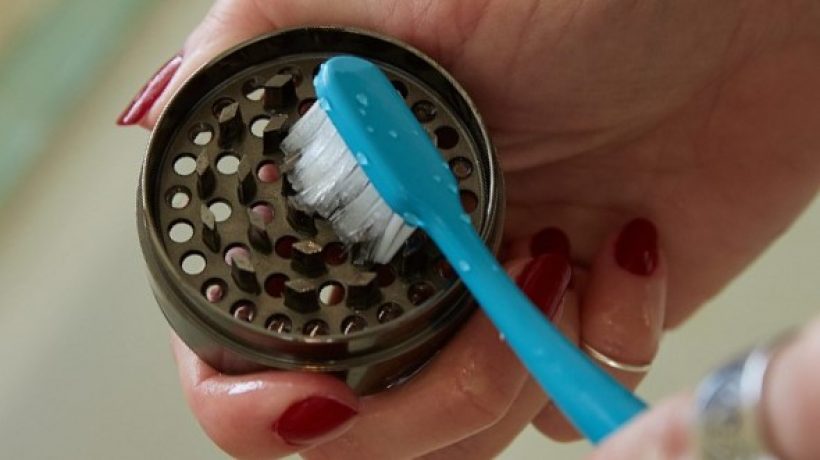
What is a grinder?
A grinder is a tool that helps you to grind your weed into small pieces before the consumption process. It is the most important step as it helps you to get the most smoke and it increases flavor, taste, and smell. Besides, it ensures optimizing efficiency and gives you consistent burn. The grinder is the best way to break your weed into small pieces in the shortest possible time.
Ever smelled your little green herbs before rolling a joint? Of course, you did at least once. The smell of those small cruciferous vegetables gave you a thrill inside you before smoking. Grinder helps you to add some extra smell by cutting it into small pieces.
Easiest steps for cleaning your grinder (Select among two methods given)
Disassemble your dirty grinder
Firstly, you have to separate each part of your dirty grinder. In four pieces, a three-chamber grinder, the parts will be grinding, collected, and kief chamber. In some grinders, removable parts can exist between the collection and kief chamber.
Submerge the grinder in alcohol
Right after dissembling your grinder, you have to bring on isopropyl alcohol. Then, place your grinder in a Ziploc bag or a plastic jar. Then fill up the bag or jar with alcohol till all parts of the grinder submerge fully. Then wait for around 30 minutes. After that, agitate the bag or jar a bit to loosen up any stubborn plant residue.
Brush you grinder
After pouring out from the alcohol, brush up your grinder with a stiff-bristled brush. Scrub each chamber properly with that brush so that no residue is left behind.
Wash and dry the grinder
The following step is to clean your grinder thoroughly with warm water. Ensure you wash out all the plan residue and alcohol properly. Then, dry your grinder off with a clean towel. Wait for few minutes till your grinder is complete gets dried. Then, your grinder is completely ready to use.
Alternative methods
Well, there are other easiest steps to clean your grinder properly. I call it the “to the freezer’ method. Well, you might have guessed the reason behind naming it. In this method, you have to go through an additional step of freezing it in your freeze. Let’s go through all the steps of How to clean a grinder:
Dissemble your dirty grinder
Firstly, you have to disassemble your dirty grinder carefully of course without breaking it. You have to remove each chamber from the others.
Remove residue
Remove the leftover residue into a bowel. You can keep the leftover for your later use to prevent waste.
Take it to the freeze
In this step, you have to freeze the grinder for around 30 minutes. Freezing makes the residue stiffer. When it freezes, it will start developing into trivial clumps instead of clinging strongly with the grinder. The main objective is to make the removal of the residue process easier.
Brush your grinder
After removing the grinder from the freeze, you can brush your dirty grinder with a toothpick or brush. Like before, you can place a bowel beneath to collect the residue.
Soak it in alcohol
After brushing the residue as much as you can properly, brings in alcohol. You have to submerge the residue for around 30 minutes. For that, place the grinder in a Ziploc bag or plastic jar, or glass jar. Fill up the container with isopropyl alcohol. Meanwhile, you can agitate the jar for loosening up residue.
Clean the grinder
After bringing it out from the grinder, you can use a toothbrush or stiff to clean the grinder.
Wash and dry the grinder
Wash your grinder with warm-hot water for getting rid of alcohol and plant residue. Use a clean towel for choking all the water and make it dry.
Well, after reassembling it, your grinder is again ready to use. Load up your grinder with green herbs, grind them down and enjoy your smoke.
You may also like to read, How to wash and clean circulon cookware?
Essential Tips for Moving Your Refrigerator

Every relocation requires a lot of planning and organization, especially if you are doing it on your own. And while there are a lot of things to consider when relocating to a new home, moving heavy and bulky appliances like refrigerators is one of the most complicated challenges you will be facing. Not only will you have to do some heavy lifting, but you’ll also need to be extra careful during transportation since these appliances are very sensitive and can be easily damaged. Of course, the best thing would be to call professionals to do the hard work for you. But, if that’s not an option, here are the essential tips for moving your refrigerator.
Necessary supplies for moving your refrigerator
Whether you’re moving loving locally or interstate, good preparation is essential for any type of appliances. To make it easier on yourself, gather all the necessary supplies for the refrigerator securing and moving process. Here are a few basic things you’ll need:
- Tape measure,
- Cleaning supplies,
- Cargo straps,
- Transport dolly,
- Bubble wrap,
- Quality duct tape,
- Some fabric (an old blanket will do)
Measure the fridge, doors, and narrow transit spaces
Before you start preparing your refrigerator for the move, it’s essential to make the best plan for getting it from the kitchen to the moving truck. Some doors and entryways can be very narrow, while freezers come in many shapes and sizes. In some cases, you’ll need to be creative and very careful to get it through. Thus, the first step when following the essential tips for moving your refrigerator is to measure the appliance’s height, weight, and depth and every doorway on its way to the truck. If all is within the measurements, you probably won’t have any issues. But if the measurements almost match, you might need to tilt it a bit or remove the refrigerator doors to get it through. Using the appliance manual will help with the latter.

After you write down all the measurements, do the math to ensure that it’s safe and possible to get your appliance through the doorways.
Preparing the refrigerator for the move
It would be best if you started with taking all the food out of the appliance. The food can’t stay fresh for long when out of the fridge, so make sure to adequately store it or use the ingredients right away. Alternatively, plan to start eating all the perishable foods weeks before moving the refrigerator. After the fridge is empty, remove the glass shelves and plastic containers and thoroughly clean them. The same goes for the whole interior since you want to get rid of all bacteria and odors.
Only after the refrigerator completely defrosts, you’ll notice how odors become stronger. Therefore, if you unplug and clean your refrigerator the night before the move, make sure to leave the doors open to air it out. Odors and smudges can easily be removed with a simple mixture of water and baking soda, but opening it for a bit will help as well. After you’ve meticulously cleaned it, wipe it with a dry cloth. Only after it’s completely dry will it be safe to close it and move onto the next step in preparing the refrigerator for the move.
Wrap the bubble wrap around glass and plastic refrigerator elements and secure them for transport. Glass shelves need to be protected with the utmost care so they don’t break. Using cardboard around a thick layer of bubble wrap will act as cushioning if these sensitive elements are accidentally dropped.
Protect the fridge surfaces
After the refrigerator has been cleaned, it’s time to protect its surface. Wrap the exterior with blankets or bubble wrap and secure it with cords, straps, or tape. The fixtures mustn’t touch the metal surfaces. Most modern refrigerators are made from sheet metal outer casting that could be easily damaged or scratched. Even duct tape can leave a residue that’s very hard to clean. To avoid any additional work, you need to be precautious in advance.
When to turn it off
Some experts recommend turning the refrigerator off the night before the move because this will allow enough time for defrosting. That way, the oils, and fluids will have time to settle and stop moving through the compressor. Since some refrigerators have automatic ice makers, you might need to disconnect the water hose as well. It’s essential to remove all the water and ice from the fridge to prevent spills and leaks during transport. After the cord is out, secure it to the back of a fridge with duct tape. This step is essential since you don’t want to trip.
Protect the floors
Every refrigerator weighs a lot – around 300 pounds. Even though it’s imperative to avoid any possible damage, we mustn’t oversee the damage moving such a heavy object can cause to our floors. Some refrigerators have wheels, so pushing it over the floor surfaces shouldn’t be an issue. But since most of them don’t, you might need to rock the fridge slightly and put some blankets under to push it to another place. However, this method only works for short distances. For example, moving it a couple of feet away or to another side of the room.

Make sure to follow the essential tips for moving your refrigerator to protect your hardwood kitchen floors.
A moving trolley is a life-saver
For moving the fridge further than a couple of yards, a moving trolley is imperative. But to get the refrigerator on the trolley, you will need someone’s help. Gently rock the appliance and slide the trolley underneath it. After you do that, fix it firmly, so it doesn’t accidentally slip on its way to the truck. Use moving straps or automatic tighteners to secure the refrigerator length-wise.
Push the trolley slowly for a couple of inches back and forward to check if it’s fixed properly. Only after you’re sure it is safe, add the last protective surface layer. A simple blanket should do the job. Of course, this layer won’t help soften the blow if the refrigerator falls off the trolley, but it will prevent any potential surface damage from bumping when getting it through doors and narrow spaces.
How to move a refrigerator downstairs
If you have a trolley, moving the refrigerator down the stairs shouldn’t be that hard. The key to successfully executing this task is to take it slow and be patient. Also, having someone to navigate you would help a lot. First, take a deep breath and tilt a dolly at a 45 degrees angle. Then, push it very slowly, one step at a time, with one person in front of you to support the bottom and sides. Moving it up the stairs to your new home shouldn’t be hard if you use the same approach.
Loading a refrigerator into a truck
We can all agree that unloading heavy objects is almost always easier than loading them. But when it comes to loading a refrigerator onto a pickup truck, a simple plank should help the trolley safely climb. Once it’s up, make sure to tightly secure it on the top and from side to side. Only when it’s firmly bound without the possibility of moving can you start the truck and move it to your new home.
Needles to say, your work doesn’t end here. Refrigerators are very delicate and expensive. So whoever is driving the moving truck needs to be careful to avoid any bumping along the way.
The unloading of the refrigerator from the truck shouldn’t be an issue if you use the same plank method. However, both loading and unloading require the engagement of at least two people, so make sure to have someone to help you out.

Refrigerators come in many sizes. Make sure to read the manual before starting the moving process.
How long should you wait before turning it on?
When it comes to turning on the refrigerator after the move, the appropriate time can vary depending on many factors. Some experts might tell you to plug it in after half an hour, while others suggest waiting for 3 hours. The essential tips for moving your refrigerator can help you execute this project, but only after consulting the manual. Since there are various models of refrigerators, the answer to when to turn it on after moving will depend on the manufacturer. Still, whenever you turn it on, remember it needs time to reach its optimum temperature. So, before putting back the food, make sure it has had 24 hours to achieve the right temperature that will keep your food fresh.
Things to avoid when transferring your refrigerator
The task ahead of you is not that easy, so make sure to follow four golden rules when moving a bulky and expensive appliance:
- During the move, refrigerators need to stand upright. You should never place it on the side.
- Read the manual.
- Ask for professional help and advice.
- Don’t play the hero. Even if you have a trolley to push it to the moving van, you will need all the help you can get.
Refrigerators are big and heavy, but they have a specific mechanism. And like any delicate equipment, they need extra care and special handling. However, if you follow the essential tips for moving your refrigerator, you can be sure the relocation process will be successful. It might be a bit more complicated than moving other items, but there is a solution for everything with proper guidance and a lot of patience.
Photos used:
https://www.pexels.com/photo/fridge-with-different-vegetable-in-modern-kitchen-6508357/
https://www.pexels.com/photo/food-man-people-woman-5582869/
https://unsplash.com/photos/MP0bgaS_d1c
https://www.pexels.com/photo/photo-of-kitchen-interior-4713253/
How to clean hair brushes

You may not have stopped to think that hair brushes need to be cleaned often. Good regular maintenance of our everyday objects is essential to guarantee their hygiene, and a hairbrush cannot be an exception.
How to load a dishwasher Correctly: The Definitive Guide
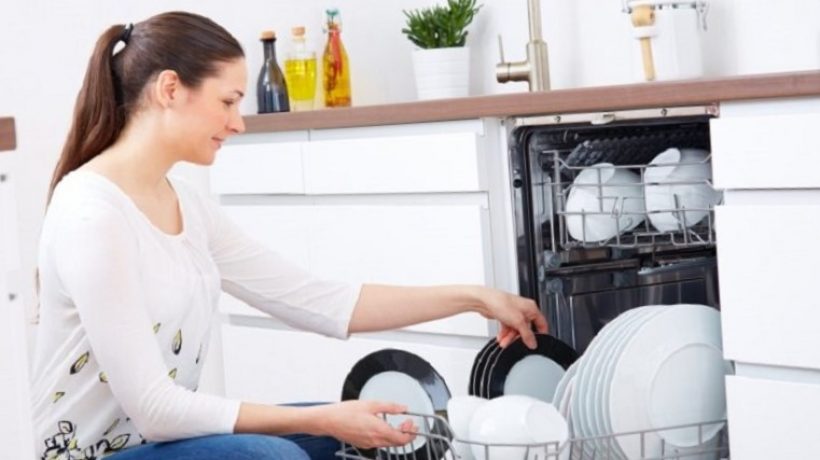
A dishwasher machine is a useful gadget for the kitchen. In the dishwasher, we can clean various kinds of kitchen gadgets like dishes, cups, glass, knives, etc. The dishwasher can clean cookware faster than the manual process. But most of us do not know how to load a dishwasher. Loading is the most important part of the dishwasher.
Below describe how to load a dishwasher
Load Top Rack
How to properly load a dishwasher like glasses, cups, and small bowls the type of goods you can place on the top rack. Generally plastic material can’t clean by dishwasher. But dishwasher-safe plastic can be wash by a dishwasher. Every kind of dishwasher-safe plastic can place on the top rack. Because the top rack is the lowest temperature area. You have to keep in mind that every mugs or cups have to upside down and the dishes will be lean. Otherwise, cups or mugs collect dirty water and they will not clean properly. if you do not lean the curvy dishes then the water cannot reach the dish everywhere.
Load Bottom Rack
This place is for large bowls, pots, plates, pans, etc. This type of kitchen gadgets have food scrape or different kind of food trash, but pre-rinsing is not mandatory. In that case, pre-rinsing is a waste of water, energy, and time. Because modern dishwashers are so smart to clean this type of dirt. Modern dishwashers have a sensor that can measure how dirty the dishes or cooking pans. A bottom rack is also a place for dishwasher-safe cutting boards, aluminum, and stainless steel.
But nonstick cookware, large kitchen knives, wood, bronze, colorful material, and brass can be damaged in the bottom rack. so be careful, before placing material in the bottom rack. Otherwise, your products can be damaged or wrap.
Load Utensil Holder
Different kinds of silverware like spoons, forks load handle-first. If you load handle-first then the silverware facing up. But this rule is not for knives. You should point down the knives for safety purposes.
What items are not dishwasher safe?

Dishwasher reduces our manual work and saves time. But dishwasher is not appropriate for every kitchen products
Painted Plates: The dishwasher can destroy the paint of the plate. Because when dishwasher washes the products then it uses hot water and detergent. That time, the temperature is high inside. Detergent chemicals, hot water can react with plate paint and damage the paint. Also, it can happen with Fine China and Crystal Plates.
Kitchen Knives: A knife is a common element of the kitchen. Without knives, the kitchen is incomplete. So it is a common matter that the knives need to clean. In this case, we cannot use the dishwasher to clean knives. Because the detergent and hot water can damage the sharpness of knives. Most of the knives handle made of either plastic or wood. Plastic or wood cannot sustain in the dishwasher. For this, don’t use the dishwasher to clean knives.
Plastic Items: Dishwasher water temperature at least 120 degrees Fahrenheit and highest temperature 150 degrees Fahrenheit. This temperature is enough to melt or wrap many plastic products. So try to read the level of plastic product to ensure is it dishwasher-safe or not.
Nonstick Cookware: Nonstick cookware has a coating. This coating is can be damaged because of heat and detergent reactions. For this read, the level is dishwasher-safe or not.
Copper: Dishwasher can discolor the copper materials. It also discolors bronze, gold silver. So don’t try to clean these metal products by dishwasher.
Cast iron: The detergent and the hot water will start a reaction with cast iron. And that can ruin your cast-iron cookware. So instead of using a dishwasher, you can use hot water or other washing methods to clean. Keep reading Clean Your Dishwasher for Cleaner Dishes!
Do you know how to clean toilet tank?
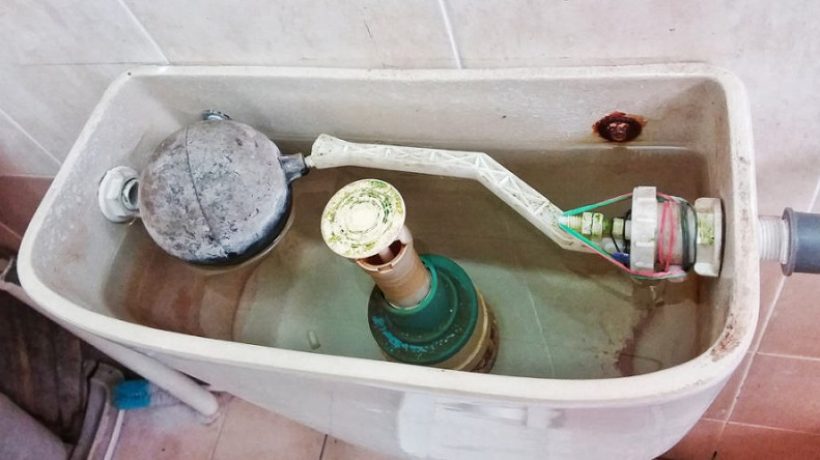
All or most of us know how to clean a toilet depending on the dirt it has and how it is presented. But knowing how to clean the toilet tank is something very important that we should not leave behind, so today we will teach you how to do it.
How to get dog poop out of carpet
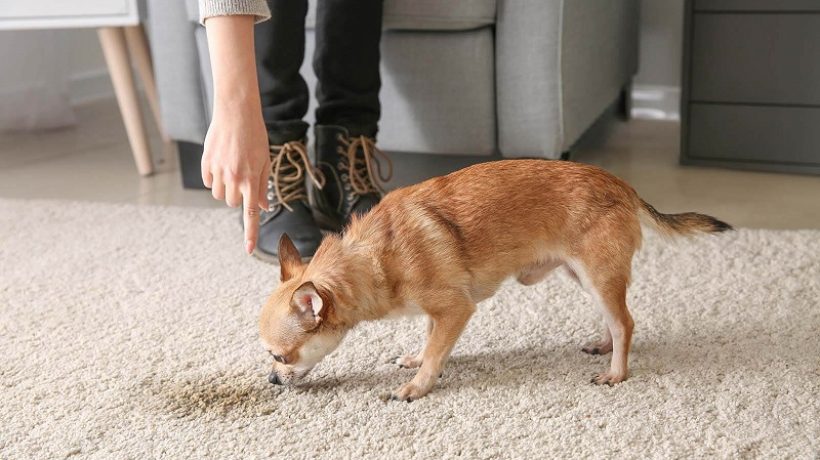
Most dogs will have an indoor poop accident at some point. When this happens on a carpet, it can be quite a mess, even if the poop is pretty solid and doesn’t leak. There is a technique for getting poo or most other semi-liquid stuff out of the carpet. Mainly, care must be taken not to grind the poop into the carpet pad, or deeper into the carpet fibers, when attempting to remove dog poop. Also, the mat should be thoroughly cleaned so that the dog does not associate with that area of defecating, or it is likely to happen again.
How to get gum out of carpet
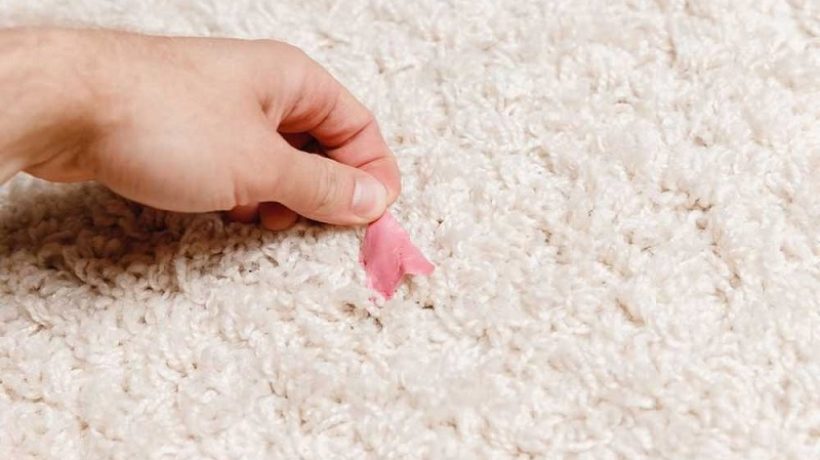
Although gum stains on the carpet are very common, many of us do not know how to clean them, for that reason we will show you some cleaning tips.
How to clean pewter cups
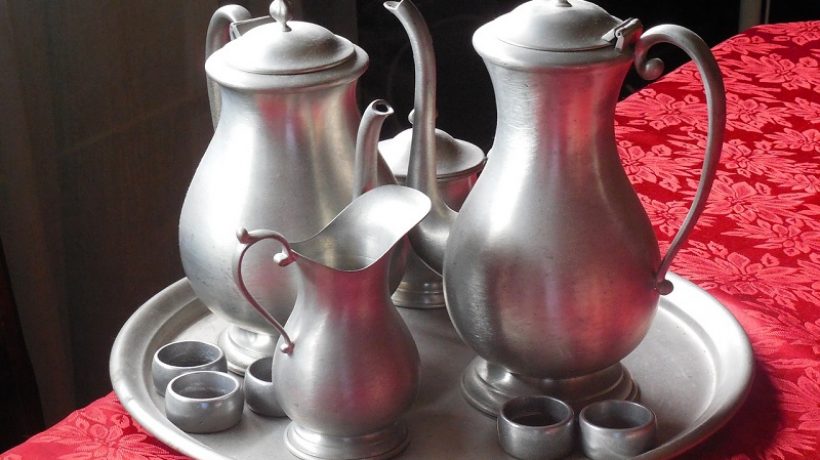
Since the days of ancient Rome, tin has been a popular metal for creating tableware and decorative items. Made from a tin alloy, tin today is low maintenance when it comes to cleaning. It is also a safer tableware material compared to previous versions, which contain toxic elements such as lead.