How to Empty a Shark Navigator Lift Away?

How to Dry Greens in the OXO Salad Spinner
August 9, 2026
How to Foam Milk With a Zulay Kitchen Frother
August 11, 2026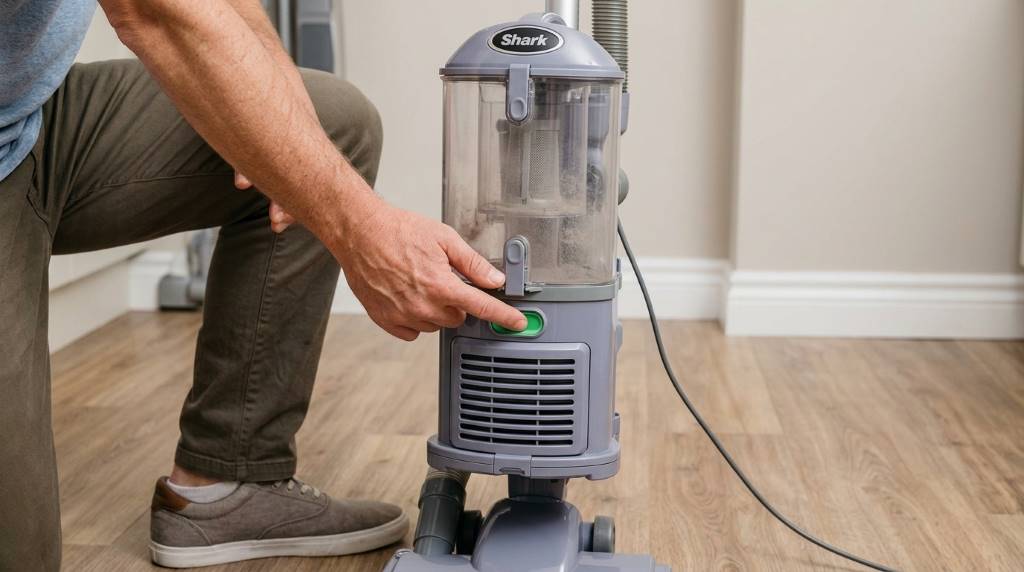
Emptying a Shark Navigator Lift Away takes only a few careful steps when you know the release points. Most users can remove the dust cup, release the collected debris, and reinstall it within minutes. The Shark navigator lift away vacuum uses a removable dust cup that simplifies routine cleaning. Regular emptying also helps maintain steady airflow and reliable suction. Shark recommends checking the dust cup regularly rather than allowing debris to build up completely.
How to Empty a Shark Navigator Lift Away
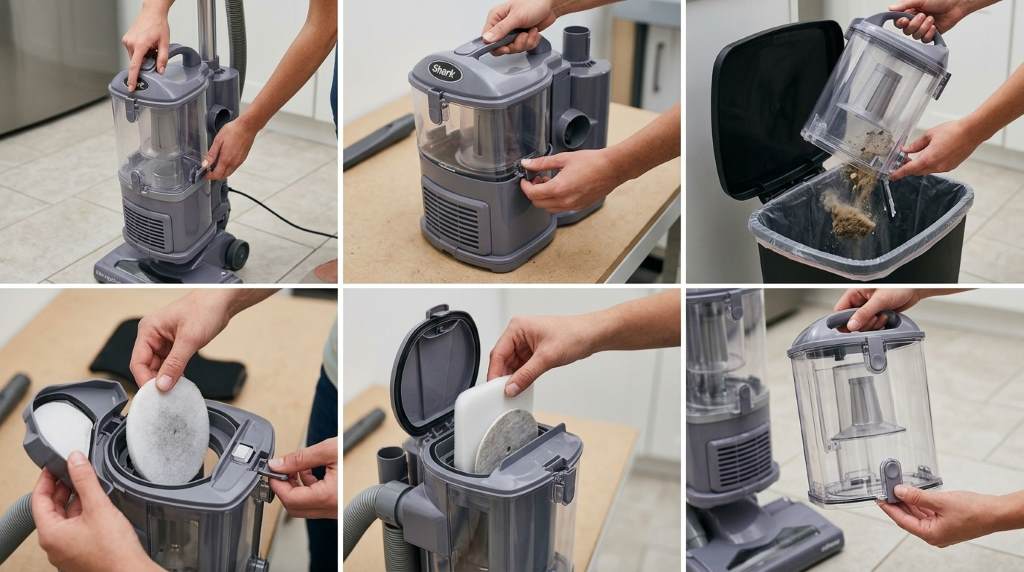
First, turn off the vacuum and unplug it from the electrical outlet. Then, place the vacuum on a stable surface before removing the dust cup.
Press the dust cup release button and lift the container away from the vacuum body. Hold the cup over a trash can before opening its bottom door.
Next, press the lower release button to open the dust cup base. Let the dirt, hair, dust, and larger debris fall directly into the trash.
Afterward, check the inside of the cup for material that remains stuck around the sides. Tap the container gently against your hand if loose debris needs help falling out.
Finally, close the bottom door firmly and return the dust cup to its original position. Push it into place until it sits securely on the vacuum.
What You Need Before Emptying the Vacuum
You usually need no special tools to empty a Shark Navigator Lift Away. However, preparing the area can make the process cleaner and easier.
- A sturdy trash can or waste container
- A dry microfiber cloth for exterior cleaning
- A small soft brush for stubborn debris
- Clean water if the removable cup requires washing
- A clear workspace for inspecting the vacuum
Keep the vacuum switched off throughout the process. Also, avoid placing the dust cup near wet surfaces while you empty it.
Where the Dust Cup Release Button Is Located
The exact button position can vary slightly between Shark Navigator models. Generally, the dust cup sits near the upper portion of the vacuum body.
Look for a release control near the dust cup handle or its connection point. A second release control usually opens the bottom of the cup.
Identify Both Release Controls
The first control separates the dust cup from the vacuum. The second control opens the debris door underneath the container.
Do not force either button if it does not move normally. Instead, check whether the cup has fully released from the vacuum body.
Step by Step Dust Cup Emptying Process
1. Turn Off and Unplug the Vacuum
Start by switching the vacuum off before handling any removable component. Unplugging it removes unnecessary electrical risk during cleaning.
Next, allow the motor and other moving parts to stop completely. This small step creates a safer and more controlled cleaning process.
2. Remove the Dust Cup
Hold the vacuum securely with one hand while operating the dust cup release. Lift the container straight away from the vacuum body.
Keep the cup upright as you carry it toward the trash can. This position helps prevent loose dust from escaping prematurely.
3. Position the Cup Over the Trash
Place the dust cup directly above the trash can before opening it. A wider container works better because fine debris can spread quickly.
For extra cleanliness, empty the cup outdoors when weather and conditions allow. You can also use a large garbage bag around the opening.
4. Open the Bottom Door
Press the lower release button to open the debris door. Allow gravity to remove most of the collected material.
Wait several seconds before closing the door. Hair and heavier debris sometimes remain inside after the first release.
5. Remove Remaining Debris
Inspect the cup after the main debris falls away. Use a soft brush to loosen material that clings around corners or edges.
Avoid using sharp objects inside the dust cup. Scratches can make future cleaning harder and may damage plastic components.
6. Close and Reinstall the Cup
Close the bottom door until it sits firmly in its normal position. Then, align the dust cup with its mounting area.
Press the cup back into place until it locks securely. Check the connection before switching the vacuum on again.
How to Clean the Dust Cup After Emptying
Emptying removes debris, but occasional dust cup cleaning can remove finer residue. However, you should follow the cleaning instructions for your specific Navigator model.
Some removable dust cups can receive water after you remove them from the vacuum. Never return a damp component to the machine.
Dry Cleaning Method
For routine maintenance, wipe the inside with a dry microfiber cloth. This method works well when the cup contains only loose dust.
Use a soft brush around seams and corners where powdery residue collects. Avoid aggressive scrubbing because plastic surfaces can scratch.
Washing the Dust Cup
If your model permits washing, rinse the removable cup with clean water. Avoid harsh cleaners unless Shark specifically approves them for that component.
Most importantly, let the cup dry completely before reinstalling it. Moisture inside a vacuum can create problems with airflow and internal components.
How Often Should You Empty a Shark Navigator?
Empty the dust cup whenever debris approaches the recommended fill level. Waiting until the container becomes completely packed can restrict airflow.
Homes with pets, children, carpets, or frequent cleaning may require more frequent emptying. Therefore, inspect the cup after larger cleaning sessions.
- Light household cleaning: Check after each major cleaning session.
- Pet hair: Empty whenever hair approaches the fill line.
- Heavy debris: Empty the cup during longer cleaning sessions.
- Fine dust: Inspect the cup frequently for compacted residue.
Your actual cleaning frequency depends on floor type, household size, and debris levels. Therefore, use the dust cup condition rather than a fixed schedule alone.
Why You Should Not Overfill the Dust Cup
An overfilled dust cup can interfere with normal airflow through the vacuum. As debris accumulates, the machine may struggle to maintain its expected cleaning performance.
Furthermore, packed debris can make emptying more difficult. Hair may wrap around existing material instead of dropping freely through the bottom door.
Regular emptying also makes routine maintenance faster. You can inspect the cup, filters, and visible airflow paths before problems become noticeable.
What to Do If Debris Stays Inside
Sometimes dust and hair remain inside even after you open the bottom door. This situation usually happens when material becomes compacted around the cup walls.
First, keep the vacuum unplugged and hold the cup securely over the trash. Gently shake the container without striking it against a hard surface.
Next, use a soft brush to loosen stubborn material. Never push your fingers deeply into narrow openings where debris may remain tightly packed.
What If the Dust Cup Will Not Come Off?
Do not force the dust cup if it refuses to release. Excessive pressure can damage the release mechanism or surrounding plastic.
Instead, make sure you press the correct release control fully. Then, gently lift the cup while maintaining steady pressure on the release.
If the mechanism still does not work, inspect the connection area for packed debris. Consult your model’s instructions before attempting further disassembly.
Common Mistakes to Avoid
Several simple mistakes can make vacuum maintenance messier or less effective. Fortunately, you can prevent most problems with a few consistent habits.
- Do not empty the cup while the vacuum remains powered.
- Do not force a release button that feels stuck.
- Do not reinstall a washable component while it remains wet.
- Do not use sharp tools to scrape stubborn debris.
- Do not ignore the recommended fill level.
- Do not shake the dust cup aggressively against hard surfaces.
These precautions protect both the dust cup and the vacuum. They also reduce unnecessary cleanup after routine maintenance.
How to Keep Your Shark Navigator Performing Well
Emptying the dust cup represents only one part of regular vacuum care. You should also inspect filters and brush areas according to your model’s maintenance instructions.
Check the brush roll periodically for wrapped hair and string. Remove visible buildup carefully after switching off and unplugging the vacuum.
Additionally, inspect hoses and airflow pathways when suction seems weaker than normal. A blockage can reduce performance even when the dust cup looks reasonably empty.
Watch for These Warning Signs
- Noticeably weaker suction during normal cleaning
- Unusual sounds from the vacuum
- Persistent dust buildup around airflow areas
- A dust cup that fills unusually quickly
- Brush roll movement that seems restricted
These signs do not always indicate a serious problem. Nevertheless, they provide useful reasons to stop and inspect the vacuum before continuing.
How to Empty the Vacuum Without Creating a Dust Cloud
Fine dust can escape quickly when you open a full dust cup. Therefore, use a large trash bag or deep waste container whenever possible.
Hold the cup low inside the container before opening its bottom door. This approach keeps more loose dust contained as the debris falls.
For particularly dusty loads, empty the cup outdoors when practical. However, avoid windy conditions that could scatter debris around your cleaning area.
When Should You Empty the Shark Navigator During Cleaning?
You do not always need to wait until the cleaning session ends. Empty the cup earlier when visible debris approaches its recommended capacity.
Large homes and heavily carpeted rooms can fill the container faster than small spaces. Therefore, checking the cup between rooms can maintain consistent performance.
Pet owners may also need more frequent checks because hair can occupy significant space quickly. A partly filled cup can still contain a dense layer of fur.
Frequently Asked Questions
How do you empty a Shark Navigator Lift Away?
Remove the dust cup, hold it over a trash can, press the bottom release, and let debris fall out.
Can you wash the Shark Navigator dust cup?
Some models allow dust cup washing, but you should follow the cleaning instructions for your specific model.
Why will my Shark Navigator dust cup not open?
Check the release mechanism for correct operation and inspect the area for debris before applying additional pressure.
How often should I empty my Shark Navigator?
Empty the dust cup whenever debris approaches its recommended fill level or before heavy cleaning sessions.
Can I use the vacuum immediately after washing the dust cup?
No, allow every washable component to dry completely before reinstalling it and operating the vacuum.
Final Thoughts
Emptying a Shark Navigator Lift Away becomes simple once you understand the two release controls. Turn the vacuum off, remove the cup, open the bottom door, clear remaining debris, and reinstall it securely.
For better long term performance, make dust cup checks part of every major cleaning session. Also inspect filters, brush areas, and airflow paths whenever suction changes noticeably.
Use these steps whenever your dust cup needs attention, and keep the process gentle and consistent. A few minutes of regular maintenance can make everyday vacuuming cleaner, easier, and more reliable.